
Unit Data
Classification: Umbra Mortis - Gungyalado MKII
Type: Dragon
Primary Mission: Aerial Bombardment
Secondary Mission: Airspace Superiority
Power Plant: Twin Synchronized DHI-3 (Dynasty Hyper-Infusion Core; Type 3)
Chassis: DPZ-320
Crew: 1 (pilot / minimal rank requirement: Commander)
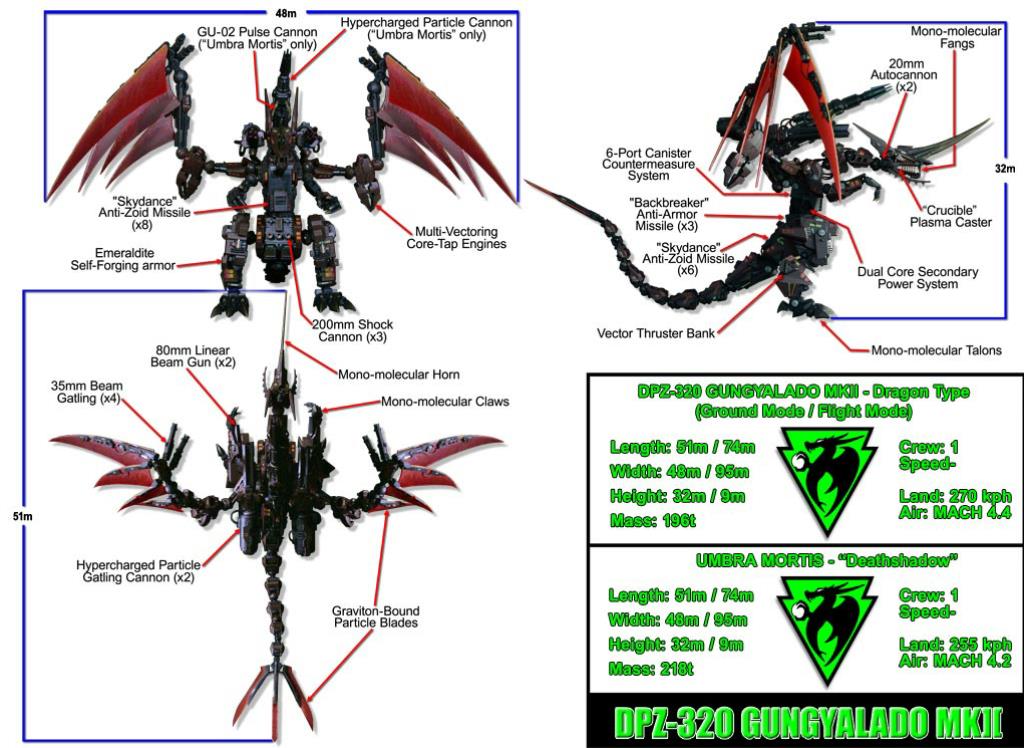
Statistics (ground)
Length: 63 m (23m)
Width: 88 m (? m)
Height: 8 (15 m)
Mass: 196 tons (155 tons)
Statistics (flight)
Length: 74 m (36m)
Wingspan: 95 meters (45m)
Height: 8 (11m)
Performance
Supercruise: (MACH 3.7)
Scramboosted: MACH 4.4
Land: 270 kph (110 kph)
Sea: 30 knots
CAPABILITIES (Performance: Ground)
The original Gungyalado was an almost unstoppable machine in its day; the fastest, fiercest, most destructive Zoid ever built; its reign was ended only in a confrontation with the King Gojulas combined with the cataclysmic disaster that ended an age on Zi. The MkII is a greatly improved version of that platform. While the original model was a terrifying power in the air, it was almost lackluster on the ground. Heavy and ponderous, it was limited by its own chassis in speed, agility, weapon capacity, and melee combat. The Gungyalado MkII is completely redesigned from framing to jointing, musculature to weight distribution. It can charge on all fours with boosters at a speed of 270 kph.
HISTORY
Though the development of a front line command unit and escort for Gil Kaiserin was known by Helic, the kingdom had no clue from what origins that unit would spawn. Deep sea surveys conducted by the DFZ-1000 Daidalos revealed several destroyed and one disabled Gungyalado; one of the fiercest Zoids ever fielded. The merging on ancient and cutting edge technologies created a terrifying progeny; the Gungyalado MkII. Intended to rapidly deploy force-destroying power to any field of battle, the re-appearance of the Gungyalado frame has brought great concern to the war councils of Guylos, Zenevas, and the kingdom of Helic. It is possible that the Gungyalado MkII could be the single most successful avian Zoid of all time.
UMBRA MORTIS - "DEATHSHADOW"
When Gil Kaiserin and her followers break from the human/Zoidarian nations to form the first Zoid Empire the MkIIs also swayed to follow her... but one stood apart. Her second-in-command broke ranks to form his own rogue force. Deadly to all nations, loyal to the Zoids as a species but under his own leadership. This unit became branded as "Deathshadow."
ARMAMENT
The Gungyalado MkII was created to front a few, powerful weapons that can kill large targets and decimate smaller ones. A more well-rounded platform, The MkII is in every way more lethal than its predecessor.
HPGC (Hypercharged Particle Gatling Cannon) (x2) – torso mounted in two batteries, 360° arcs
The HPGC refines the original weapon and divides the mechanism into a far smaller and less lethal package. However, the HPGC cycles four of these guns… and the MkII carries a pair that function as a single system. The HPGC has multiple firing modes that broaden its use on the battlefield. A single barrel shot has enough power to reduce an Iron Kong to a spray of smoldering parts at a range of 20 kilometers. With two dedicated cores, the MkII can cycle the eight barrels between targets continuously with only 5 seconds of recharge per gun. In secondary mode each system operates as a HCPC “shotgun”, firing a less powerful round with far less focus. This mode is limited to 5 kilometers but can spray an area 100 meters across. Mode three is one of the most feared; as a pair of Gatling cannons, the HPGC fires 64 rounds per second; able to saw an Ultrasaurus in half or ravage a battleherd in moments. The fourth mode sees each cannon act as a full-function HCPC, melting away dozens of Redhorn sized targets almost instantly. Finally, eight barrels fire as one, almost achieving the level of damage as Deathsaurer’s mighty weapon. This last mode leaves the MkII completely vulnerable for more than a minute as it must cool and recharge its systems.
200mm Shock Cannon (x3) – integrated construction, torso mounted, fixed forward arc
The 200mm shock cannon is used as both a direct fire weapon (range of 15 kilometers) and as an indirect artillery system (range of 120 kilometers). Each gun is fed with a 10-shot internal magazine and fires a projectile that energizes an internal hypercharged battery. The semi-guided round deals brutal kinetic force on impact, delivers a massive power surge into the target, and then detonates within microseconds. The accuracy of the gun is questionable beyond 10 kilometers in direct fire mode and can be unreliable at long artillery ranges, however, this is made up for by the results of a hit being virtually guaranteed to kill the target. It is the folly of a commander to dismiss that this weapon can engage ground targets from the air, allowing the MkII to operate as an air support platform as well.
“Crucible” Plasma Caster – integrated construction, head mounted, 90° forward arc
The MkII, however, replaces the defensive flame thrower with the Crucible, an 8,000° Kelvin plasma caster capable of melting armored units to slag up to a half kilometer away. The intensity the head forces the MkII to reserve it to short bursts with the active cooling system engaged, making one shot every 15 seconds considered “rapid fire”.
35mm Beam Gatling (x4) – wing mounted in two batteries, 90° forward arcs
Mounted to each wing at the knuckle is a pair of independently targeting beam Gatling cannons. These high focus, lower yield weapons can sustain bursts of fire up to 10 seconds with a rate of fire of 300 rounds per second. Each beam is capable of melting through 5cm of armor, but as the average burst from the gun delivers an average of 100 rounds to a target 5 kilometers away, the outpouring of energy will saw through most median rated units in a single burst.
35mm Cannon (x2) – integrated construction, head mounted, 90° forward arc
Included as an instrument to quell the most minor of nuisances, these light anti-armor weapons have greatly shortened barrels so as not to interfere with melee combat. Each gun has a 1,000 -round magazine located in the back of the head. The gun can empty in 20 seconds, falling into the realm of “reserve weapon.”
20mm Cannon (x2) - integrated construction, head mounted, 90° forward arc
Included as an instrument to quell the most minor of nuisances, these light anti-armor weapons have greatly shortened barrels so as not to interfere with melee combat which also reduces their accuracy. Each gun has a small drum of 1,000 rounds located in the back of the head. With the ability to empty a gun in less than one minute, the 20mm cannons certainly fall into the realm of “reserve weapon.”
"Skydance" Anti-Zoid Missile (x6) – torso mounted, fixed, rear arc
Skydance missiles are a medium damage, medium range weapon designed to evade active defense fire when engaging a Zoid in the air, on the ground, or on the sea's surface. The missile can also be used to target incoming warheads, though it excels at the prior role. A Skydance missile travels MACH 5.4 and can detonate within 10 meters to damage a light target or directly impact heavier targets at ranges up to 16 km.
"Backbreaker" Anti-Armor Missile (8) - torso mounted, fixed, forward arc
Backbreaker missiles are engineered to breach armored targets up to 14 kilometers away, striking with surgical precision. They use velocity and a charged penetrator to compromise armor, allowing a high-explosive, shaped warhead to rip it apart.
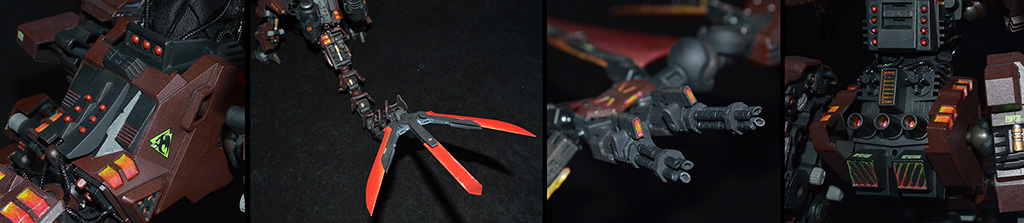
Mono-molecular Blades - Integrated construction: fangs, talons, and horns
The Gungyalado MkII uses melee technology migrated from Gil Kaiserin's development. These hardened, diamond-serrated, mono-molecular edged blades are virtually indestructible via kinetic means and can pass through almost any armor.
Graviton-Bound Particle Blades - Integrated construction: wings & tail
Using technology derived from the Guylos/Helic development partnership that created the Supreme King Gojulas’ unique weapons, the Gungyalado MkII wields similar energy blades. These, however, serve three functions: 1) as flight control surfaces, they offer a unique ability to act as a solid wing while amplifying the magnezer wing output, increasing both lift and speed. 2) the same qualities that coalesce the energies into “solid” surfaces also make for exceptional shields that resist kinetic and energy penetration. 3) Finally, the blades afford some of the deadliest melee weapons mounted on a Zoid, as was testified by the Supreme King Gojulas. The Gungyalado may be the only Zoid capable of standing toe-to-toe against the SKJ.
SUMMARY
The Dynasty is all too aware that its position is one of quality over quantity. The DPZ-305 Celestis Tenebris is also testimony to the principle that Dynasty engineers must create multimission platforms that excel in all of their roles. The combination of maritime stealth, heavy artillery support, and some of the deadliest close combat per mass makes the Tenebris one of the deadliest of the newest strain of Zoids. Coupled with the AI-2 profile of a hunter-killer, and the DPZ-305 becomes one of the most terrifying weapons on the field.
OF DREAMS & NIGHTMARES
My client wanted something special for the second in command to Gil Kaiserin. I suggested it be a Zoids icon, and I just happened to have one on my shelf from an exchange that went poorly years ago. Gungyalado is one of the Holy Grail Zoid kits, even after it was given a limited re-release under the Zoids Graphics line. To give you an idea of how rare this Zoid is, and how prized, a search of the Internet as of April 23, 2018 revealed exactly ZERO customs. There could be some out there, but I could find none, even scrutinizing many hundreds of photos that even resembled dragons or T-Rex style kits. If that holds true until you read this, I will effectively be the first Zoid customizer to ever create a custom Gungyalado and post it. As you can imagine, this places some pressure on me to do a damned fine job. Here we go!


AI-2 Profile
Rather than develop an AI-2 mind from scratch they used a copy of the jointly produced Dreadmander imprint as a base because at its heart was the mind of Deadborder, that and the avian skillset of the Salamander seemed to be a way to ensure the new Zoid would least be the Dreadmander's equal. However, they suppressed the Salamander imprint. As the AI-2 mind adapted to the new body and core, a Gungyalado recovered from a deep undersea mining operation, they also used traces of Gil Kaiserin's code to bolster the program in hopes it would form a better bond with her.
It worked.
the very first “G2,” as the engineers referred to it, showed unusually complete traits that were not entirely intended. It took from the Deadborder's mind a fearless aggression well-formed for both ranged and close combat operations with a lean toward absolute destruction of a target... almost overkill. From the Salamander portion it gained some aerobatic acumen and an excellent sense of 3D space and situational awareness. But from Gil Kaiserin the MkII seemed to take on a penchant to lead... almost to rule. The result is a vicious combatant with brutal, honed battle skills, second-to-none aeronautical acumen, and a high degree of command ability tinged with the desire to lead.
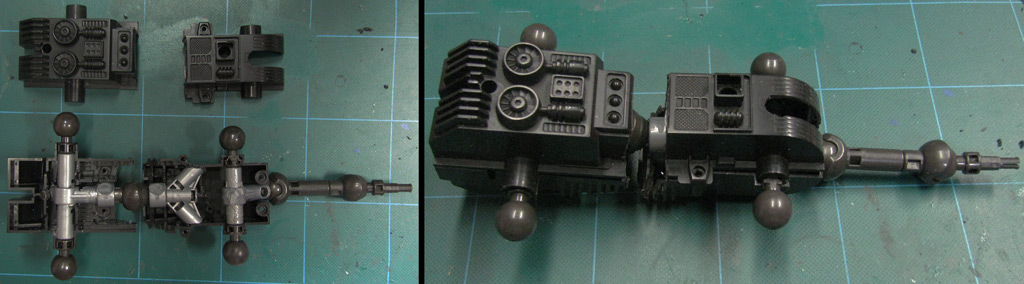
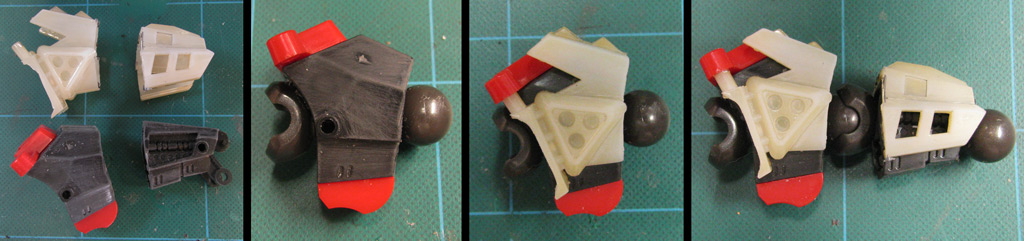
SEEMED LIKE A SOUND SOLUTION
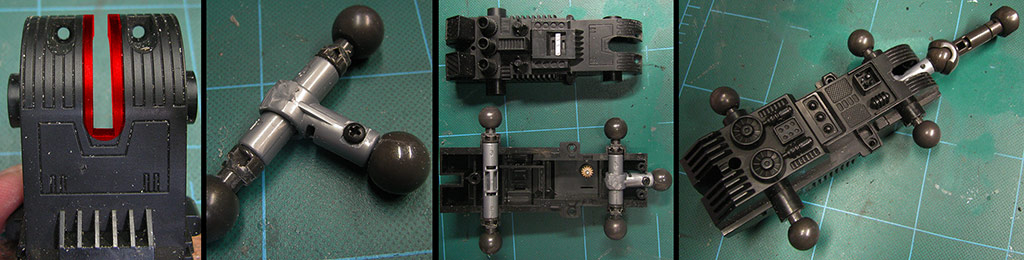
My first attempt at taming the issue with the upper interconnected articulation portion. This worked great… until it didn’t. First, I had to open up the slot in the neck to accommodate the broader Struxx support. On the toy the shoulders/torso provided a huge hinge joint for the mechanism, but now I was asking the whole thing to rotate around an axle passing between the shoulder joints. I textured the heck out of the axle and glued it liberally, then created a Struxx support for the neck that I screwed in place for strength. You can see in image #3 that the plan was fairly simple, and the plan for the hips was even simpler. What could go wrong? It looks great! … :-/
OVERVIEW OF THE UNDERLYING
The original design had a gimmick unique from every Zoid kit before and after; while there are several Zoids that have a 2-mode stance (Bearfighter, Dimetra Ptera, Gojulas Giga, Gravity Wolf, and even Storm Sworder and Zabat all have multiple stances, and some, like LeoGator, actually have two animal modes). However, Gungyalado’s stance change is the most extreme in terms of engineering: the whole Zoid changes from a straight, flat form to an upright, recoiled stance. Notice frame #1, above: A) shoulders, wings, neck, are all interconnected yet independent of one another, B) the hips (and therefore the legs) remain level while allowing the torso to bend in excess of 90°. At C) the tail does not articulate at all, which is fine for the toy but not for the plans I have for the new legs, so that has to be added. D) The head and neck are all interconnected in some truly intricate ways. Articulating a Gungyalado wouldn’t be too difficult… articulating a Gungyalado while retaining the functionality of the hips and shoulders would be daunting.
GROWING COMPLEXITY
So, I added a temporary structure for the inner neck to the right, but I had to add a waist, too. In order to place the waist joint I needed to create a really strong structure that braced against the body in several places. The “Y” support at the center of the chest was screwed in on the sides and underneath, and glued to boot. The hip section of the waist was similarly secured, and used a shaft which the hip axle passed through to add strength to bot the hips and the waist. Closed up, everything seemed just fine.
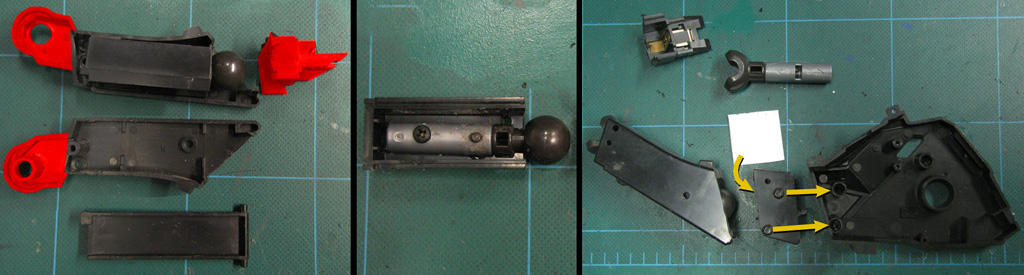
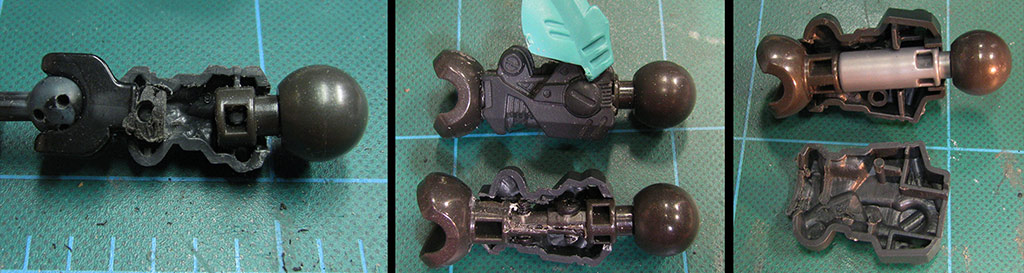
LABORING IN LAYERS
The base of the tail was a different beast from other builds. Most Zoids have a tail that clips to the frames encasing the motor, or they are articulated and attach with a clip of some kind. Gungy has a battery box that is a separate component from the tail (not molded in like 95% of other kits) that is encased inside the base tail frame… that frame is encased within the hip outer frame which, in turn, encases the torso motor box. Savvy? Okay, so I have to crop the battery box apart so that it can have a Struxx post pass through it lengthwise, a joint at either end. This is placed back into the battery box frame, which is modified to allow the joint to flex. I had to cut the end off of the battery box frame, shave the angle off of it, add structural plastic (as I did on Siobhan), and add another Struxx joint inside. The other key here is that this box is the support for the entire tail, but unlike other builds I can’t secure it inside the torso frame, only to the hip frame, which has to remain able to rotate. It’s a bit of a thing.
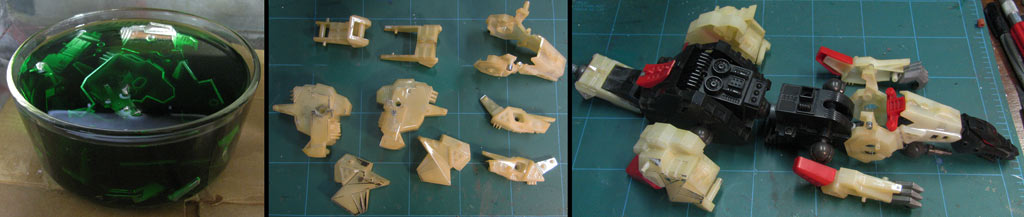
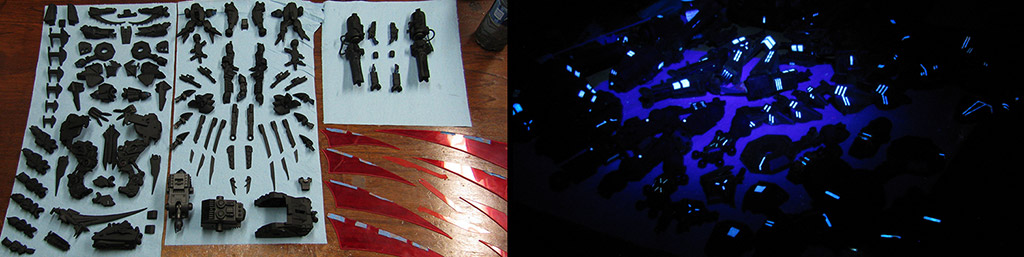
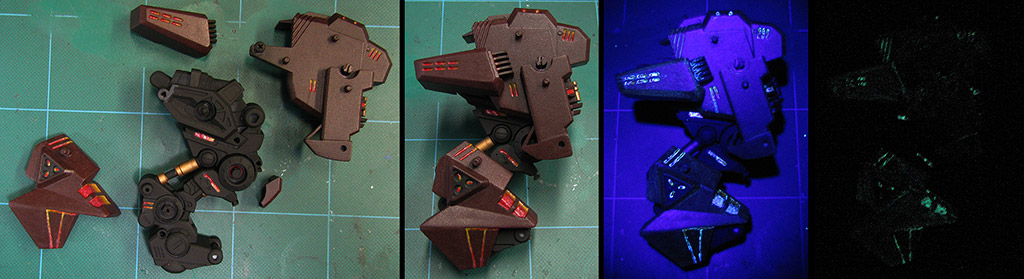
GOING GREEN
One of the challenges of customizing the Gungy is that it has quite a few large parts are chromed. Some folks love chrome, but I’ve never been a fan. Either way, I knew I was going to have to give this custom a new paint job, I was concerned about the results in merely sanding chrome. I found two solutions to removing chrome; between using oven cleaner and Simple Green, I chose the least dangerous solution. I soaked the Gungyalados parts in a bath for a total of 48 hours, and you can see that there are still portions where the chrome survived. The plastic beneath was super slick, too, and required a lot of meticulous sanding.
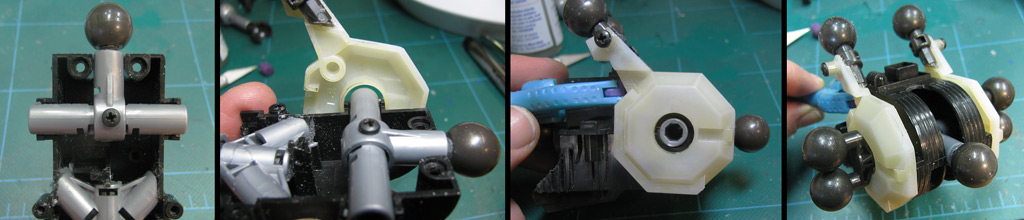
UPPER COMBO SECTION (TAKE TWO)
My first solution to the shoulders had to be tossed out and a new structure adopted. Due to the complexity of the six attach points (arms x2, wings x2, and guns x2), I opted to replace the original shoulder ball joint with a double joint that would support both the arms and wings simultaneously. It would limit the articulation of each, but the overall paired joint can also rotate. Essentially, this version does not allow the base neck joint to position independent of the shoulders; rather, when the neck is lowered it will roll the shoulders downward and the wings will rotate up. Those octagonal armor plates hold up the original wing posts, but out of necessity I converted them to the attach points for the cannon armatures. Each of those plates can rotate independently of all other structures; each other (they were originally attached around both the torso and the neck), the shoulder joints, and the neck position.
SEPARATIONS & JOININGS
The interconnected shoulder and neck pieces had to be cut apart to add joints at either end of the neck. I removed the hexagonal shoulder armor pieces and added Struxx joints. Knowing those joints take a bit of torque to move, I opted to slice the top off of the peg that once held the wing hinge in place and drive a screw through the new piece. I used a screw with a head the size of the peg so I could place a rubber cap on it when the build was finished. Here you can see the original shoulder setup with a single ball joint for the shoulder, but, as you will see in a moment, that plan didn’t pan out.
CAPABILITIES (Defenses)
Like the original model, the Gungyalado MkII places a high degree of emphasis on armor. The MkI used Deochalcum refined as a reflective coating dubbed “Ice Armor,” but the MkII utilizes the infused Emeraldite self-forging armor donned by all the current Guylos front line forces. The armor has the same stealth coating employed on Gil Kaiserin, as the Gungyalados were intended to escort her into battle without drawing fire. In addition to armor, the wings of the MkII are effectively narrow-band e-shields; the blades are almost impenetrable to energy weapons and are strong enough to redirect or reduce the velocity of kinetic projectiles enough to render them ineffective. The MkII also carries the Shadow Shroud ECM system that projects false sensor data to tracking systems, effectively erasing it from perception.
CAPABILITIES (Combat)
Gungyalado was developed to be a rapid, agile flyer tasked with bringing its dreaded Hyper-Charged Particle Cannon onto the field of battle. The MkII, however, is just as apt as an aerial interceptor and grounded fighter. While its firepower is still centered around the Hyper Gatling, it has a broader array of effective light and medium rated weapons. Further, where the MkI was designed to be able to hold its own at infighting, the MkII is a terrifying, lethal combatant using its wings as both energy blades and shields. The replacement of the tail drill/mace with a triple bladed energy sword at the end of a vastly more agile tail is a daunting development for would-be melee attackers.
ZOID PARTS
Gungyalado
Base Kit
Dark Spiner (x2)
Tail & legs
Gil Vader
Rear claws
Zaber Fang
Teeth
Hard Bear
Thigh intakes
HMM Liger Zero Schneider
Nose spike, wing intakes
HMM Liger Zero Panzer
Wing “knuckle” armor, HCP-GC housing, Aft torso launchers
Gojulas
Leg armor mounts
CP-09 Booster Cannon
Inner-talon boosters
BUILD NOTES
TENTH COMMISSION CUSTOM!
Hours to create: 86
Articulations: 130
BUILD "FIRSTS"
First time de-chroming a kit
Retaining Gungy’s unique “twin-hinge” architecture
The huge 48" wingspan makes the Gungylado Mk2 my largest ever custom by dimension!
DEFENSES
The Gungyalado MkII continues to place a strong emphasis on armor. The MkI used Deochalcum refined as a reflective coating dubbed “Ice Armor,” but the MkII utilizes the infused Emeraldite self-forging armor donned by current Guylos front line forces. The armor has the same stealth coating employed on Gil Kaiserin, as the Mk2 were intended to escort her into battle without drawing fire. Additionally, the wings of the MkII are effectively narrow-band e-shields; the blades are almost impenetrable to energy weapons and are strong enough to redirect or reduce the velocity of kinetic projectiles rendering them ineffective. The MkII carries the Shadow Shroud ECM system that projects false data to sensors, effectively erasing it from perception. Finally, it mounts an aft-arc 6-tube canister countermeasure system; each tube is loaded with a 4-shot carousel holding flares, chaff, a ghost signature, or comm-chatter beacon to distract incoming projectiles.
THE BUILD
GALLERIES
CAPABILITIES (Performance: Air/Sea)
The Gungyalado MkII is able to supercruise at a speed equivalent to the original model’s maximum, then boost beyond it for a sustained period up to an hour. It bristles with maneuvering thrusters and is as agile as a Redler while exceeding the mass of the Dreadmander. Its new tail blade is also used as a rudder in the air and for propulsion while submerged, where the Zoid can reach speeds up to 30 knots by adding boosters.
COMPLEX TO MORE COMPLEX
The configuration of the neck parts is difficult to show or to describe. The black portion is the neck structure; at the shoulder end it does not attach to the torso, at the head it actually clamshells the jaw... but not the head. The arm controlling the head position passes through the neck and into the torso without contacting the neck. The head clamps around the neck but not around the jaw. The white armor (once chrome) clamps around the neck and was originally attached to the shoulder octagons, which themselves clambed around the torso. That means that the part that originally held the neck together and created the outer hinge for the neck no longer performs either function. Worse, the neck was too short and stiff, so I cut it in half to add a mid-joint. Double the connection problems. I affixed a pair of Struxx joints through the neck by boring it out gluing the heck out of it.
OUT OF MANY, ONE
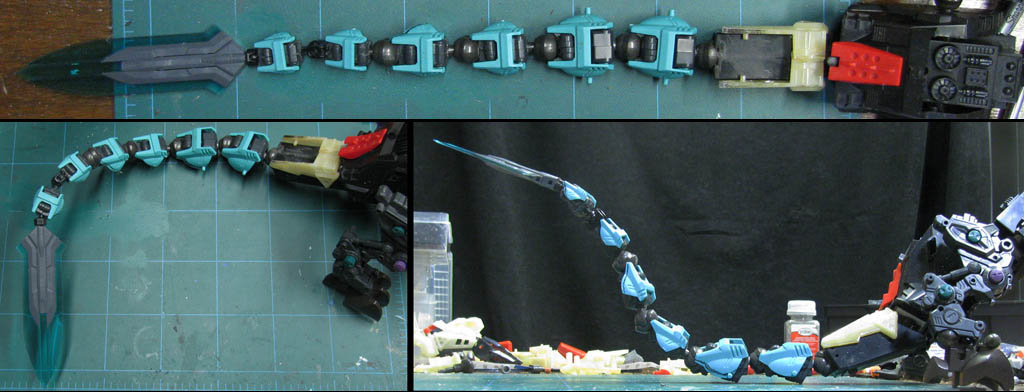
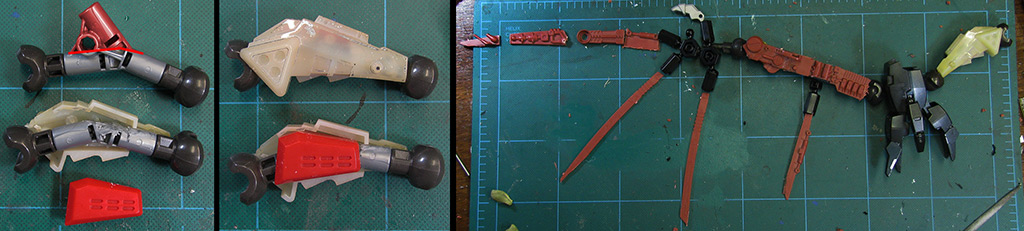
The original Gungyalado’s tail design is aweful. Comprised of four parts, its overly thick base is permanently bent in an “L” shape and holds the batteries, the next two sections only hinge up and down and have a bizarre, reverse-tapered shape. They were also chromed. Finally, the sleek, incredible dragon’s tail ends with a huge, blocky, ugly drill that is more like a long club. I had planned on at least replacing the drill with the tail of a Deadborder or Heldigunner (or both). I opted to fully replace it with a pair of Dark Spiner tails spliced together, doubling its length. That club-thing was replaced it with a Kotobukiya Heavy Weapon MH05 Mega Slash Edge. This image shows my plan before I began cutting.
SIMILAR OUTSIDE, BUT…
Since I used two Dark Spiner tails together, every two segments were slightly different in size. So, even though they end up looking the same on the outside, the lengths and diameters of the tail segments were built very differently inside. The segments near the base of the tail simply had two stock Struxx joints, no worries. The next two segments looked the same on the outside, but with less length and width, I had to trim down the Struxx joints and use a pair of screws for each to give them the strength they would require. I also had to carve much more of the inner tail away to make room for them. The last two segments were more different, as I wanted to taper the joints along with the segment size. #5 begins with a Struxx joint but ends with a Bionicle joint, and the pins of the tail halves pass through them to stabilize them.
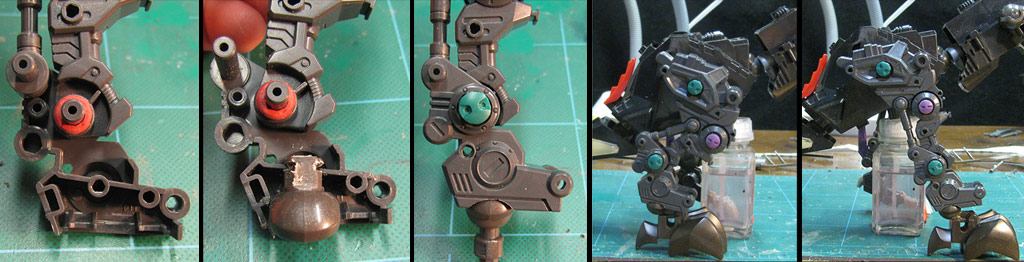
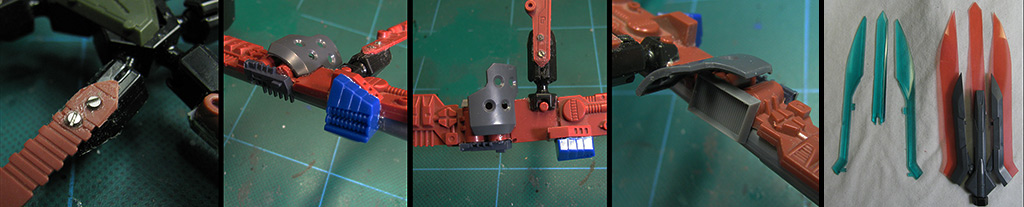
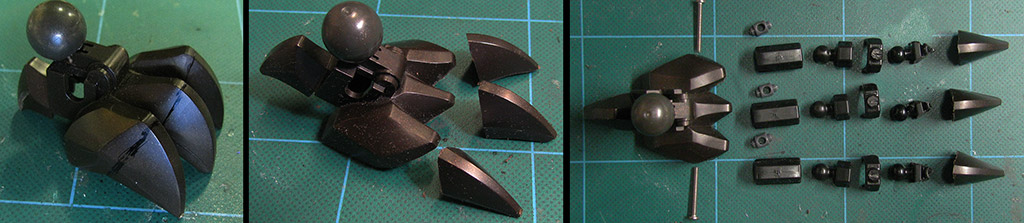
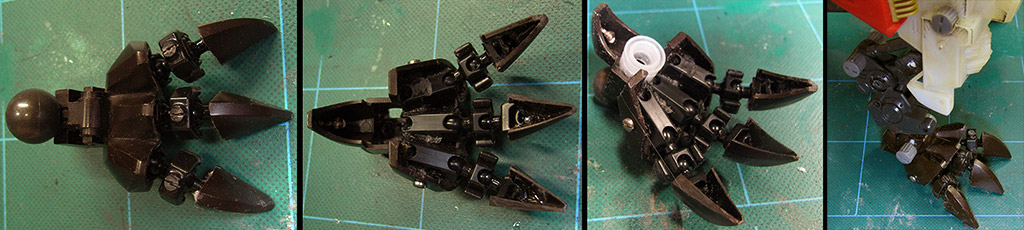
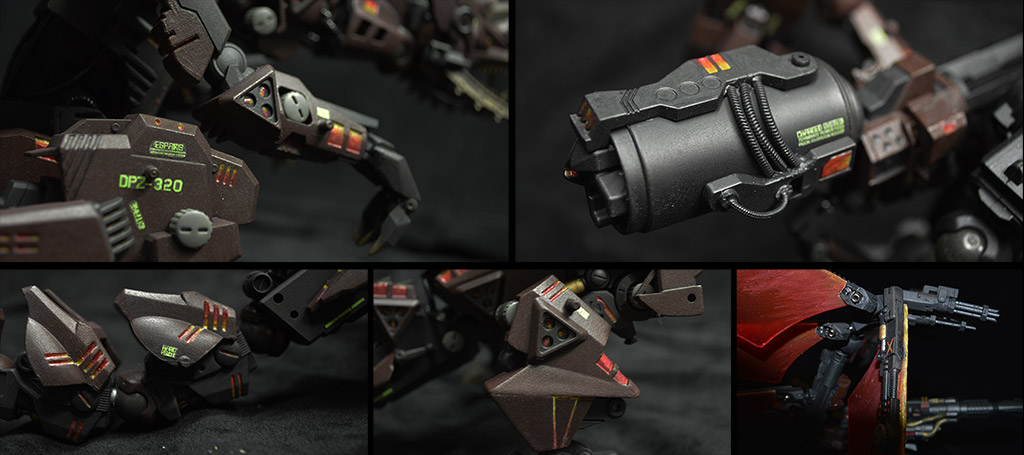
LEGGING IT
The original legs are literally a chunky block of plastic with a blocky chunk of plastic crammed onto it. The molding was intended to look “hunched down” in both modes. I decided early on that you can’t actually add joints to a pair of chromed plastic blocks, so I replaced the legs with those of a Dark Spiner. I did not want to destroy some of the cool details by adding a ball joint, so I removed the slick plastic caster and replaced it with a VERY tight Blox gasket. I removed the foot plate and installed a Struxx joint as a new ankle. At this point I did not decide on how to build the foot, so I temporarily used the original Gil Dragon claw left over from the creation of Gil Kaiserin. In the final two images you can see the range of motion the Dark Spiner leg has. I considered removing the hamstring hydraulic post in favor from a functioning piston, but decided to opt for the strength and detail of the post.
ENDING ON A SHARP NOTE
Tail segment #6 transitions from a Bionicle joint to an Asoblock. Ordinarily I wouldn’t be too concerned with an Asoblock holding up the tip of a Zoid’s tail, but in this case it wields the huge Mega Slash Edge sword! I opted to remove the two lowermost secions of the sword and the handle, but the blade can still split into 3. The sword required very little modification for the Asoblock joint, which I installed as a socket as opposed to a ball like I normally might.
A TALE OF TWO SPINERS
With the tail joints cured, I then moved to make the tail seem just a little more tapered. Since every pair of segments was actually the same size, I sanded down the blue armor shield from one of each pair so they were just slightly smaller. To my surprise, the entire tail ca actually lift into the air! The third shot above is not resting on the desk to support its own weight, it had to rest there because the front half of the Gungy didn’t exist yet to counterbalance it! Upon taking this pic I realized that the base of the tail was, by comparison, just a boring square block. That wouldn’t do.
BASE JUMPING
The transitionary segment between the dual-Spiner tail and the body was due for a major refit. I looked at the details on the Spiner segments and realized that they had a single, large piston on the top that linked a pair of “articulated” cylinders. I pulled together a motley crew of bits and created what really did come out like an HMM interpretation of the first segment! I took the Gungy’s original armor to tie the two models together, and I added a true hinge so it could mimic the behavior of the others. I split a cool Bionicle armor piece in half and glued the pieces to the sides, helping it with the rounded clamshell look of the Spiner armor, too. At this stage I haven’t tried to duplicate the underside piston yet, but I might have to make some kind of a rest or stability system like the Gojulas has so it can rest its tail in standing mode.
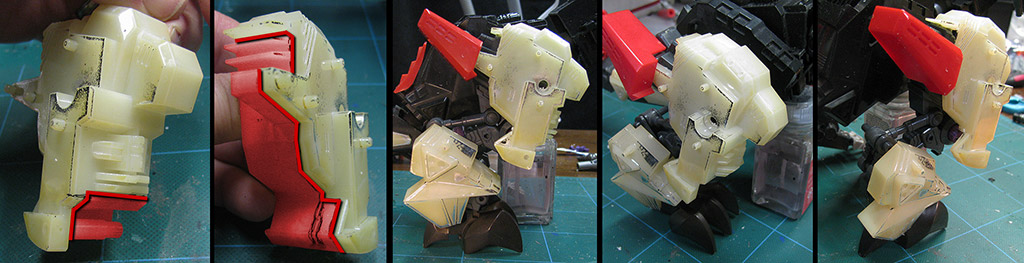
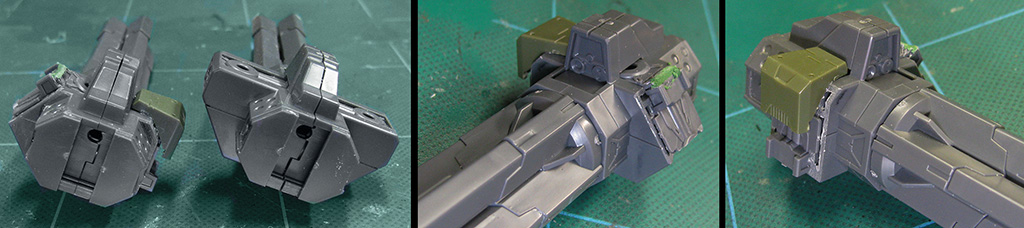
FROM STRUCTURE TO ARMOR
Replacing the legs was child’s play compared to what I had in mind for the final product; preserving the original look of Gungyalado’s legs by carving the pieces into armor to cover the Spiner legs. Of the two pieces, the thighs required the most work. Images #1 and #2 show how much of the piece had to be chopped away from front to back in order to let it slip over the Spiner leg. The next three photos show the upper leg armor in place with the “thigh box” tacked on to help me envision how I could re-attach it, and the outer leg piece is balanced against the shin.
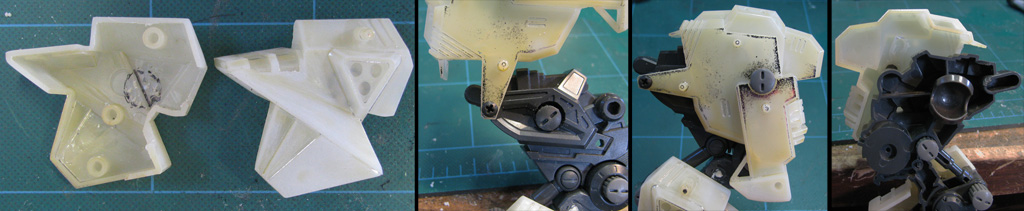
STUCK ON YOU
The lower leg armor required less butchery but some more meticulous tuning. The circle I have sketched inside the armor piece is where the bolt covering the heel joint comes to rest. I actually glued the rubber cap here so it could slip onto the post after painting was done. To make sure the hip armor stayed in place and was strong, I drove a screw through the only place I could… at the back of the hip. Ironically, this created a hinge that will allow me to paint under it more easily (though it isn’t intended as a detail feature!) You can see in the last image there is a very large hallow space between the top of the Spiner thigh and the top of the original Gungy thigh… I intend to install some detail pieces here.
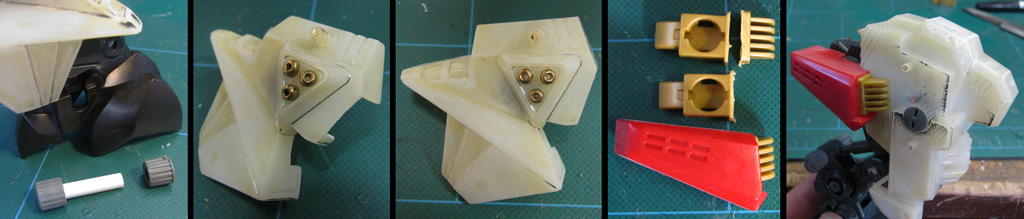
MISTER DRESS-UP
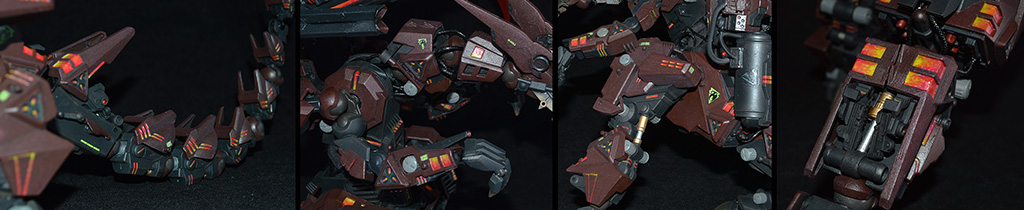
As the structure solidified I began to fill in details. I disliked the lack of exposed rubber caps in the legs; most of them are covered by the armor. I cut a styrene rod to place caps on either side of the ankle. There are ten triangular modules around Gungy’s body, each holding three circles. There are no references to what they might be in the lore, so I envisioned them as either some kind of missile batteries or, thruster banks. I’ve played with many designs to add some interest to them; above I tried to make some nozzles using brass beads. I also decided how to re-add and update the red-block-thingy from Gungy’s hip. First I had to shape it so that I could pin it back in place around the re-shaped armor and Spiner leg. Then I cut up a Hard Bear’s paws and added an intake vent to the front, which made the unit look more functional. Originally, I wanted to make it an opening missile box, but it would be too time intensive. I figure it now houses some kind of magnexer/antigravity hardware that makes the G2 maneuver like a Zoid a quarter its weight.
UPWARD & ARMWARD
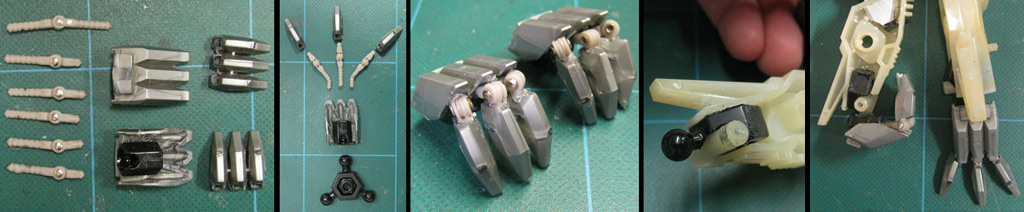
While I built the rest of the custom I kept fishing around for a solution for Gungy’s arms. The original kit didn’t really have arms… it had forearms pinned to a block that was supposed to resemble a folded shoulder. Worse, the “elbow” was in the middle of the forearm. I ended up doing some surgery on a Gundam Astray first, but decide to chop the Gungy forearm and marry the two kits. I was really pleased with the result… except for that worthless claw on the front! I spent weeks trolling around for a solution for the Gungy’s hands. The biggest problem was that the new claws had to work well in both biped mode and quadruped mode. In frame #5 you can see I was reaching, but I knew what had to be done….
HANDS-DOWN, GOTTA CLAW
The Gungyalado MkII has the smallest set of joints I have installed on a Zoid. They are the same type as those the hold up the lid on Eradicator’s dorsal missile box, but they are 25% smaller. I nervously carved up Gungy’s static, permanently curled claws and affixed the new hinges to open them. The wrist was supplied by an Asoblock. The final result is a pretty dynamic claw that curls like the original when upright but extends to press against the ground when on all fours. The claws are angled to spread against the ground and appear as if they are bearing weight.
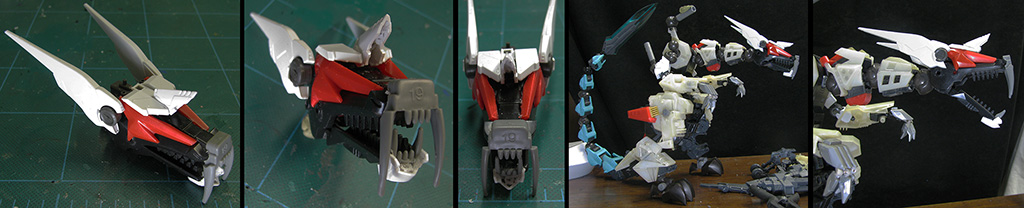
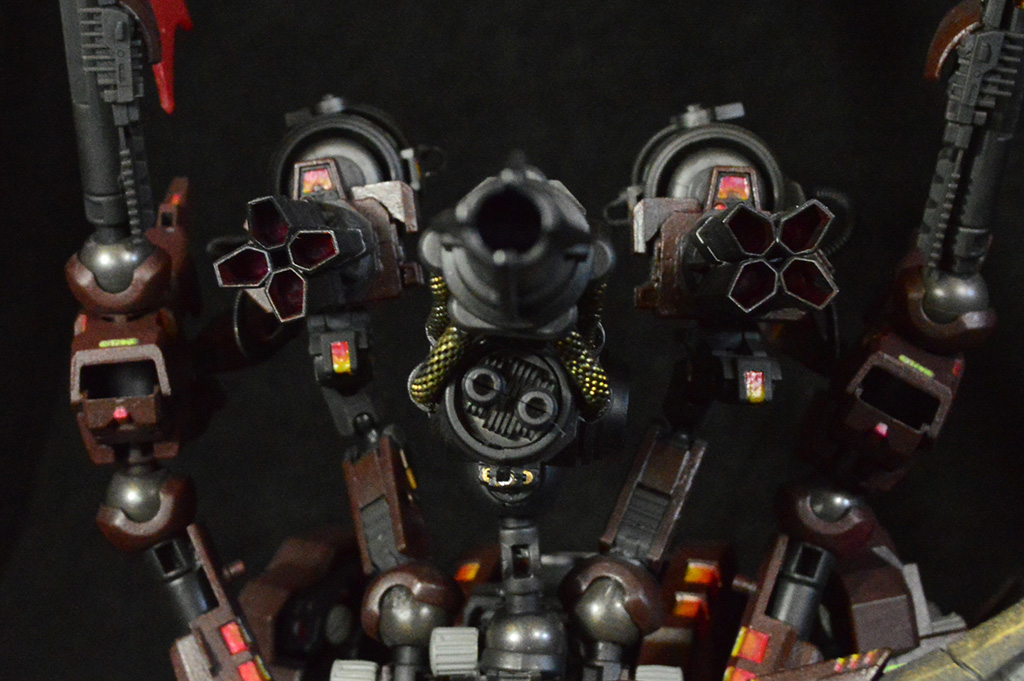
HEAD GAMES
The head of the Gungy is… a mess. The shells of the head clamp around the forehead, but not around the jaw. The jaw, it turns out, is clamped within the neck, which is clamped by the head. The first image is how the neck, jaw, and head, along with the Gundam piece I split up to create the new chin. After more than an hour of fiddling around, the second image was possible… the head has a new neck joint piece mounted within the head and around the jaw. I knew I wanted to change the head design fairly radically, as I did with Gil Kaiserin, but keep the oriental flare if I could. I temporarily placed some Saber fangs on the nose... and they stayed. I made a new, stronger chin to lend a tad more character to the G2, and had to make some adjustments to allow the cockpit to open. You actually have to open the jaws first, then ou can swing the canopy and fangs downward. Finally, I replaced the simple horns with some articulated thruster wings from a Gundam Lupus Rex.
A NEW SELF IMAGE
One challenge that seems to repeat itself with my builds is as I add articulation and features, things like the claws or heads appear to shrink away. I had made some improvements to the head but it didn't look heavy enough. I took the cheek armor from the Gungy kit and fit it to the canopy, then added a few more Gundam parts to close gaps and make way for the prominant horn I knew would feature. The new head looked much better scaled than the old.
ONE HORN TO RULE THEM ALL
I looked through every part I haf to see if anything could make the base of the G2's prominent horn. In the end, I carved it out of sheet styrene. I wanted to add some strength and mass while adding detail, so I took a Kotobukiya drill lance and secured it at the base. It is also a nice nod to the Orudios, which the Gungyalados was designed to defeat, The final look dominates the battlefield, and the horn adds eight meters in length!
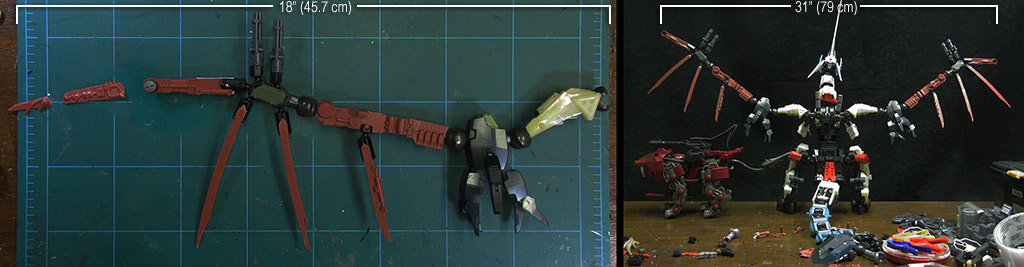
PREFLIGHT WINGS
Above is the first assembly of the wing structures. Note that my cutting mat is 18” wide. Placed on the body, the span just to the first finger joint is 31” wide. In the second picture, I placed my Shield Liger Commander for scale. It looks like it is a forced perspective shot, but look at the alignment of the feet. In this picture, its tail gun is actually resting against the red box on the Gungy’s hip!
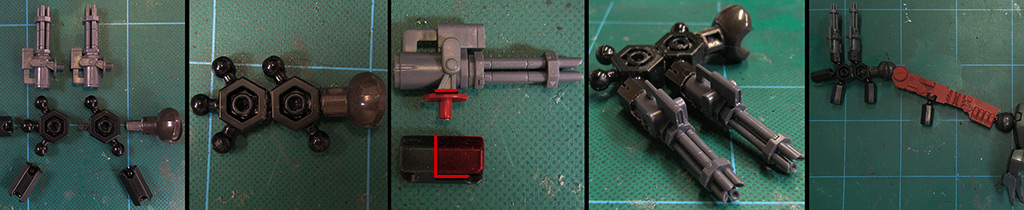
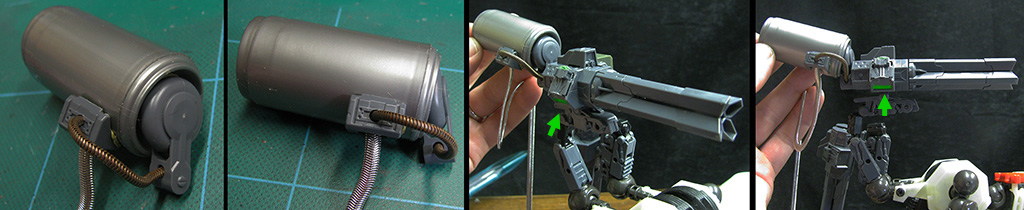
HYPER-REACTORS
Tthe former HCPC had something over the new Gatlings; mass and presence. I thought it would look great to add a powerful generator of some kind to add bulk and balance. The drum is a soda candy containep with Kotobukiya scraps and some necklace chains. Even though this is an energy weapon, the Zoids line is fond of assigning ammo chutes to them, and they look cool, so I added a flat chain to be an ammo cable bundle. It will slink from the bottom of the ammo box on the drum and will be tucked into the gun housing where the green arrow illustrates the slot for it.
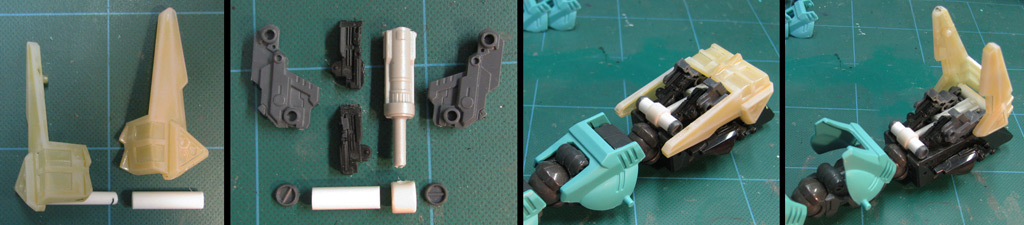
JOINTED BOOSTERS
The boosters are the legs of a GN-008RE Seravee Gundam II, chosen because they had a very menacing, claw-like quality to them. To make them in-line with the wings, I drove a Struxx support straight through them and screwed them in place. To cover the unsightly post and to retain a cool-looking intake, I used a missile door from an HMM Liger Zero Panzer. A simple fix that really turned out well.
KEEPING IT HUMERUS
The two main challenges of wing design (make it not look like Dreadmander, and make the span greater) was made tougher by the Radox wings being broken in several places. I trimmed off all of the connecting bits to the wing parts and shifted parts around to break up the straight Salamander look. The new forearm is actually half from the left wing and half of the right wing. I have yet to add some detail bits to change up the structure a little more.
TRIGGER FINGERS
Building the “hand” on an articulated wing is always tricky. I Needed to make it strong and broad enough to allow the fingers to flex. I was debating the whole process if I should not include a thumb, or how exactly I should do it, because I am still very proud of how the Dreadmander’s claw turned out. I even played with including a pair of thumbs, or an articulated claw. In the end I decided to opt for installing a pair of Gatling guns on each wing. Unlike most of my other builds of late, I really like the idea of the G2 having a focus on a good, strong body with only a handful of potent weapons.
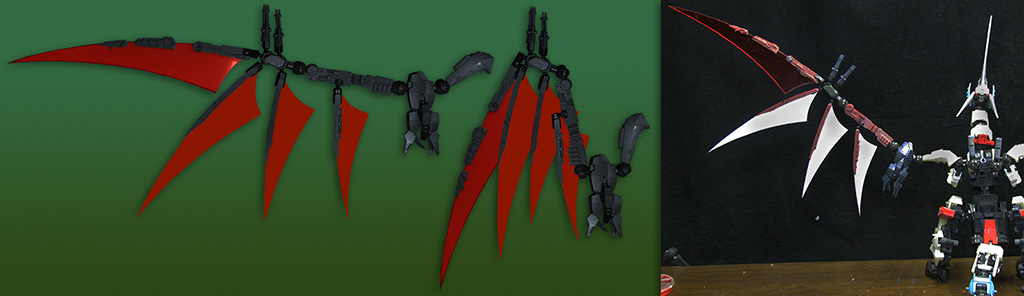
BLADES OF GLORY
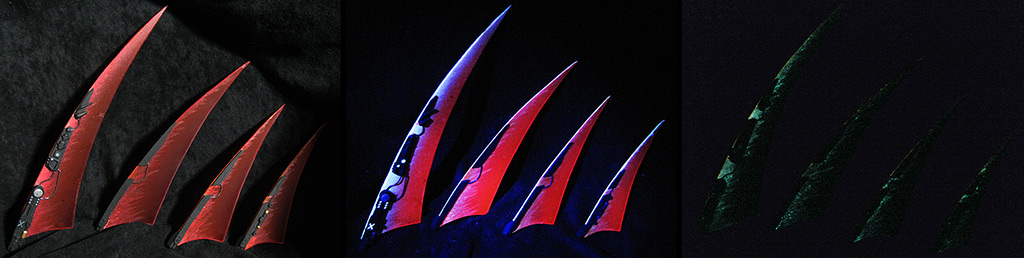
The wing blades themselves are cut from plastic party trays my wife discovered at a local Party City. In the first image above I took the actual wing pieces and colored them gray to see them better, then I attached the blade patterns. The first blade (the outermost one) is the actual plastic blade with the floating finger parts temporarily tacked to it, the flat white blades are colorized but are physical paper patterns. I also folded the wing to get a better feel for how much flexibility it has overall. The inner three blades can actually fold and touch points, but I felt this mode nodded to the original Gungy wing. The second photo shows the actual blade and three patterns tacked to the wing in place. At this point I measured the total wingspan at 48” or 121.9 cm.
FINISHING TOUCHES
I've added a pair of micro screws to every finger of the wings to add strength (and they don't look bad, either). I've also added a few details to the wings to help them look a bit less... "Salamandery." I've determined that after this build I am going to drop about $50 on some Kotobukiya detail kits... they are just too handy to fill in empty spots and add interest. I also had to source a different red sheet plastic to replace the tail blades; the wing blade material is simply too thick. I am confident that I can paint it to blend with the wings by spraying dark clear red over it before I apply the glowy paint.
ARMAMENT ARMATURES
From the start I wanted to replace the single HCPC on Gungy’s back with a pair of weapons; in the end those ended up being a pair of CP Gatling cannons. I decided early on that I did not want to rely on straight Struxx or Asoblocks for the armatures required to hold and pose the guns, so I incorporate both into the armatures included with Kotobukiya’s Heavy Weapon Unit: Grave Arms.
MODDED GATS
My one real qualm with the Kotobukiya Sentry Gun model kits is that they have this huge bulge to hold out the mounts for the optional smaller 4-barrel Gatling guns. On the G2, where I mount two of these guns side by side, the bulge become a real nuisance to pose. I trimmed the bloat from the gun mechanism and then filled the gaps with hardware.
A DIFFERENT WING
The wings were dusted with phosphorescent paint and edged with luminescent paint. I used streaks of clear instilled with glowing paint. I hoped that I could create an effect that looked like energy waves. I linked the pieces of the wing bones together with necklace chains to make them appear to be floating on the blades. When all the painting was complete, the set looked very cool.
PAINT AT LAST
I decided to prime this build in black. That is, except for the wings. Those would receive a different treatment, but I had to mask off the places where the wing "bones" would adhere to each blade. I also had to paint all of the luminescent paint at this stage.
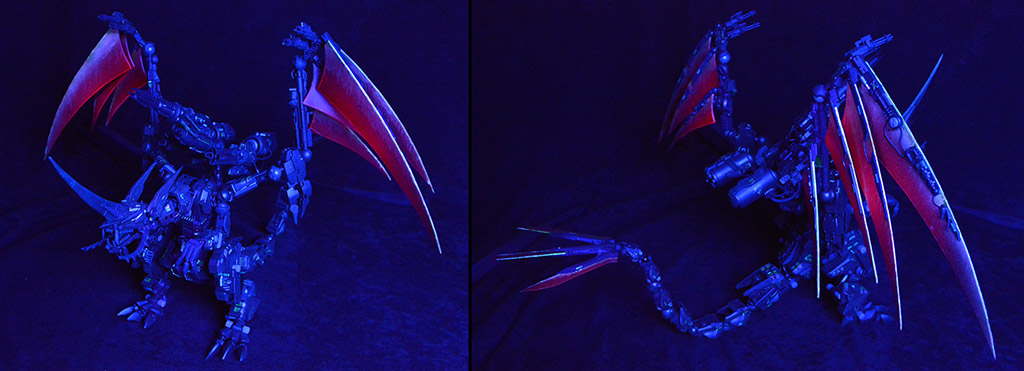
FROM DIM TO DARK
I liked the appearance of the wings in normal light, but was concerned how they would apper in the dark. The second picture, above, shows the wings propped up in my spray booth illuminated by black light. The luminescent edge is a dramatic contrast; the blade of the wing. The last photo shows the wings glowing after the lights have been turned out; a 30-second exposure was required to get this shot.
BLACK & BLUE (& GREEN)
The structures of the build.were all painted flat black and then I dry brushed them with burnt umber rather than silver or gray. The armor was flat black as well, but then I washed it with phosphorescent white. Over this I airbrushed layers of a custom blend of transparent cherry red, primary red, and black, which turns out looking like a dark brick red. The glowing vents were first painted with pure luminescent white (the stuff reflects black light to absolute whiteness so bright you can light a room with it!) Over the top of that a layer of phosphorescent paint went on. Finally, over the glow paint, a gradiant was painted with transparent yellow to transparent red. The gradient theme is that the yellow is always closest to the Zoid's core. In normal light it can look like fire. Under black light the armor is almost a ghostly blue and the red/yellow came out off-white. With no lights on the whole Zoid has a green cast. In the future, I would like to purchase red glowing paint, since all of that tinting didn't make much difference in darkness.
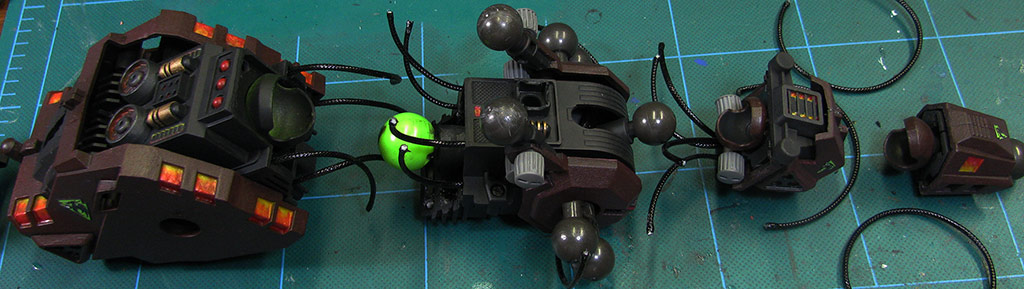
BASIC CABLE
Always the last step in my designs seems to be threading power cables through the custom. Most of Gungy's cables were limited to runs between adjascent sections rather than any nose-to-tail stuff; the double 90-degree torso hinge points pretty much put a stop to that.
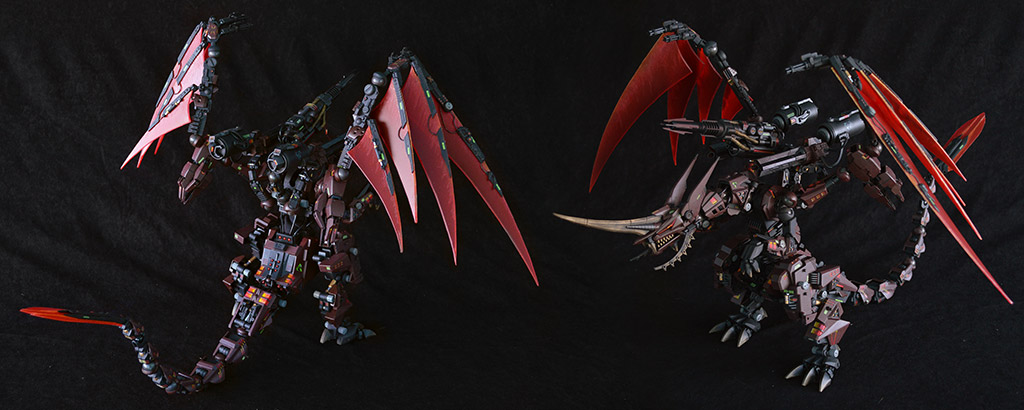
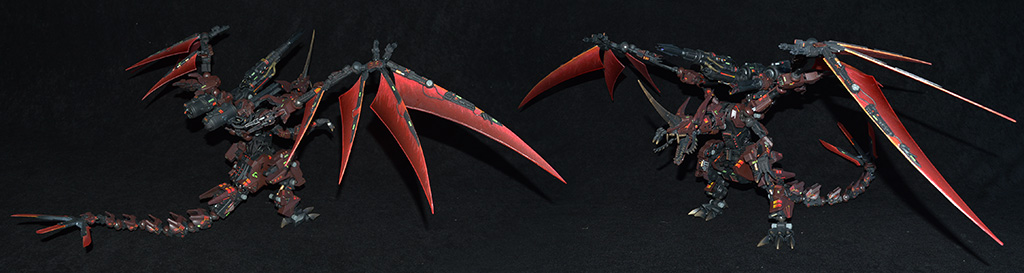
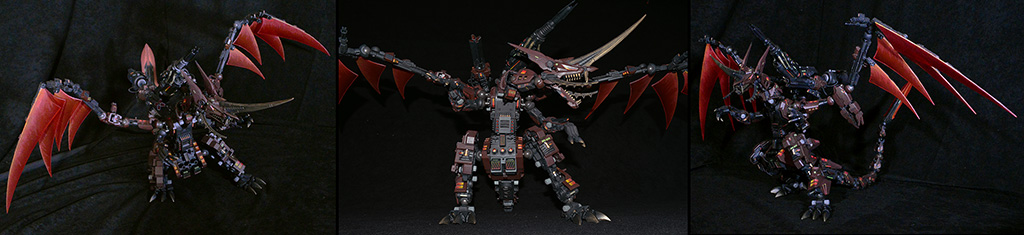
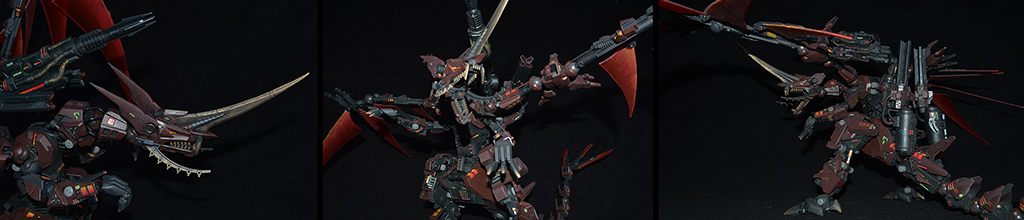
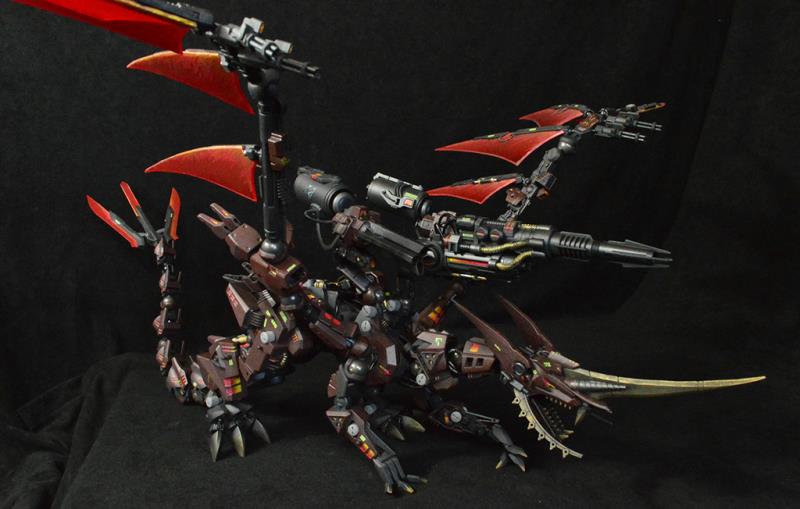
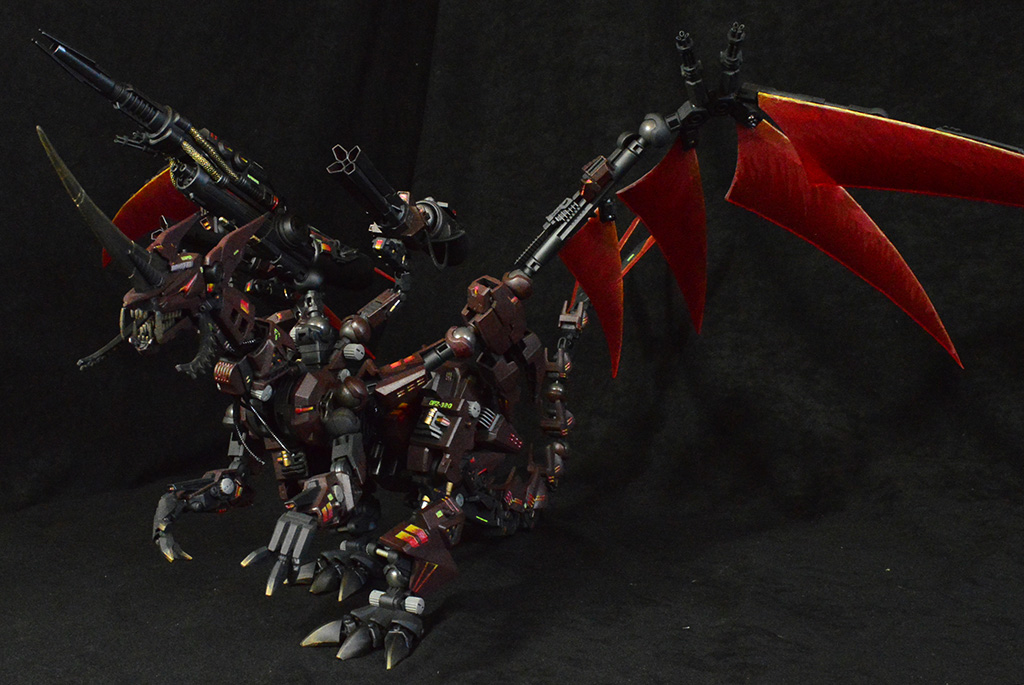
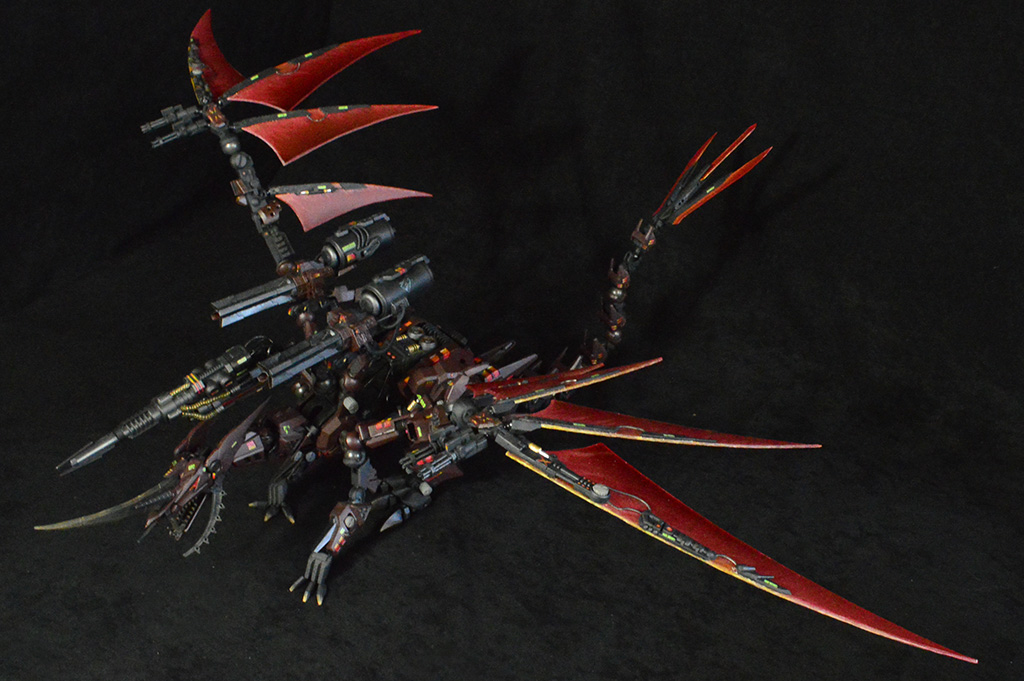
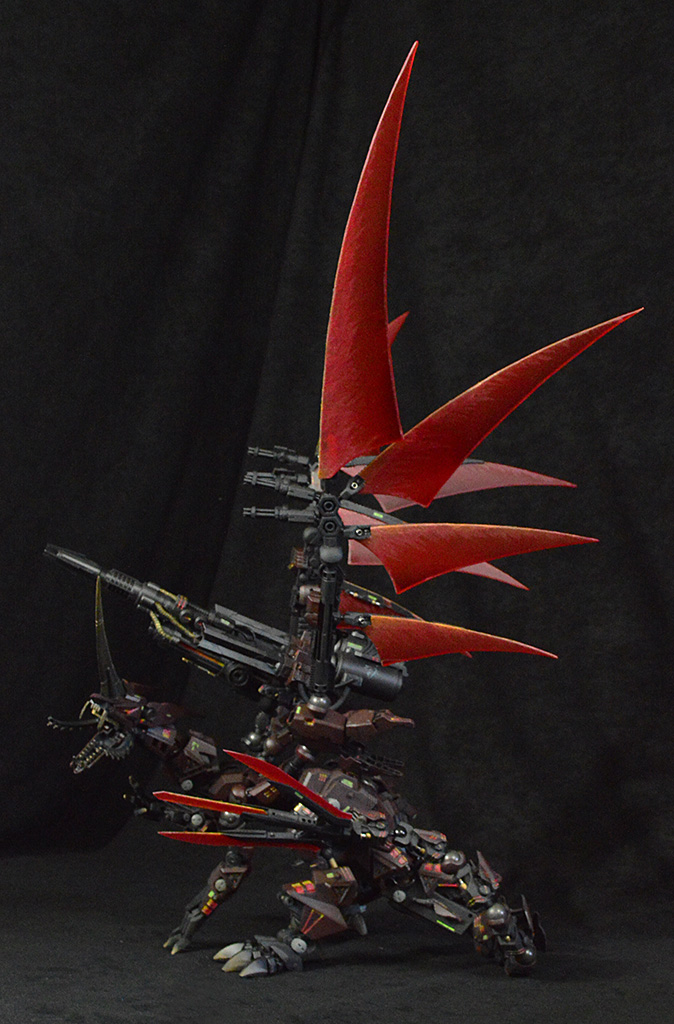
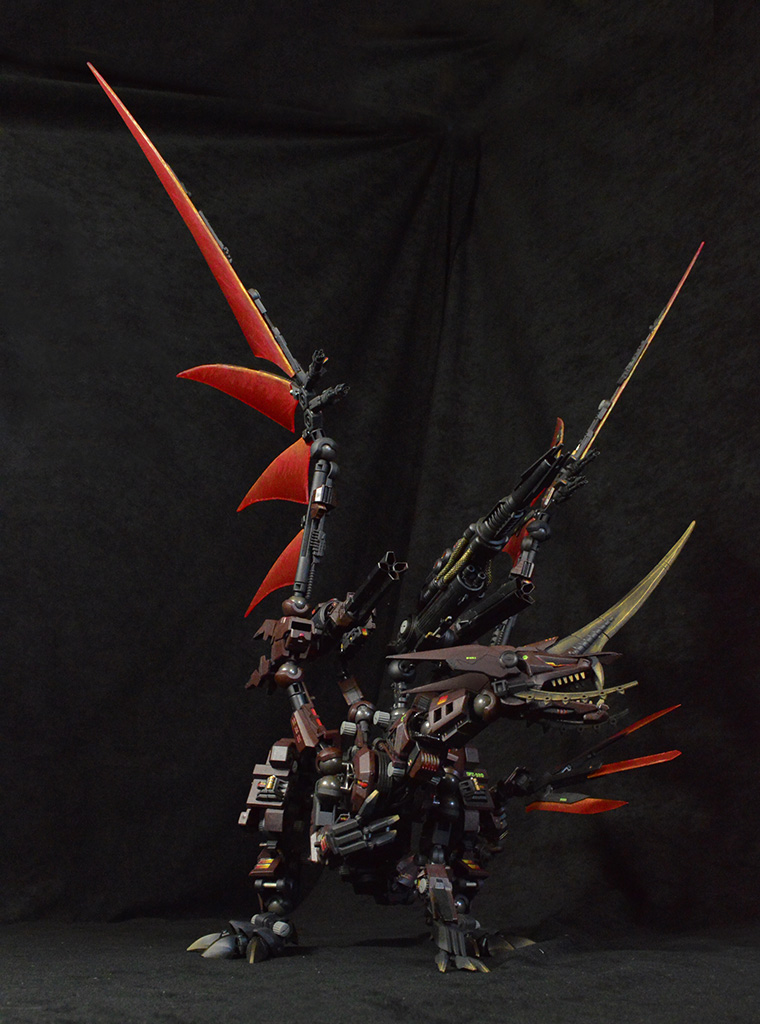
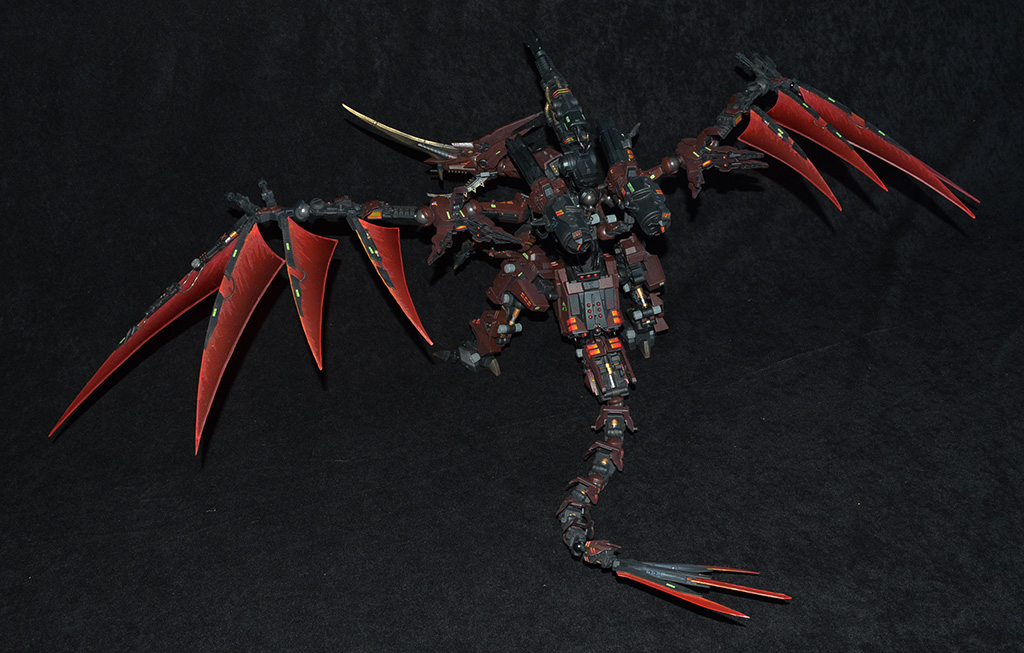
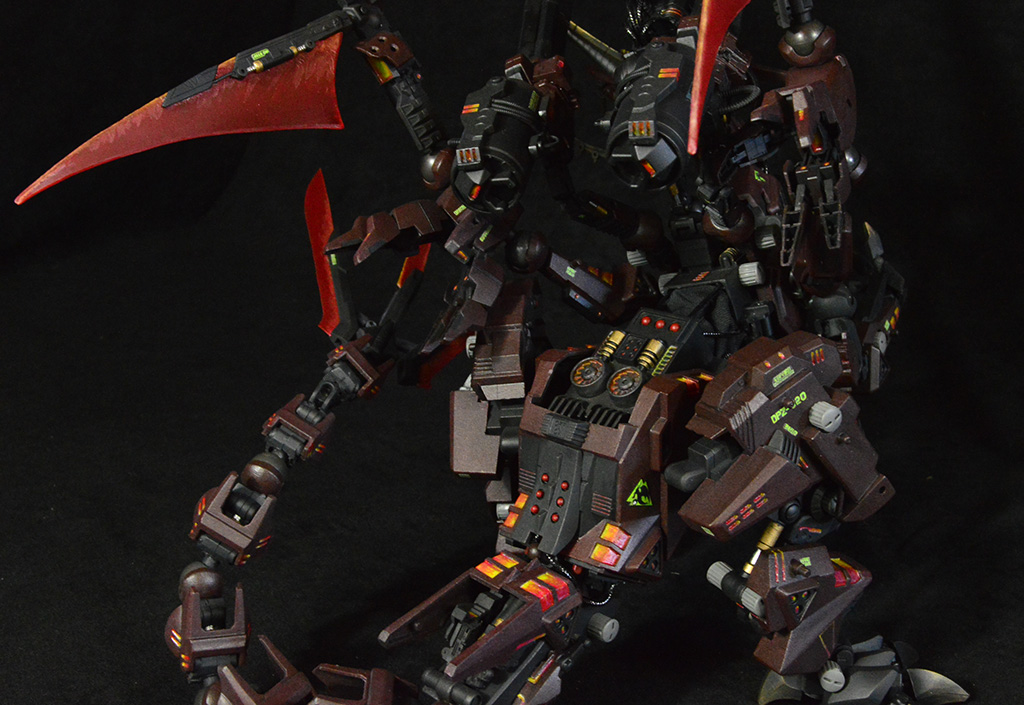
DPZ-320 GUNGYALADO Mk][ - "UMBRUS MORTIS"
This gallery provides an overview of my 10th commission custom. There are so many details on this custom that I feel I got lost in recording images of it. Dor some reason, it was the hardest build I've made to photograph in any lighting conditions or with any camera. I still have much to learn, but I hope that some of these images convey the complexity and the scale of this build... that wingspan is 48" at its maximum reach! Images #3 and #4 hold the wings straight up; the tip of the wing stretches 25" into the air.
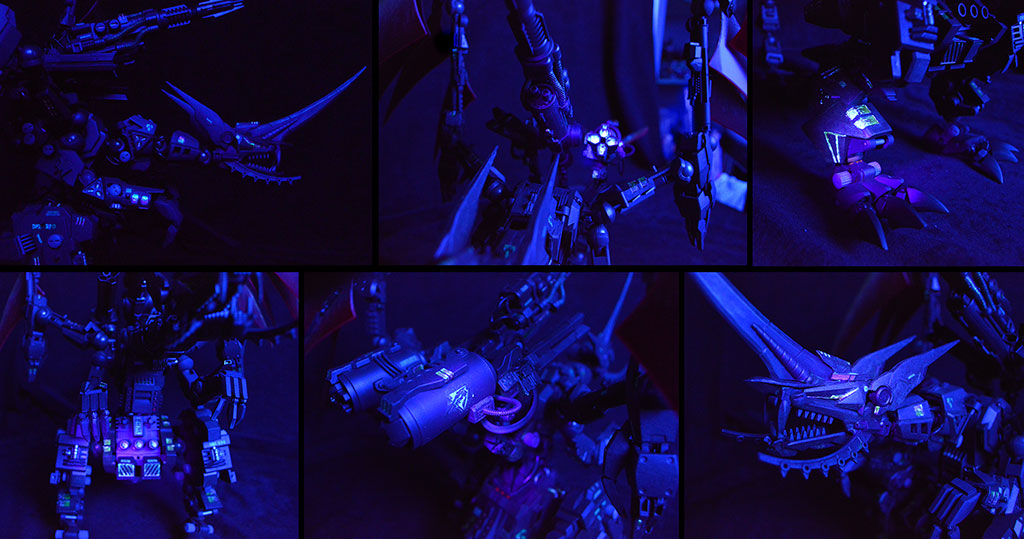
G3 (GUNGY GLOW GALLERY)
These images show the Gungyalado Mk][ while under black light. Images without lamps at all simply would not record, so I am working on simulating what the model actually looks like to the naked eye in pitch darkness.
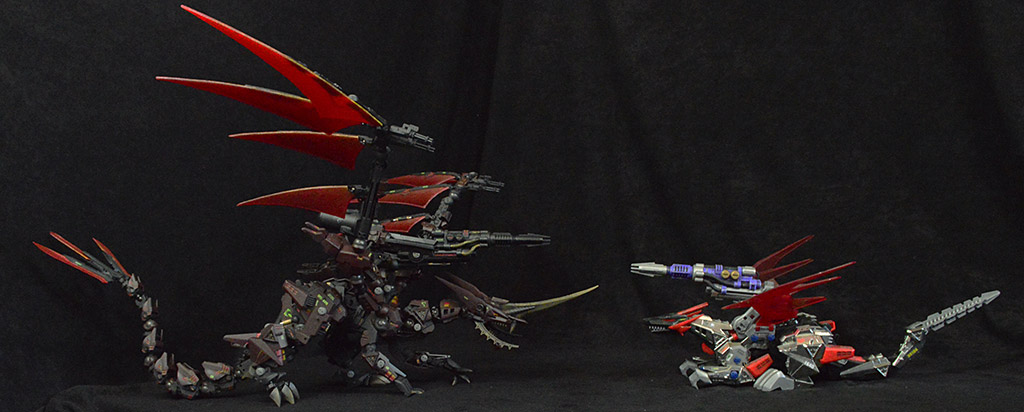
GUNGYALADO Mk][ vs. GUNGYALADO
Yes, I painted my Gungy way back in the day, and yes, that is an OJR. Sorry. When nose-to-nose with its source material, the G2 makes the OJR look like a juvenile of the same species. I think the G2 really did manage to hold on to some of the original aesthetics in the end.
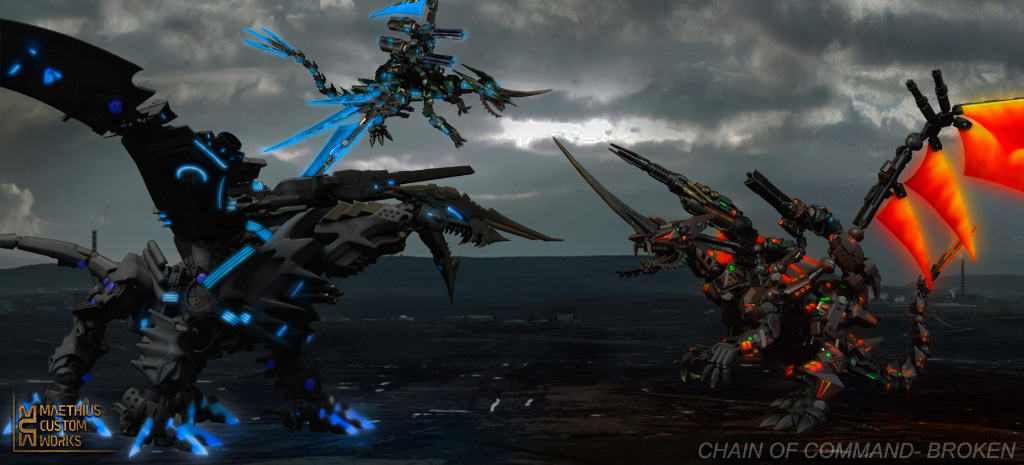
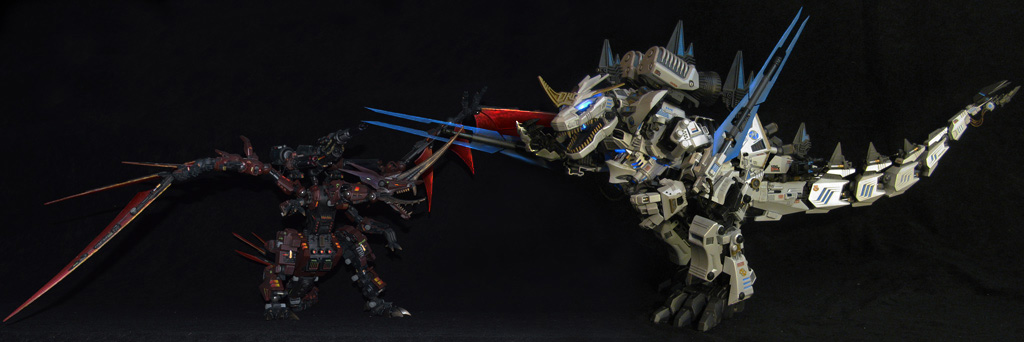
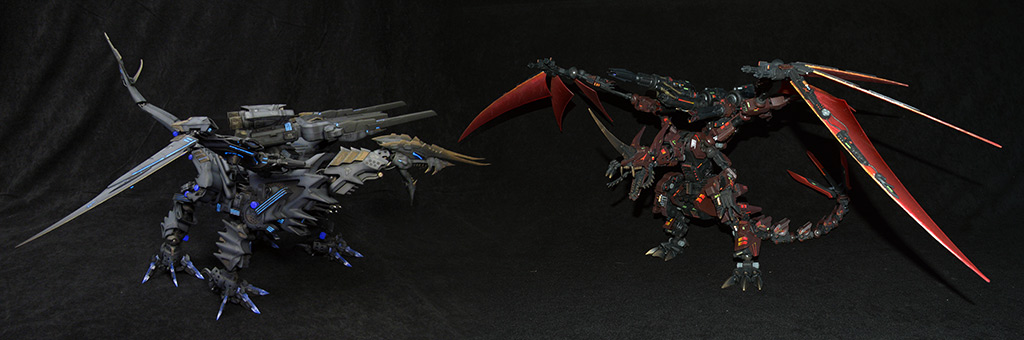
GUNGYALADO Mk][ vs. SUPREME KING GOJULAS
Possibly the only Zoid capable of standing against the Supreme King Gojulas in melee combat, the G2 might even have the right stuff to survive long enough to close to in-fighting range. Both machines are apex predators, both wield terrifying arsenals at range, and both are agile melee masters. In the end, SKG edges out the G2 in all categories, however.


WINGS: VARIATIONS ON A THEME
The original Gungy had serrated, clear red wings that were one piece. I wanted to have the same "energy wing" look, but I wanted them articulated. After Dreadmander, I couldn't take two steps back on that feature! But how to make articulate Salamanderd wings when I had just done that on the prior custom? I had cut the wings apart to create the dorsal fin of the Celestis Tenebris, and that build left me with only the "bones" for parts. I studied bat wings. Still, the wings were far too small for the new design, which was essentially double the dimensions of the original. I decided I could lenthen the wings by adding a shoulder joint and by placing the articulated booster at the elbow. I built the new shoulder out of discarded tail pieces, which also extended the classic look into the wings. I also found a home for the large, red elbow boxes by using them up to fill in the underside of the shoulders, which is actually very close to the same position. This ends up filling the gap and being a great nod to the OJR kit.


HIGH-CALIBER BONUS
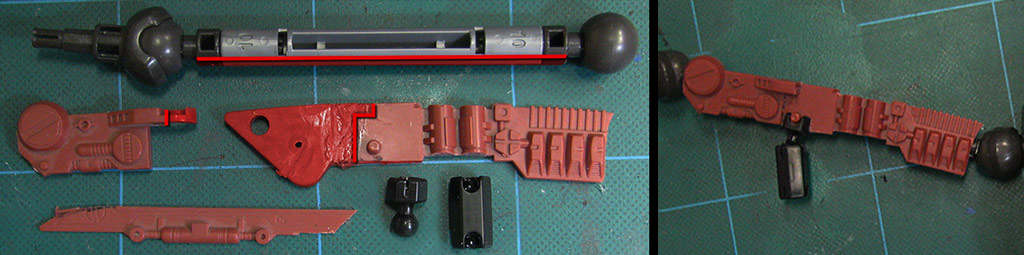
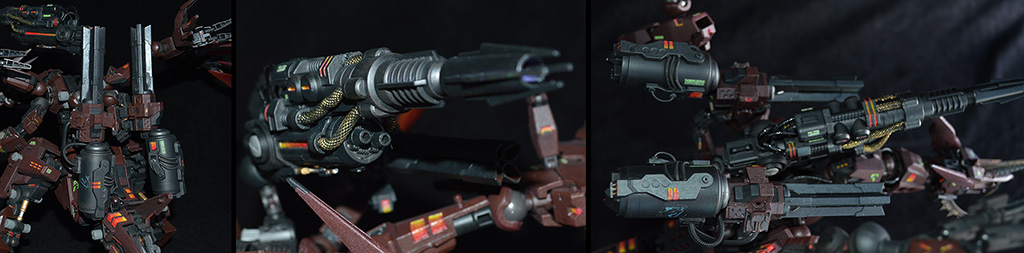
Ever since I started doing customs I have wanted to revamp this gun. I decided to do this because the original (which is broken and badly glued together), isn’t used on this custom. I wanted to do this piece for myself, but I included it for my client as a thank you bonus on this, my tenth custom. I peeled apart the pulse cannon and replaced the old two-cam armature with a new two-ball one. This gives the cannon a 360° arc of fire.
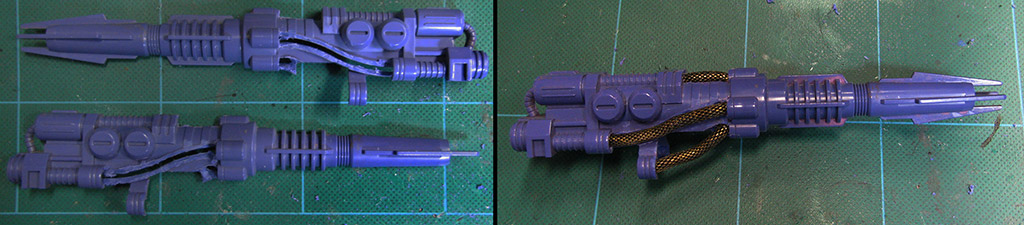
FROM PIPES TO CABLES
The big gun looks okay, and could look great if it were painted up a bit. I decided, instead, that I could replace the featureless, molded plastic hoses with thick necklace chains. I have wanted to do this for years!
ARMAMENT: UMBRA MORTIS
The Captain of the Guard, Umbra Mortis, carries a modernized upgrade to the original Gungyalado’s heavy weapon systems; The Pulse Cannon and Hypercharged Partlical Cannon.
GU-02 Pulse Cannon – torso mounted, 360° arc
Considered the primary weapon of the MkI, the pulse cannon pours out coalesced energy pulses capable of melting through 50mm of armor at a rate of 6 pulses per second. The weapon can maintain fire for almost 20 seconds before it requires cooling, but gunners can use it as a burst weapon indefinitely, taking down targets up to 10 kilometers away.
HCPC (Hyper-Charged Particle Cannon) – torso mounted, 360° arc
Essentially copied from the Deathsaurer, the original HCPC requires the G2 to brace before firing. The beam can cleave through a battleherd in a flash, collapse shields, and devastate a large city. Within 1 kilometer the beam can erase a Red Horn from existence, but at a range of 100 kilometers the spread can damage light vehicles, down aircraft, and kill infantry in a swath 200 meters wide. The beam will saw through a dozen Gojulas in seconds at close range, but takes five minutes to cool and fully recharge.
SIMPLICITY TO COMPLEXITY
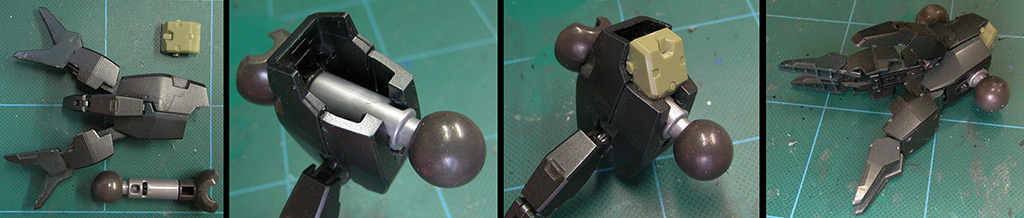
The last step I took in the Gungyalado journey was to modify the feet. For one thing, the Gil Dragon feet worked well… that is, they allowed it to stand up and were a pretty decent size. However, this is a super rare, rockin’ Zoid custom, and I didn’t want it to have solid block feet with no detail. The closer I got to finishing, the more I disliked the feet. I also have four Gil Vader feet left over from making Gil Kaiserin, so if I totally scrapped a pair I still had a set I could use. I cut off the claws first and looked at them with joints. They looked stumpy, awkward, and awful. I decided I knew I had to add toes between the foot and claws. After about an hour of experimentation, I came up with the above solution in frame #3.
TALONS FIT FOR A GUNGY
The pieces assembled into the new foot. Each toe has two joints, but the heel remains static as a point of strength for the entire model to rest upon. Where the original feet only represented two joints for the model's count, the new ones now total 14. I replaced the temporary "engine" in frame #3 with an actual thruster nozzel, as well. I thought about making it poseable, adding another joint, but I think strength is more important in the foot.
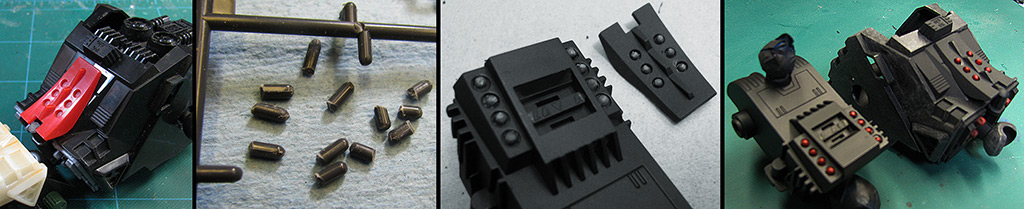
CAN'T LEAVE WELL ENOUGH ALONE
Missile tubes; many Zoids have them. Gungy has them. I thought the build needed real warheads. First I drilled out the sunken recesses into actual holes. I then clipped 14 nubs from the sprue tree and sanded them smooth. Plugging the holes looked really good, but painted the missiles looked great!


NON-ZOID PARTS
Gundam Astray
Forearms & joints, 35mm autocannons
Kotobukiya Heavy Weapon Unit MH02 Spiral Crasher
Wing exhaust armor, warheads
Kotobukiya Heavy Weapon Unit MH04 Grave Arms
Armatures
Kotobukiya Heavy Weapon Unit MH05 Mega-Slash Edge
Tail blade
Kotobukiya Heavy Weapon Unit MH08 Sentry Gun
HCP-GC & 35mm beam Gatlings
Kotobukiya MA-SX628 Fodio Drill Lance
Central horn structures
Bionicles
Mono-edge horns, joints, tail armor
Asoblocks
Various joints
Struxx
Torso joints, HCPC armature
Robart Hinges
Forward claw joints
Party Serving Tray
Wing blades
Pop Can Candy Dispenser
HCP-GC generators
1:6 Uzi (x2)
Tail detail
Styrene
Central horn, support posts
X-Wing (Cannon)
Tail central hydraulic piston

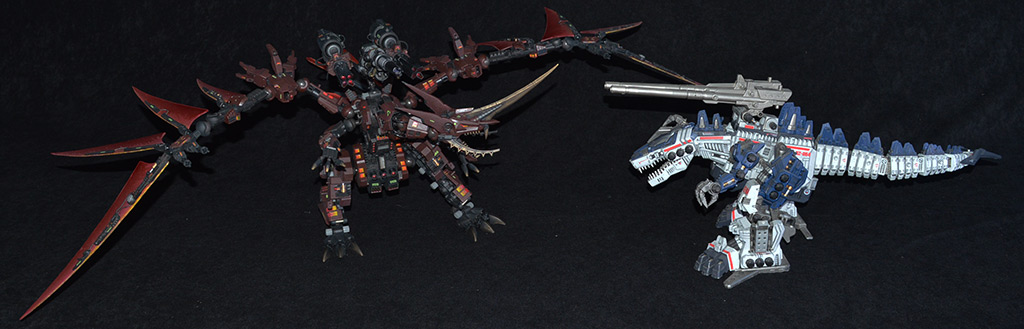
GUNGYALADO Mk][ vs. GOJULAS GIGA
These two beasts are now very similar in size. The Giga's buster cannons would offer it shallow consolation against the packed arsenal of the G2. Close in, the massive beam blades would absorb and mitigate so much damage that a shredded, smoldering Giga is virtually guarenteed.
GUNGYALADO Mk][ vs. GIL KAISERIN
A battle between these two would be a nailbiter. After analyzing their defenses, maneuverability, and firepower at all ranges I can say they are essentially at a draw. In the end, however, Gil Kaiserin could rely on the Tynon cannon to effectively erase her righ hand dragon... and much of the countryside.
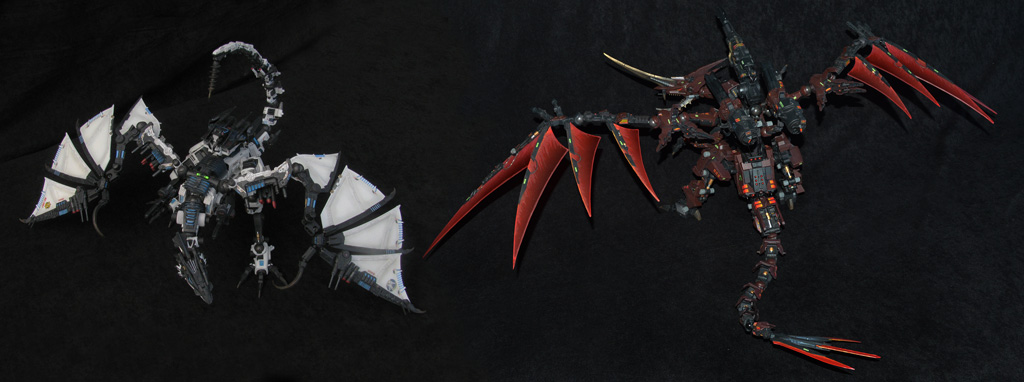
GUNGYALADO Mk][ vs. DEREADMANDER
Back to back builds, the two lethal fliers required me to construct articulated Salamander wings completely differently. I really wish I had both of these models at the same time, because the posing potential between them is staggering! If they encountered each other in battle the range advantage would definitely go to the Gungy, but the mid-range categoy might sway toward the Dreadmander's gravity cannons. Up close, there is no doubt, however... Dreadmander's pieces would litter the ground in seconds.