CAST
NJR King Gojulas
Base kit, head/neck armor
Gojulas Giga
Neck, head, fingers, caps
CP-07
Sword cannon housings
Buster Eagle (Cannons)
Sword cannon barrels
Jet Falcon
Blade crown
HMM Liger Zero Panzer
Missile pods, various detail pieces
Seismosaurus
Thigh armor, cockpit controls, collar panel
Gil Dragon
Collar structures, engine cowl hydraulics
Buster Eagle
Blade cannon barrels & power sockets, spinal sail joints
Neo-Blox (Generic Sprue)
Blade cannon muzzles, thruster bells
Hard Bear
Hip cowl joint armor
Brachio Zilla
Inner thigh details
NON-ZOID PARTS
Struxx
Joints & internal structures
Asoblocks
Joints & internal structures
Bionicles
Pauldron Joints & supports, toe knuckle joints
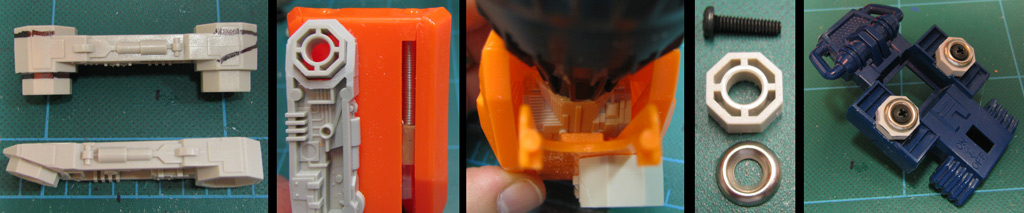
Detergent Caps (2)
Shoulder support structures
Paint Jar Cap
Tail base support
Warmachine Hyperion Colossal
Hyperion chest cannon
Kotobukiya MSG MP-02
Thumb armor, tail blade, inner thigh detail, blade cannon supports
Kotobukiya MSG Circle Mold 2 PIIIR
Tail post hole filler
Nerf Super Soaker
Primary booster housings
Robotix
Jaw cannon housing, various details, booster supports & engine bells,
GI Joe Howitzer
Lower leg structures
Gundam Arios
Tail Mace Flanges
AMT ERTL 1:350 scale Klingon Bird of Prey
Jaw cannon barrel lens
AMT ERTL 1:1300 scale Klingon Bird of Prey
Impact Mace hydraulic armor, torso/battery box void details
Digital Camera Electronics
Various detail pieces
Soft Soap Dispenser
Blade cannon barrels, Hyperion cannon bore, forehead sensor dome
Zip Tie
Shoulder maneuvering vernier slats
Steel Necklace Chain
Neck, head, and blade cannon power cables
Stainless Steel Chain
Hyperion and various power cables
Sheet Acrylic
Blade cannon blades
Hard Drive Vent Grill
Gunnery station enclosures
Dollar Tree Rubber Bat
Rubber Foot Treads
LocTite Adhesive Caps
Booster Bells
Remington Electric Razor Heads
Collar ventilation structures
Computer Capacitors
Detail pieces and hole-fillers
Light String Kit
Battery pack & micro LEDs
MANY Screws
Legs, spine, neck, tail, head, feet
Nuts, Bolts, and Cap Screws
Tail and battery compartment ballast/counterweights
Built for
THE FOOT PLAN
Yet another piece that made me nervous. The feet of the King Gojulas are huge. As in, each foot is roughly the size of a Canon Tortoise and weighs more! The SKG would seldom place its weight far ahead of center, so drilling the hole in the heel was the best way to allow strength and stability while keeping the toes free to flex. As the project progressed, I also realized that the feet would require stout traction pads to prevent this giant from doing some colossal splits. That would require creating bottom plates to adhere those treads to.
PLANNING A HEAD
My client was very intent on the SKG maintaining the silhouette of the KG in order to look like an evolution of that design as opposed to it being completely different but using some KG parts. Initially, I thought about using the original head and modifying it for a commander anda crew, but the shapes of the head and neck quickly became prohibitive. Also, as the rest of the model increased in size, the head looked more and more diminutive. I had suspected the need to swap for a Giga head early on, so I transferred my efforts to creating a two-man version of the Giga.
OLD NECK, NEW ARMOR
This “armored casing” had the added benefit of making cable-running through the neck really simple, and that was an important feature because the cables are used to fill in the gaps left by heavy articulation of the neck, and that requires the heavy articulation of those cables. By screwing the spinal armor of the KG to the spinal cap to the Giga’s neck, I could add in all the guides for cables and continue working on the interior of the neck itself without gluing it all closed.
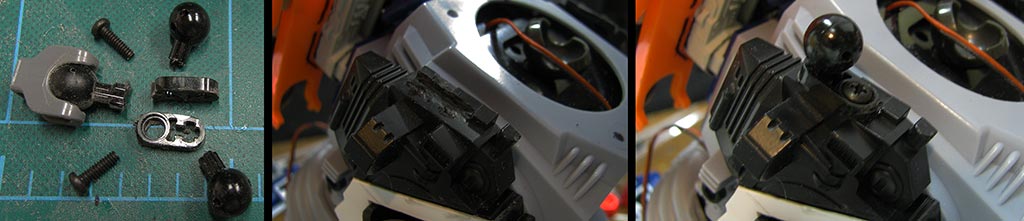
SADDLE-SORE SAIL
Sail #3 is the largest of the four, mounted precariously on the hip/tail shroud. On this build the shroud must adjust with the pose of the SKG, so it ends up a moving part on a moving part. I upgraded this joint to a NeoBlox; it is larger and more robust than an Asoblock but smaller than a Bionicle. I had to install the socket into the blue part, above, but that was tricky, since that piece is also a clip that holds the shroud together. The four parts fit together simultaneously to finish the shroud, so it will have to wait for final assembly before it can finally be glued together.
MISSILE COMMAND
The KG was designed to carry massive firepower in the forward arc. I felt that, as a frontline unit and the personal Zoid of the king, the SKG should take a more universal approach. I placed missile pods all around the frame that could be used to eliminate “soft” targets and thin out large battle herds without the SKG resorting to its heavy weaponry. As a leader, it should be able to back up and assist its own forces in a large battle. By giving the SKG a couple dozen missiles, it could potentially use fire and forget technology to offer that assistance while maintaining focus on its own mission.
SAILS IN ACTION
Test shots after the work on the sails was concluded. You can see how the joints allow the sails to compensate for the SKG’s stance and remain upright versus pointing constantly toward its head.
COVER YOUR REAR
I knew I wanted to fill in the massive gap left open by jointing the tail, and using the KG’s skullcap was a good start. After placing the boosters around it, however, I realized that there was more potential here. I assembled the dorsal missile launcher from my HMM Liger Zero Panzer and looked it over. By removing the support structures the unit could rest perfectly atop the KG skullcap. The booster cowl lowers perfectly against it, and the booster wrap around it while it retains its functionality.
MADE FOR EACH OTHER
The jointing for the Giga head came together, basically, with no modification. I decided not to add a joint at the base of the skull for a number of reasons, among them; 1) the neck was already growing too long due to the existing joints, and 2) the area was going to get very cramped and complicated with wiring, new cannon, jaw, and cables.
CAPABILITIES (Communications)
The Supreme King Gojulas is not designed merely as a battlefield brute and an impressive weapon platform, but the central communications facility for all Helic forces. Main antennas and transmitters are secured within its dorsal sails with redundant backup hardware peppering the massive slabs of armor, most tucked out of harm’s way to avoid damage when attacked. The SKG can uplink to a network of aerial units, such as the RPZ-212 Storm Heron, and coordinate all units in the theater. To facilitate the vast amount of data, the SKG maintains a TAC-COM officer, stationed in the head.
THE KAIJU TAKES SHAPE
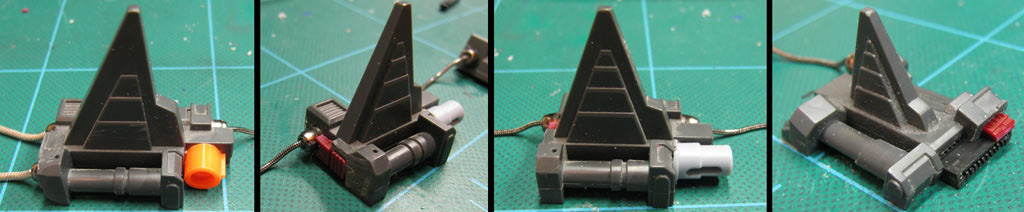
As the skull took shape it really began to look heavy and strong. I wanted to incorporate the iconic KG horn on the SKG, but was unsure if or how it should be modified. I never viewed it as a logical weapon (the KG is 20 meters too tall to use it on anything but an Ultrasaurus… which is a Helic Zoid in the first place!). Rather, I viewed it more as a symbol of authority and power, like the helmet blades on Gundam Zaku. I angled the horn and mounted it as the forefront of a crown of blades donated by a Jet Falcon. As the head progressed, I began finalizing details. I chopped up some Seismosaurus panels to create cockpit control surfaces to correct a problem I see in so many large Zoids; a cockpit that is essentially just an oversized box you can drop a pilot figure into and let it rattle around. Threading cables through and around the new armor was much easier than on other customs, but that was because so much effort when into the rest of the build. Very few customs could manage these thicker cables, and they look really incredible on the SKG.
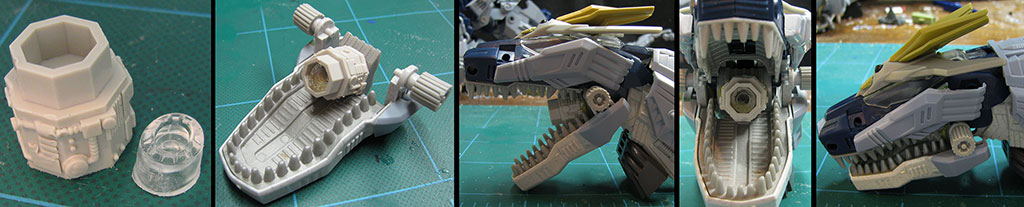
SHOOT MY MOUTH OFF
Ironically, Gojulas models are all touted as having super breath weapons, but none of them actually depict anything of a sort. Even the KG has only three little bumps for a weapon that is supposed to tear Deathsaurers to pieces. I wanted the SKG to open its mouth and reveal a gun that LOOKED the part. I took a small Robotix piece and cut it hollow, then fitted it against the plate at the back of the Giga’s throat. It can maintain a pleasing angle when the jaws are fully open, and it recesses against the roof of the mouth perfectly when the mouth is closed. I wanted it to light up, but to look really cool, too, so I took the lens from an old Klingon Bird of Prey photon torpedo tube and installed it in the end of the barrel. The result is a gun with the diameter of the Cannon Tortoise’s artillery that can completely hide inside the mouth of the SKG. BOOM!!!
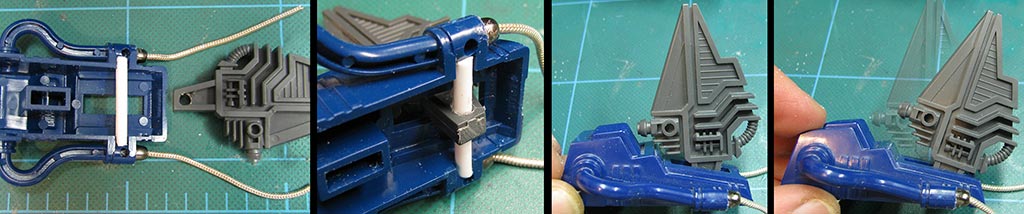
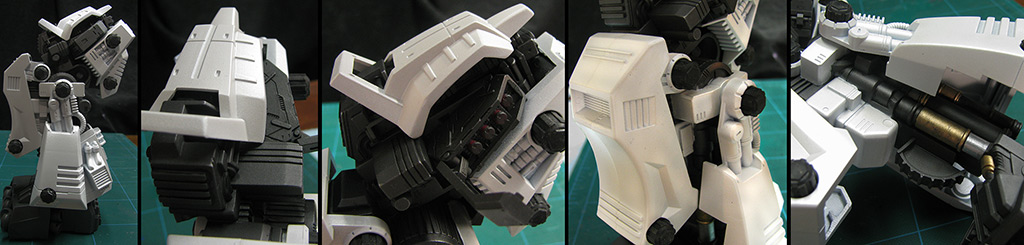
THE SKULL
I essentially cannibalized the KG’s neck to create armor to encase the Giga’s neck and stole the cheeks of the KG to armor and unify the look of the Giga head with the original head. I did the neck armor because the Giga neck truly needed to be bulked up to taper the silhouette of the broad torso with the new head. Knowing the stresses that would be placed on the neck for parts and posing, I not only glued but screwed the dorsal and ventral neck parts together. I cut out the vent holes in the armor so the cables could be seen passing through it, and then I mounted a dozen cable guides. In the end, I had essentially carved the original KG neck into a sleeve that could be snapped onto the Giga neck at need.
FINAL FOOTINGS
These pictures were shot to help determine one of the riskiest parts of the build; to articulate the knee or not. In the end it was decided that the poses would look great even with the original knee composition (which was fixed but with articulating armor that faked some movement), and that it wasn't worth the risk it would take to try and build a true knee joint. My fear was not that a decent joint could be created by hacking the intricate, hollow, backless leg parts, but that the joint would be under huge stress in addition to having to create a whole structure in addition. In order to make the lack of a knee more palatable, I decided to pack the inside of the leg with detail pieces.
MEGA-MASKING
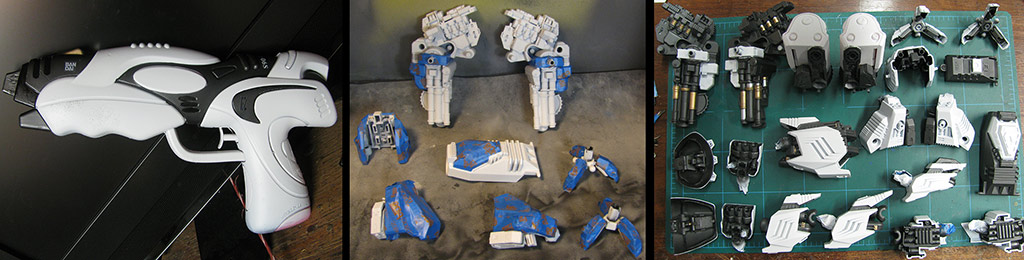
Before I jumped into dealing with final colors, I tested my scheme and techniques on a $1 squirt gun. I masked off the white portions of this gun first using Glad Press’n Seal wrap; a technique I had read about online that was MUCH cheaper than using Frisk film. While it worked very well, the warnings about the wrap leaving traces of residue were also proven true, so I resorted to 3M painter’s tape.
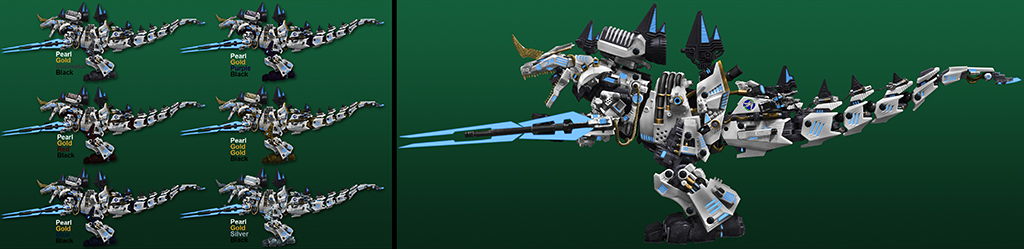
BASE COAT
After the gunmetal was sprayed, buffed, and sealed, I needed to re-apply masking in order to spray the remaining white primed pieces with pearl. In the future, I would reverse my paint order and apply the gunmetal directly on top of the masked pearl. Pictures do not do the final colors justice. The pearl gleams and the gunmetal contrasts spectacularly. In the last shot I began experimenting with the bronze hydraulic cylinders. After all of the other painting was finished, I would add the chrome silver to the pistons to make them gleam.
DECALS & DETAIL PAINT
Since I plan to have plenty of final detail shots in my gallery, I’ll just note here that the leg is the first piece I put together after the semi-gloss top coat. Though I think my skills are still lacking and I felt a bit rushed (and the glow paint is a monster to deal with, almost killing my airbrush for the blade-cannons alone), I think the final scheme turned out strikingly well. The dark metal gives it the brutal, heavy look required for a true battlefield juggernaut, while the pearl/gold lends it a regal appearance.
GALLERIES
REMAINING FLEXIBLE
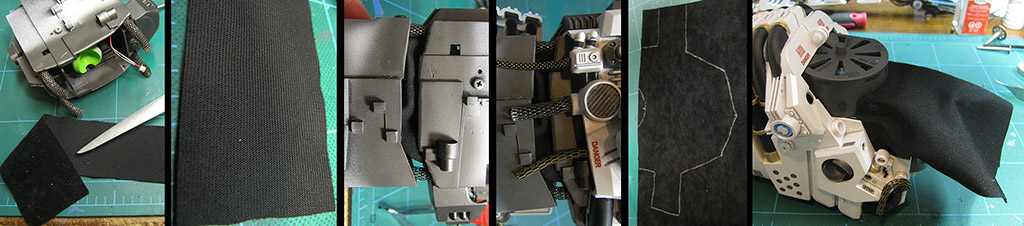
The gap at the tail was almost large enough to accommodate an Elephantus. To remedy this, I cut out weather shrouds from cloth and adhered them to one side of the gap, inside the body shell. This left the gasket hanging open on one end to slip the joint through. I then tucked the loose end and draped the chains over to complete the look. The toughest piece was the hip, which is glued both to the hip and the armored cowling that supports the engines.
REMAINING FLEXIBLE
One of the cosmetic problems I ran into on this build was also the last thing I resolved on the model. Articulating the torso left some huge gaps. On other builds I simply hung cables through those gaps and placed some little detail pieces to look at if you could see inside, but they didn’t really break up the silhouette. The SKG had HUGE gaps in the chest and at the hip/tail that were literally large enough for a Garius head to pass through.
CORPORATE INTERESTS
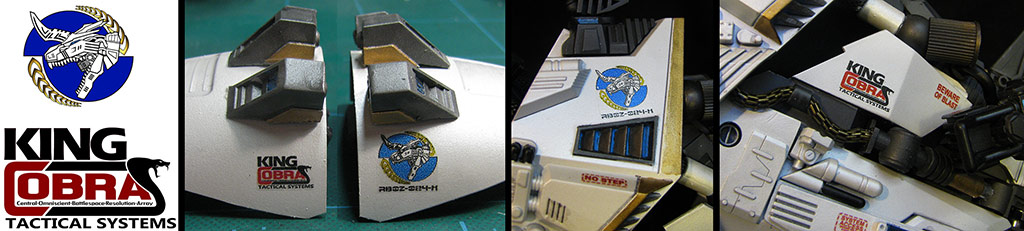
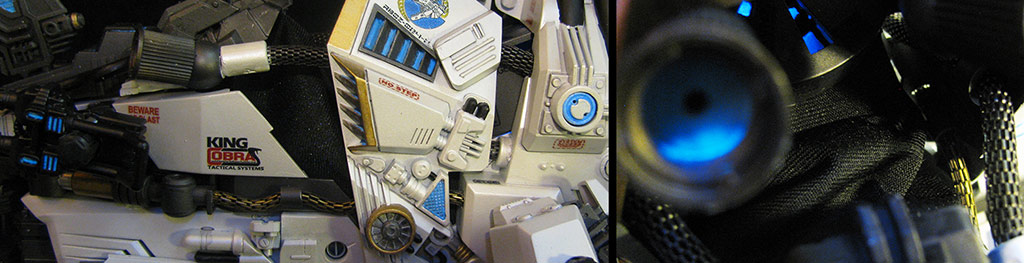
One of the details my client really wanted to see was the kind of corporate logos that are frequently displayed on real military weapon systems. In this case, I created a unit decal for the SKG and the decal for its tactical system. The two look pretty great on the big guy, and they really do give that “Raytheon” and “Boeing” look.
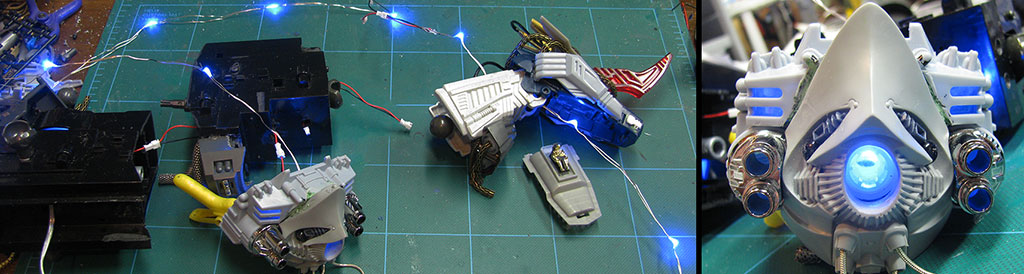
THAT HEALTHY GLOW
Once I saw how bright the lights were I had to frost the blue plastic lenses of the cannons. The final effect was exactly what I had hoped for, the only change I would be to modify the eye lenses to see the second pilot better. If I had more time, I would also have built lights into the arm-mounted cannons, but that is a real task I simply could not endeavor to do this round.
A PRIME CHALLENGE
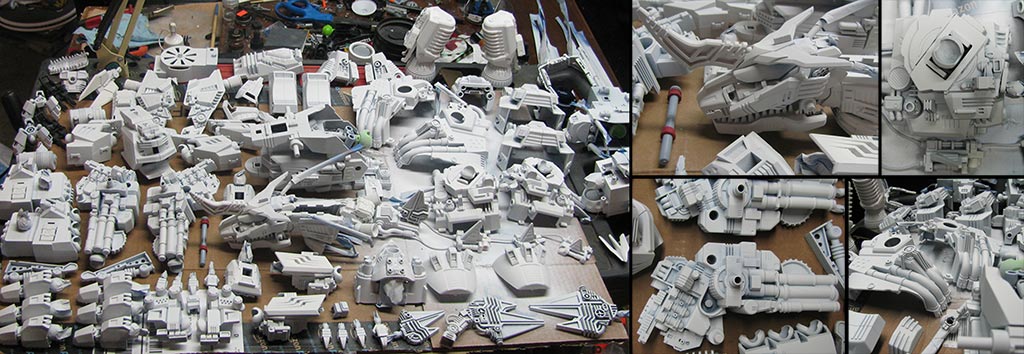
I make life hard on myself. I simply could not do a mere “pallet swap” of colors, painting the original blue as gunmetal and the original gray as pearl. With all the new parts and joints, it wasn’t going to look at all good. I was going to have to mask off almost 50% of the parts in the end. Even for the first step of applying white primer (this doubled as base color for the pearl, but also allowed a brighter shine to the buffed portions of the gunmetal Metalizer), I had to mask all of the ball joints (there were 41 of them, that is only because I could remove the finger joint pegs), the canopy, and all of the cables that could not be removed. If you look carefully in the images above, the one piece that was not primed out of the gate was the primary tail pin; I would have to wait until assembly to deal with that little snag where I painted the exposed portions in gold or chrome, making it a huge hydraulic piston.
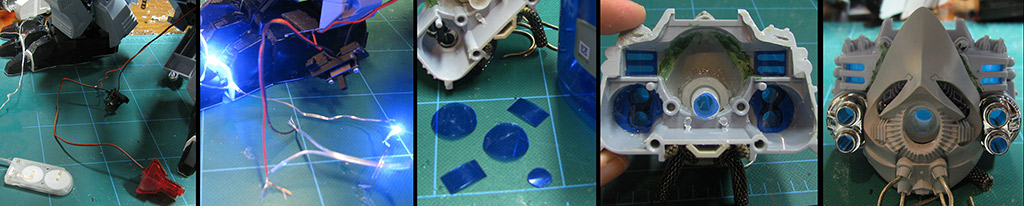
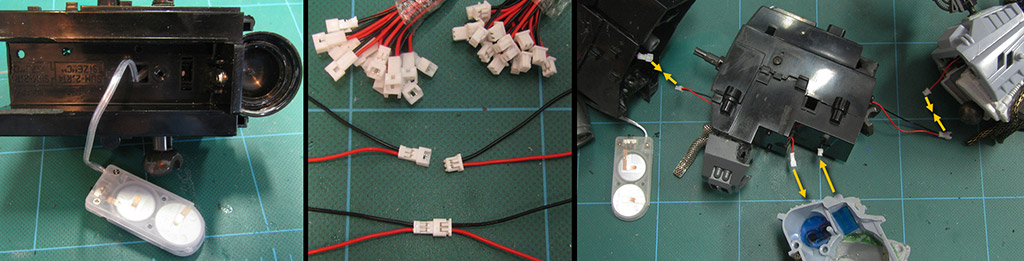
STRINGING THEM ALONG
The advantage of using a premade LED string is that the wiring is done for you. The disadvantage of using a premade LED string is that the wiring is done for you. I counted out lights, divided them into sections for the chest and head, and then wired them to my connectors. Each LED has a pair of 4” wires connecting it, and those lengths of wire are coated, making them a pain in the butt to splice. This requires some creative wire spooling/crunching to get into those close spaces.
SCHEMING
As my client and I were assembling ideas for the SKG model itself, we were also trying to determine how best to paint it. We both agreed right away that we wanted to avoid my typical semi-military look of subdued blues and grays that usually accompanied the Age of War Helic units. This was to be the personal Zoid of the king; it was to stand out in bold defiance, massive, regal, and unafraid of any opposition. At first I pictured a darker, meaner paint scheme of overall dark gray armor encasing an interior structure of brushed steel, probably with gold or platinum accents. But, though it looked very dark and brooding, it wasn’t regal. We went, instead, with a dark gunmetal gray structure encased in pearl-coated armor. The SKG would also include gold accents here and there, and half of the cables will be painted a dark brass or flat black for contrast.
A COUPLE COUPLERS
To make this work, I would have to divide the light string between each segment of the body. I threaded the string through a hole in the KG battery compartment, where the battery pack can be stored. Most importantly, the couplers allow me to take the torso of the SKG apart for painting.
ASSIMILATE THIS
I always thought the fan at Deathsaurer’s back was a bit too cute and convenient. Really, you’re going to use a giant office fan to suck in and weaponize particles? I found this piece long ago; a McDonalds’ top with perfect dimensions to replace Deathsaurer’s fan or, coincidentally, King Gojulas’ speaker. Well, I did the SKG custom first! The rethinking of the lighting system gave me a great opportunity to rout a couple of LEDs into the new particle assimilator system.
LIGHTEN UP
I had to put this part of the build off until I had made the last structural changes to the rest of the custom; you can’t run wire until you know what spaces are left to run it to. My initial plan was to use the original battery compartment in the tail and the original light switch in the KG’s back, but there were a few complications. While I could circumvent them, time was really starting to crunch me. I decided to acquire a pre-built light strip and battery unit, mod it, and incorporate it. I ended up cutting blue lenses for all lit areas out of a dish soap bottle.
CABLES
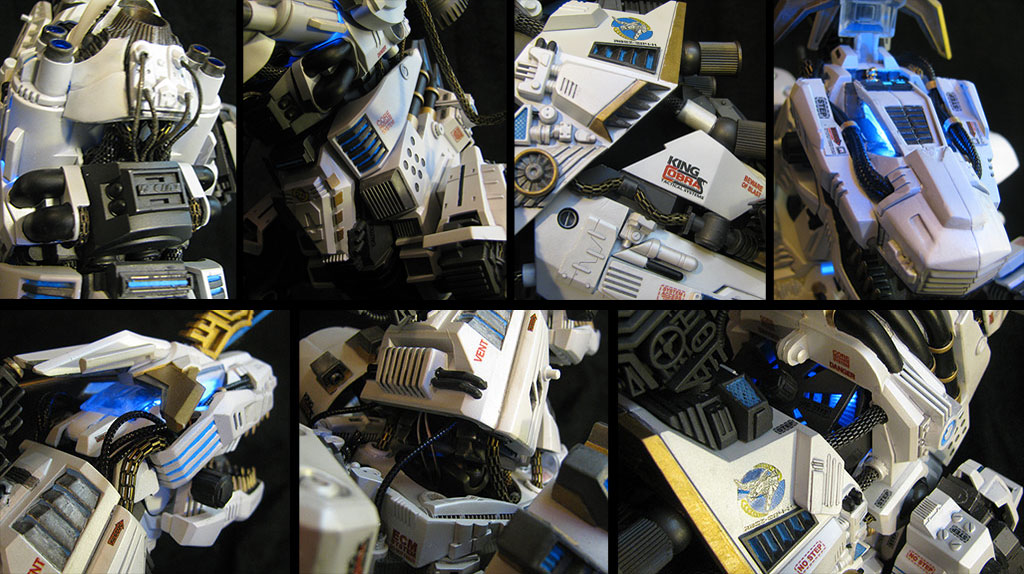
A feature I have used in my customs since I build Siobhan has been threading cables through a custom’s structure. Sometimes they are used to fill visual gaps around joints, other times they just add interest to the overall look of the model. The SKG, being such a huge build, does its measure of both. The first shots, above, feature the Hyperion cannon. You can see that the smaller cables are just hanging out for visual interest, but the huge cables feeding the gun from the chest compartment fill a large gap in the model’s construction. Both work well to make the gun look terribly powerful. The following two shots feature work on the SKG’s neck; almost all of these cables are to fill in that visual gap that opens when the head is craned around into different positions. The last pic shows cables threaded beneath and from the collar; these all fall under the visual interest banner, as they don’t so much fill in a space in the silhouette as add interest to the otherwise flat corners.
MORE WORK AFOOT
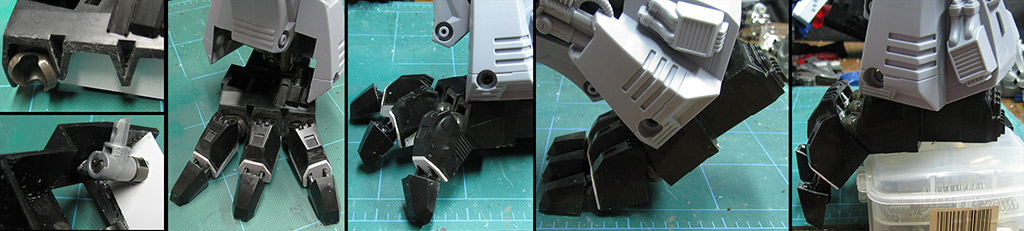
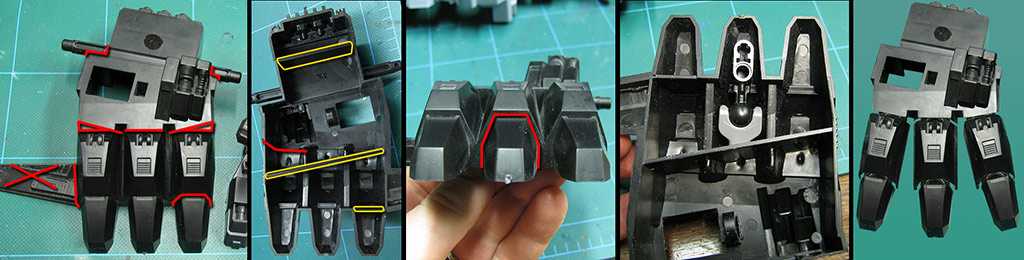
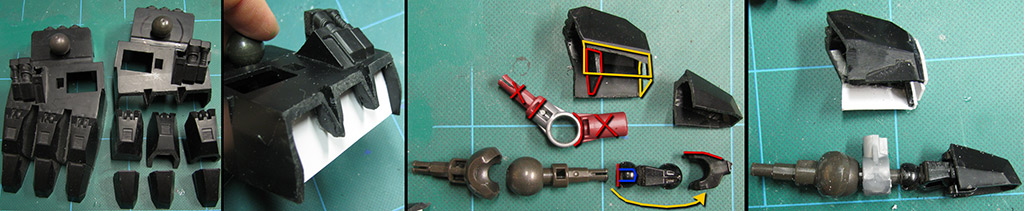
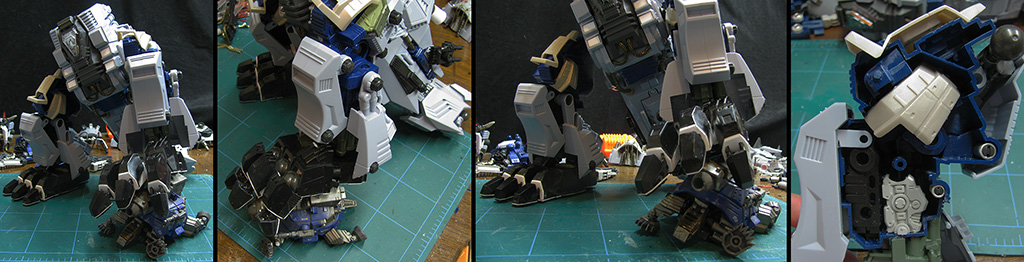
It’s so easy to destroy something without meaning to do it that, sometimes, you can spend too long thinking about it. I knew that it had to start somewhere, so I quickly sawed the toes off the foot in an effort to build up my courage. Well, more irreparable modifications made, I quickly worked to rectify the damage. First, I had to compensate for both the huge, open gaps in the foot’s architecture, as well as the oddly placed cross members cutting diagonally through the foot and ONE toe. I also needed to build my own support piece separating the foot from the toes, which was required aesthetically as well as being required to support the toe joints. My first rendition of the toe, seen in the fourth frame, fused a Struxx piece to an Asoblock, but that ended up not working out well. Has anyone else noted that the “hydraulic unit” on the top of the foot is molded directly from the foot of an Ultrasaurus? I don’t think I’ve seen it mentioned anywhere; a nice nod that the King Gojulas ascended from the classic Gojulas to supersede the Ultrasaurus, don’t you think?
TOE-JAMMIN’
In order to make each toe work right, I stuck with the Struxx joint as the first knuckle, but I replaced the Asoblock (essentially a double-sized Blox joint) with a Bionicle joint for the second knuckle. The Bionicle was more robust, filled in the space better, and provided more of a hinge, limiting the twisting of the toe tip. Due to the lack of internal structures, I carved up another Struxx piece to support and strengthen the internal mechanism. It should be noted here, as well, that each toe required extensive reconstruction, since the outer toes lacked inner walls, and the inner toe had no walls that touched the ground. Further, the middle toe required end pieces for strength and to mount the internal supports. The foot-end joint needed a structural Struxx piece fashioned securely inside the foot to give it a lot of strength.
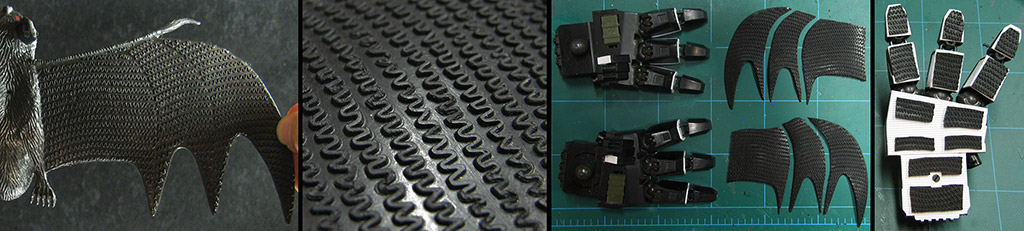
SKG’s GOT SOLE
With so much weight on the joints, especially in the legs, it was essential to provide some serious traction to prevent the SKG from doing the splits. Each foot of the SKG is covered by eight ribbed panels which are intended to be a base for a coating of rubberizing spray. To fill in some details, I used some large NeoBlox joint cups to create a pair of thrusters on the outside of each foot. These don’t interfere with the low-hanging armor around the ankle, and give an appearance of much greater function and a touch more speed and maneuverability. I filled in the gap left from trimming the original foot mechanism with a slatted vent cover. Finally, I covered the gaping hole build for the ankle joint mechanics with an armor plate from the HMM LZ Panzer Unit. The piece doesn’t fit 100%, but I loved the look of the gaps around it because they gave more of an industrial feel.
THE TREADMILL
The textured plastic sole of the foot was a lovely idea, and it made for visual interest and functional sense on a real SKG, but it wasn’t going to stop my model from sliding off the table. I needed something with a rubber tread to do the job, but where to find a tread that was strong, pliable, and easy to cut into the shapes required for those intricate feet? I was cleaning out some of my kids’ old toys when I came across the bat. This cheap, dollar store soft plastic (pretty sure real rubber is too pricey for them!) bat had wings large enough to supply enough tread for the SKG’s feet, thin enough to cut, thick enough to endure, and with an excellent texture on both sides to both stick to the floor and help adhere to the ribbed plastic soles.
The trick is that the tread had to be affixed in order to build the knees, but also had to be masked from paint or be rendered useless.
THE SKG GETS HIP
Another point of the model that required an extremely strong joint was the hip. I trimmed down a heavy piece of Struxx to wedge tightly into the top of the thigh armor and sealed it there with an unholy amount of adhesive. I knew more strength would be required, so I took a post cut from the shin armor and secured it into the position of the former top post; this piece fit perfectly against the side face of the blue thigh structure. At the point of the third image, above, I temporarily tacked it in its final position because I knew that, if I chose to create a knee joint, I would need to remove the entire thigh joint to cut the leg in half later. The new joint structure, however, could be permanently secured to the thigh armor, so I drove four screws through the armor, into the joint, and through the post below it.
NO PLAIN-JANE PIECES
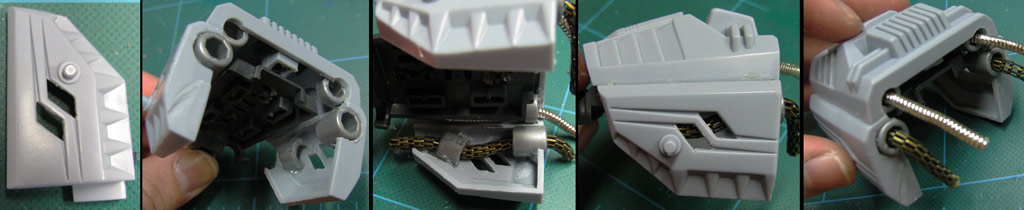
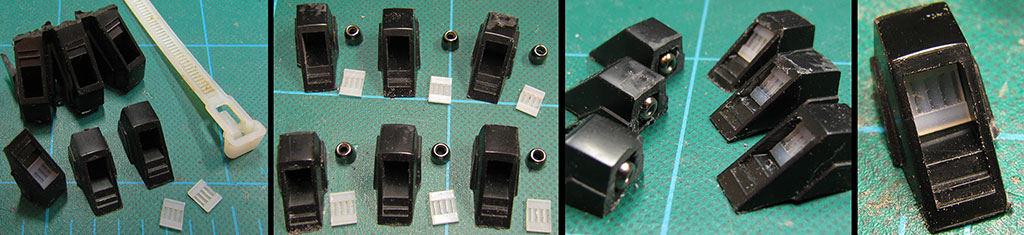
While the caps were the right size for the job, they were boring as hell. I looked around my piles of discarded bits and found two items I had set aside because they looked too darn useful; the original KG knuckles. I cut each knuckle block into three pieces and smoothed them up, then I clipped a large zip-tie into six small pieces that could be tucked neatly inside the hallow knuckles. The other side filled with steel beads; the ones I used to anchor cables on Gil Kaiserin. These pieces came together to form maneuvering thruster modules.
BOOSTING SAILS
For sail #2, between the boosters, I found a completely random bit in the Robotix parts lot I got from the thrift store that I couldn’t identify. It was some kind of arm with a hinge. One end fit PERFECTLY over the Grade-Up port as though it was designed for it! The other end, trimmed, fit into the sail’s socket PERFECTLY. This would allow the SKG’s owner to remove the boosters if he wanted to, and take the fin off its post and place it back onto the original socket. Simply amazing luck, there! At first the arm seemed really long to me, but once the boosters are in place it looks outstanding.
PAULDRON PIVOTS
To attach the pauldrons to the SKG, I decided on Bionicle joints for their size and flexibility. I razed the installation area on the tops of the shoulder pieces, and then secured the joints with LocTite and screws for strength.
A BIT OF A SIDE-STORY
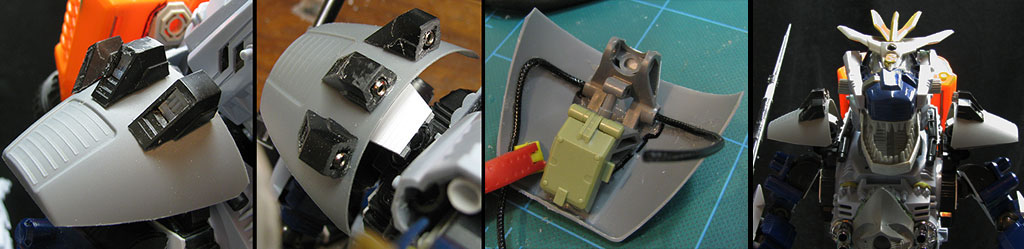
Once my thrusters were complete, I arrayed them across the top of the pauldrons. The thrusters would intake from the inside and thrust out over the pauldrons, aiding the SKG in making large dodges and turns as it fought in close quarters. I capped the back of the joint structure with slatboard, giving it an intake/vent appearance, and then flipped the pauldrons over. On the underside of each I mounted one of the LZ Panzer’s 5-shot missile pods for crowd control. Finally I ran some rayon cord around the underside of the pauldron to add a little more detail. In the end, they filled out nicely.
SWITCHING TACTICS
Sail #4 was formerly the power switch. I decided that one quick solution would be to insert a rod beneath the sail and just punch a hole through it to act as a hinge. This allowed the fin to rock back and forward, though it doesn’t have the same degree of motion as the other sails. In this position, I felt that greater movement wouldn’t be so visually impactful, anyway.
TAIL SAILS
The first three tail segments each had a sail that was a part of the awkward mechanism used to swing the whole appendage back and forth as the KG walked. I originally thought about just using the sails themselves, and trimming the mechanical parts from them, but in the end I realized they also added some bulk and functional-looking features to the tail as well. I trimmed off the joint parts of each piece, and then filled in gaps with bits that seemed appropriate. I also decided to string them all together with a power cable in the end.
LET’S NOT BE SPINELESS
After playing with stances for a bit, I turned my attention to another detail that would improve appearances and, story-wise, performance. This model is being built to stand upright like the original KG (what I refer to as “melee mode”) and lowered horizontally (what everyone refers to as “pursuit mode” but I like to think of as “cannon mode,” as this 700-ton behemoth isn’t pursuing anything… he’s blowing it up!) I decided that the spinal fins of the SKG should articulate to track not only these two modes but could also right themselves since the torso and tail sections are now capable of rotating on an axis. Further, I wanted a way to extend the #2 sail so that it could reach above the huge booster engines that completely obscured it.
The first picture, above, shows the mess the sails became in their default state just as a result of the torso and neck jointing. The second frame shows my initial plan for adding a ball joint to the sails down the back. I gathered my Asoblocks for this part of the project and set about carving/drilling. Sail #1 could not use the original socket because it would bump into the back of the crown of blades in cannon mode. You can see in the last two photos how the sail’s orientation is subtle but the orientation of the neck and boosters is near 45°.
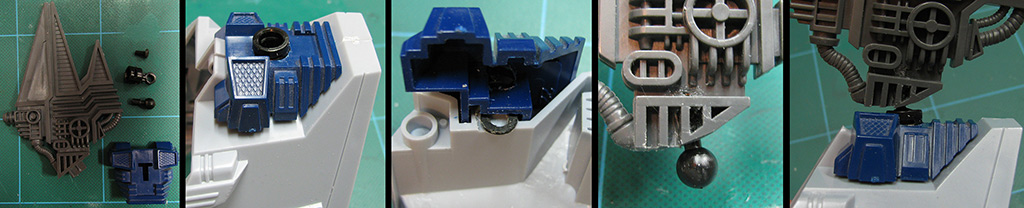
FINAL COLLAR RIG
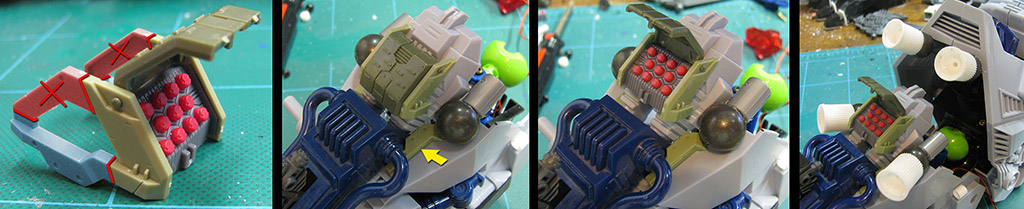
The adding of details to the collar wasn’t merely cosmetic; I needed to add support and form to hold it in place, and there wasn’t enough room to add both structural and cosmetic bits. The “black box” with the green LED is from a digital camera (too bad I couldn’t wire the light; it only appears lit due to ambience). I placed computer capacitors on either side of it to fill space and then the red Seismosaurus piece and a zip tie filled in the large opening across the back. Finally, I added cables to the Gil Dragon hinges that could run up into the neck or back down into the torso. The last shot shows the collar tucked neatly in place clearing the boosters by about 2mm.
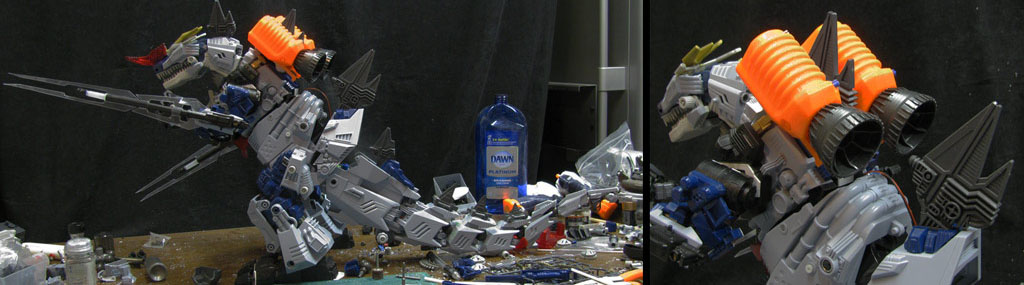
SKG GETS A BOOST
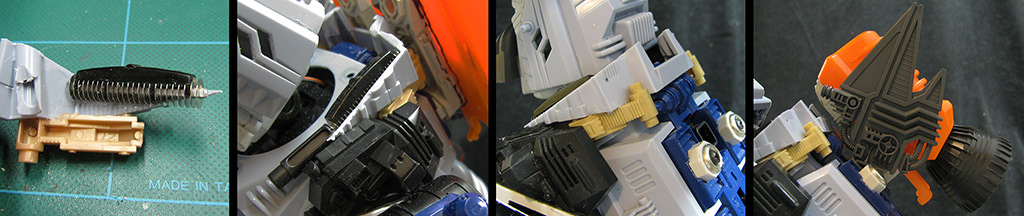
I had originally considered building some huge shoulder guns onto the SKG to continue the tradition we see in Gojulas Mk2 and Giga, but we really wanted to emphasize that this is the ultimate melee machine, and so I went a different route; let’s increase SKG’s ground speed! Only on a model of this size could I see using large parts from Nerf guns as material fodder. I used the pumps from a pair of Super Soaker Microburst as the housings for a pair of huge boosters. The engine bells were in my bag of Robotix parts; very detailed but also far too huge to use on any build other than the SKG. The bell and the housing are both supported by additional Robotix parts. The plastics used in Nerf and Robotix toys is very heavy and strong, but weights a lot, even for small pieces. To cut down on weight, I trimmed off every piece of plastic that cannot be seen once the model is assembled.
BOOSTER SUPPORTS
I carved the booster supports out of yet more Robotix bits, shaving them to the minimum. They are super strong and really well detailed. I filled the exposed gap in the booster housing with the wing-spring from my previous Gil Dragon custom. I was able to use some bits from the Robotix to construct some strong pegs to allow the boosters to be removed and re-attached. Could be handy for shipping!
DASH & SLASH
For as huge as the boosters looked on my desktop (together, they comprise more area than a Cannon Tortoise!) they seem appear diminutive on the SKG’s back! Still, they do appear to do what they need to do; give the SKG a massive burst of speed needed to charge into the enemy’s front lines. Once there, it will begin its deadly dance with swords longer than most entire Zoid kits! The boosters were placed to allow for the full articulation of the chest, neck, and shoulders. I did notice a few issues that needed resolution, however. 1) I needed to work my collar concept (shown temporarily tacked in place here) so that it would allow for the boosters and full cable movement, and 2) I needed to do something about the incredible disappearing sail; that #2 sail just about vanishes between the boosters.
RIG AROUND THE COLLAR
I saw the need for a kind of collar construct when I placed the KG armor bits on the neck; they filled in fine when the head was fully upright, but there was a huge gap at the back of the neck when the head bowed forward. The collar is made from the shavings of the chest cannon base, flipped around and dropped across the back. I filled in the space between the collar armor and the neck mechanics with a pair of dull (and very clean!) electric razor cartridges, which make for some great industrial vents. I used the wing articulation posts from Gil Dragon to lock the collar in place and extended the device to the front of the shoulders using the discarded posts from the KG’s feet. The device practically locks in place; a necessity for now, as the wiring has not been finalized, which will require the total disassembly of the torso. The last pic depicts sail #2 in place with a booster installed… you can see that only the tips show up at this point.
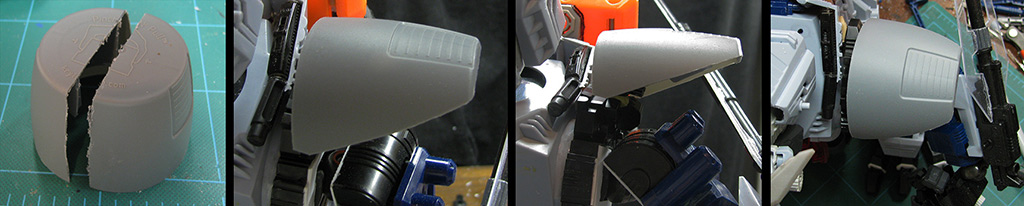
PROJECT: PAULDRONS
With so much completed, the silhouette was really coming together… and something big was missing. The body now tapered into a stout neck and thick head, but the long neck still seemed awkward somehow. I decided it was because the shoulders from the original KG appeared to be mounted too low now that the neck and head was longer. I wasn’t about to move them up, so I did the next best thing; I filled in that silhouette gap with a pair of huge pauldrons. The SKG is the only Zoid apart from the Iron Kong to actually possess pauldrons (the Ray Kong comes close, and the Hammer Rock’s are integrated). SKG is so large that the best solution I could find was in using a tapered Krylon paint can lid. I cut the lid in half and trimmed it into a more suitable shape that wouldn’t impair the articulation of the arms.


ACTION STAR
Aside from making the SKG big, aside from making it look unique among Zoids customs, apart from making it somehow still look like a King Gojulas, this colossus was to be first and foremost an action figure. It needed to be able to bend, twist, stretch, swing its swords about, slash with that tail, bite with those jaws, grip with those fingers, and find traction with those toes. If you can image Wolverine as a 700-ton 'mech (and a regal king in shining armor) you have a pretty good idea what we were gunning for. I feel, for the most part, that I accomplished this goal, and look forward to the next one.
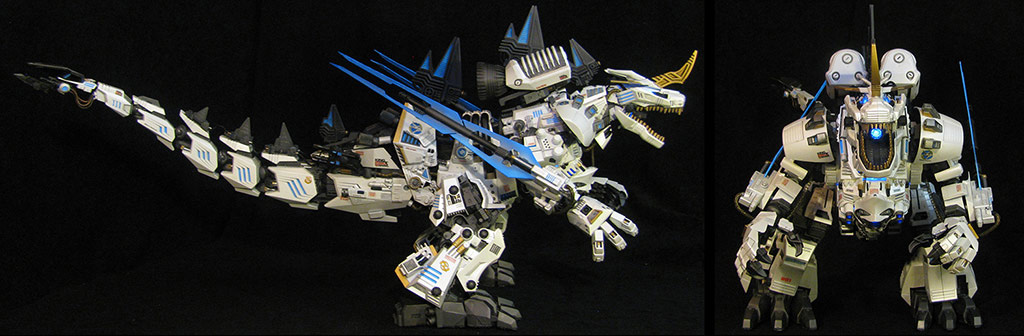
PRESENTING THE RBOZ-024-X SUPREME KING GOJULAS
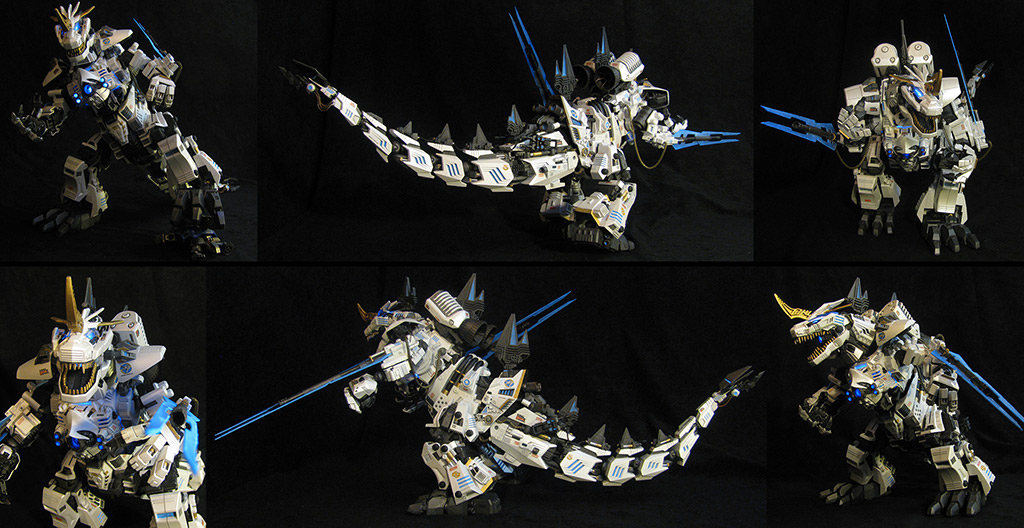
And so, after you have faithfully bored yourself out of your skull with this pair of monumentally long build pages, you have come, at last to the end. Mostly. What follows from here are a few brief galleries featuring this, my ultimate custom to date. It has been quite a journey to build, another journey just to photograph. It met and, in many cases, actually exceeded my model building abilities. As tough as it was, it is my hope to one day build another... perhaps even better. If so, I suppose I won't be able to call this one "Supreme" anymore, but I'm sure I'll think of something!
THE DETAILS
This build saw me step up my game in many aspects, and I am pleased with the outcome of not only the build as a whole, but many of the details that I incorporated into it. There was a lot of cosmetic cabling, gap filling, paint, and decal work (application and design) that were required. While there were many things I did not get to include, I did manage to touch on most of the big ones. If anyone would really like to see me surpass this build, track me down and let's talk!
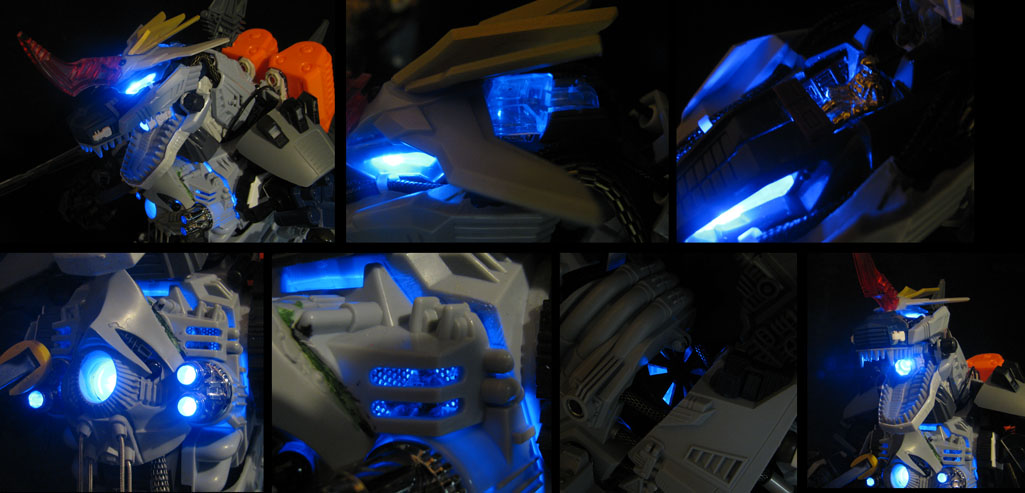
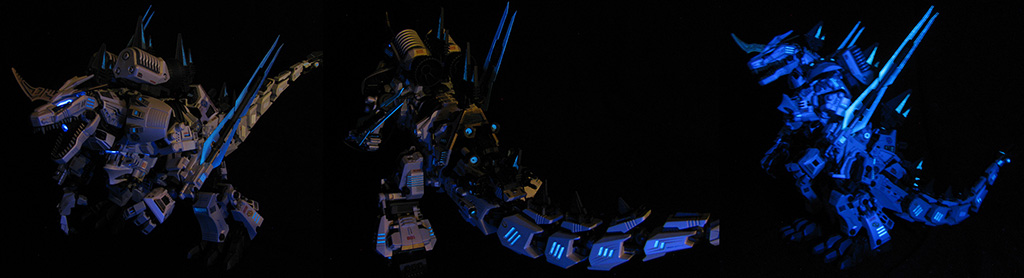
ALL THAT GLOWS
Like his mighty counterpart, GIl Kaiserin, the Supreme King Gojulas had to emanate power and awesomeness. It possesses both internal lighting and luminescent paint. I do wish I would have taken more "lights out" pictures, and more shots with just the black light on, but I am truly impressed with how well the effect turned out. If I could change one thing it would be to somehow find much finer pigment for the sake of my poor airbrush.
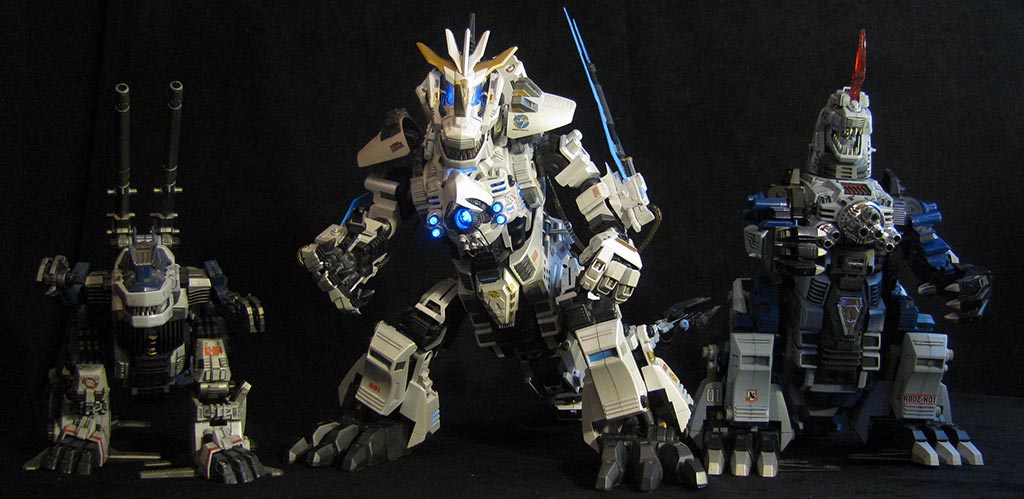
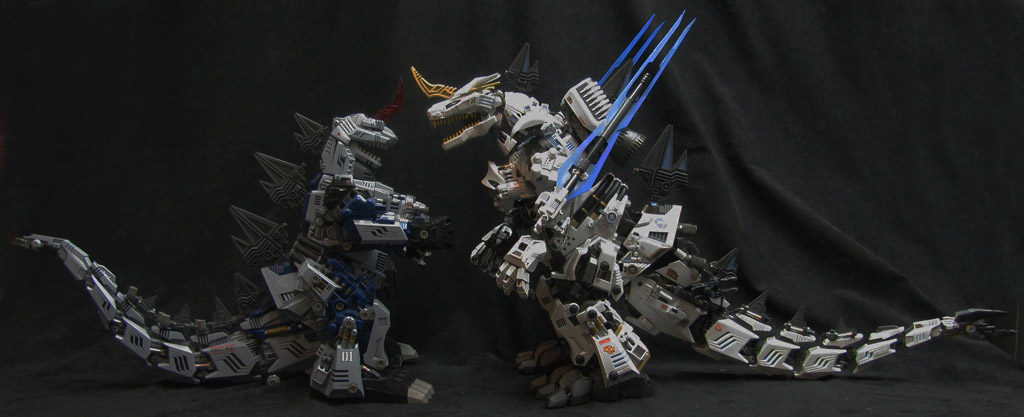
FATHER MEETS SON
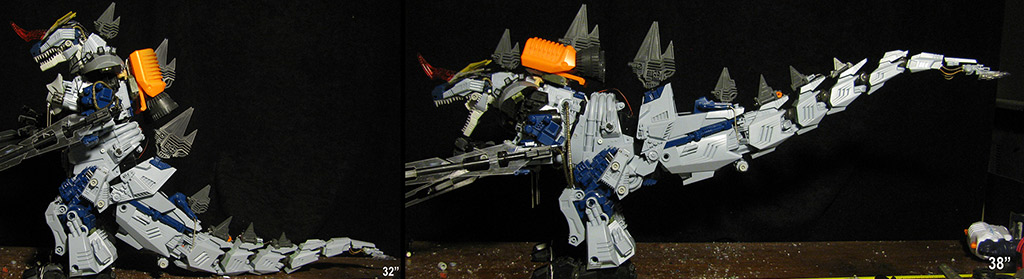
I wish I had take more shots of these two together! This photo was to help my client visualize the final product, but it is one of the best shots that really demonstrates the change in the SKG's profile over the KG. I love how the SKG leans into its opponent where the KG, intending to be puffing out its chest, seems to be withdrawing! Ironically, the chest on the SKG looks smaller and sleeker than the KG's but it is really an illusion supplied by the angle of the Hyperion cannon. The hands are larger, as are the jointed feet, making the overall scale increase more natural. The size of the head, too, seems to shrink the KG down a notch. You can also see just how huge those blades are.
GROWING THE FAMILY TREE
The technology tree for the Gojulas line gave me some headaches when coming up with the SKG's overall design. The King Gojulas was considered the ultimate Zoid... period. However, the Gojulas Giga was a later and was a technologically superior machine in many ways. They were Zoids from two different eras, and I wanted the SKG to incorporate both of them (I actually wanted to include some components of the original Gojulas, but it just wasn't meant to be, this time around). I feel it came together very well with the overall body of the KG, but with the head shape and knuckle armor of the Giga. Next time I'll go a bit more ambitiously to accommodate the OJR Gojulas as well.
SUPREME KING GOJULAS vs. ERADICATOR
As powerful an infighter and artillery machine as Eradicator is, it would be meat and drink for the SKG. The Supreme is literally designed to limit the Zi-metal vulnerability that the RiPPeR Cannon exploits, and without that advantage, the Eradicator is a dead acrocanthosaurus walking. Mind, up close the Eradicator is still capable of dealing some terribly damage, but it would have to get inside the arc of those cannon blades, and that isn't likely to happen.
SUPREME KING GOJULAS vs. LIDIER
My Descat is still in storage, but I figured the Lidier is approximately the same size... so I gave the SKG a little snack! In case you are wondering, yes, it literally is capable of gripping the Lidier in one hand, and, no, the Lidier is not helping suspend itself off the table by its tail. It is fully three inches off the table. If it WAS a Descat in the pic, the question would be, "could the KG killer face the SKG?" Truthfully, the winner between the two would be determined by who managed to pull the trigger on an accurate shot first. Despite all of the advances taken to create the SKG, the Descat's Gravity Bullet is still powerful enough to wreck it in one shot.
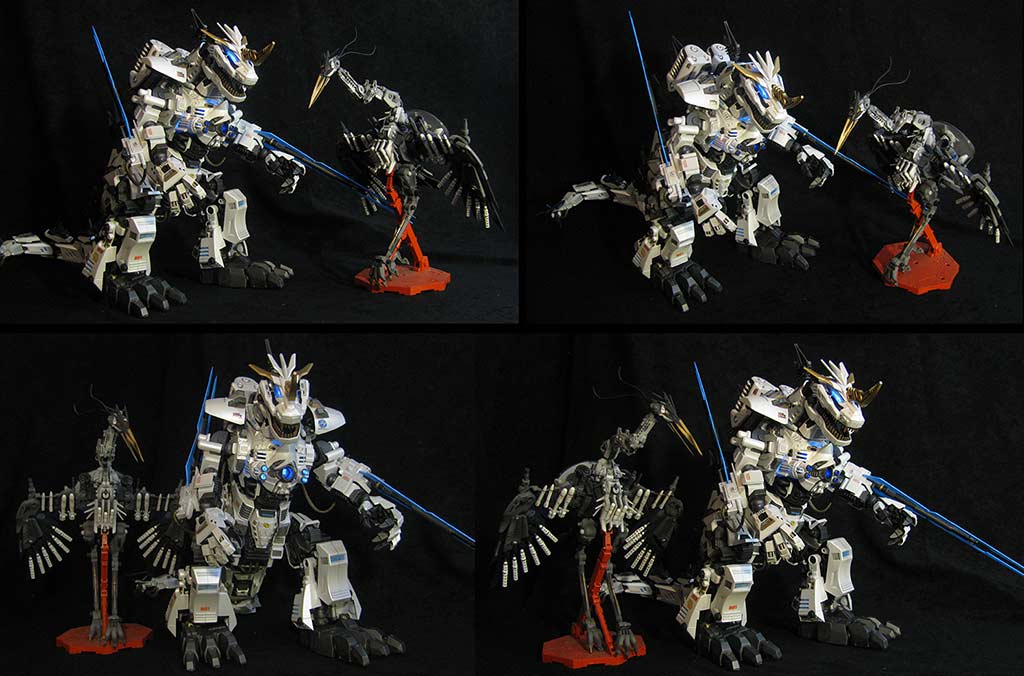
SUPREME KING GOJULAS vs. STORM HERON
While not really a versus matchup, it is quire remarkable that the Storm Heron is the only Zoid I own apart from the Ultrasaurus (which I had THAT photo!) that is capable of looking the SKG in the eye. This set looks like the king and his senior intelligence officer are in conference about the current situation, which would not be far from an accurate scenario for Age of War. After years of custom building, Storm Heron still holds up under scrutiny.
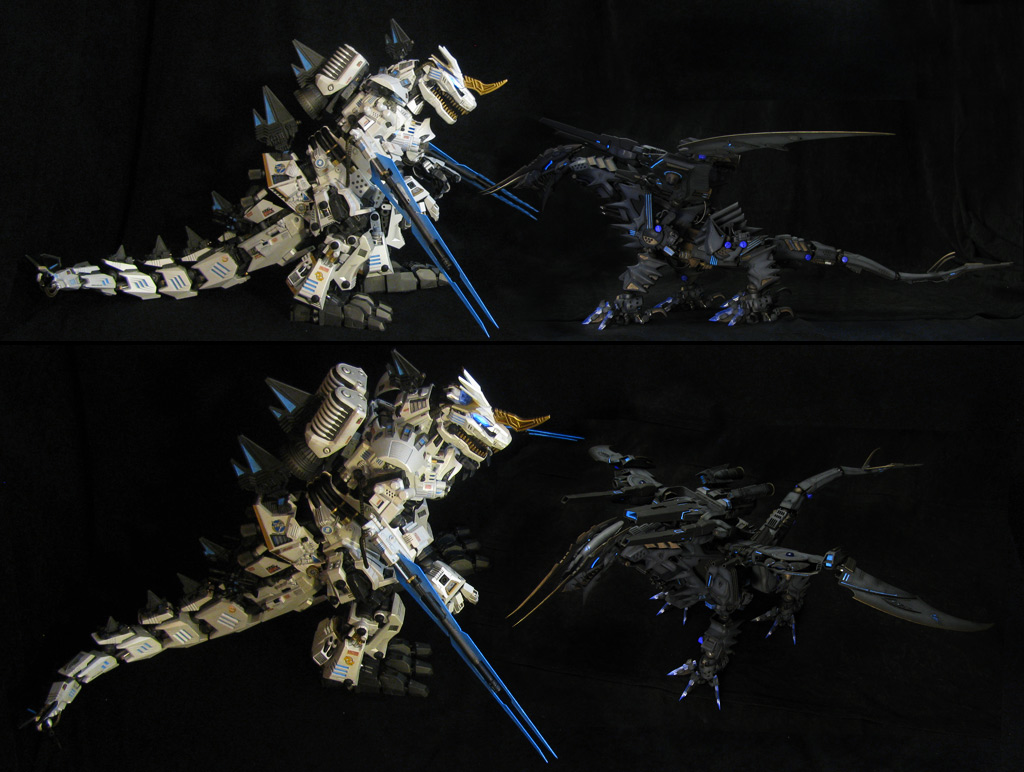
SUPREME KING GOJULAS vs. GIL DRAGON
So, it was several weeks after we had chosen a paint scheme that was very different for a Helic custom that was also regal that I realized where I had seen a very similar pallet before. Here we see the SKG standing over its unintended inspiration; Gil Dragon. The once mighty Gil, second largest Zoid kit ever produced, looks like a Hi-1000 windup next to the massive SKG. Still, if a fight were to break out between these two (despite depictions in a rather famous fan animation), the Gil would be quite capable of defeating the SKG... provided it could survive long enough to get those Gravity Cannons up close and personal.
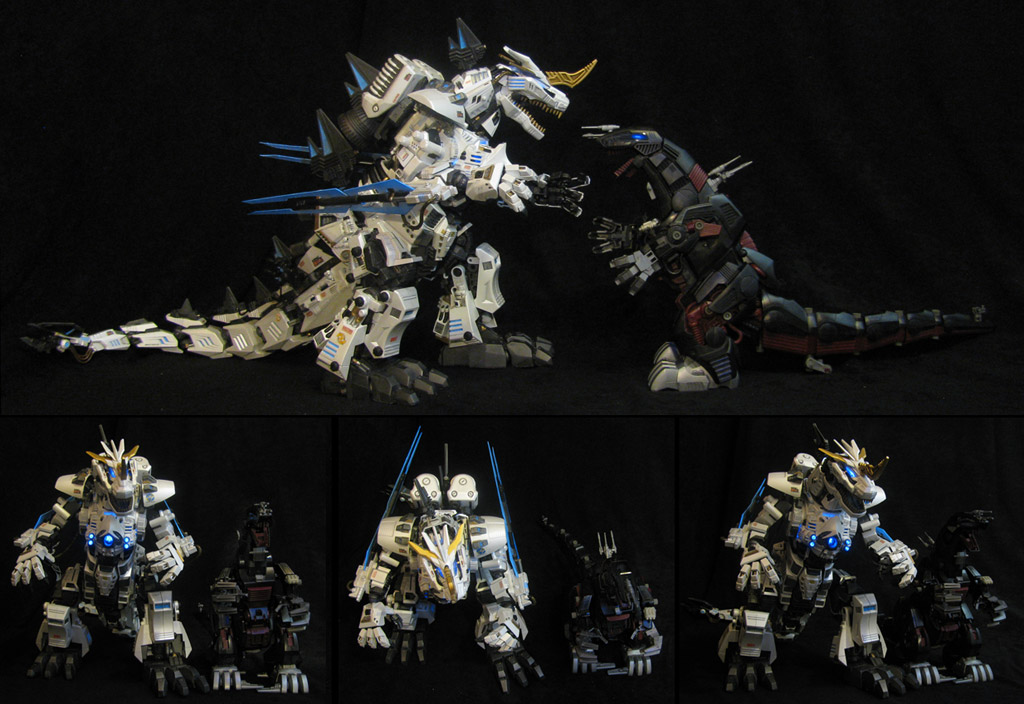
SUPREME KING GOJULAS vs. DEATHSAURER
You were great once, mighty Deathsaurer, but now you're just a little Zoid in a big Zoid's world! When I received a Deathsaurer in the mail that is slated for my next custom project, I had to build it and see it standing next to the SKG. This series of test shots also led me to use the SKG tromping a pair of Deathsaurers as my action shot for the profile portion of the Zoid's page. Were a fight to break out, the Deathsaurer wouldn't even reach the SKG.
SUPREME KING GOJULAS vs. GIL KAISERIN
You knew this one was coming! This Photo-chopping is about as close as I will get to seeing the two customs stand together, but based on the Gil Dragon's size they should be fairly close. Should the Supreme King Gojulas and the Gil Kaiserin clash, who would win? Well, there's a little bit of dirty dancing to consider with this one. Namely, Guylos supplied the technologies for the SKG's power plant, gravity weapons, and armor... even before the SKG was born, and before Helic's engineers took steps to improve upon the technologies they were given, Gil Kaiserin was designed to defeat Supreme. Kaiserin also has one of the best stealth suits on Zi, meaning even if the two monsters were to clash, she could end the SKG before he could detect her. In the final analysis, the fight goes to Gil Kaiserin at range, and with an extreme amount of luck, possibly even infighting.


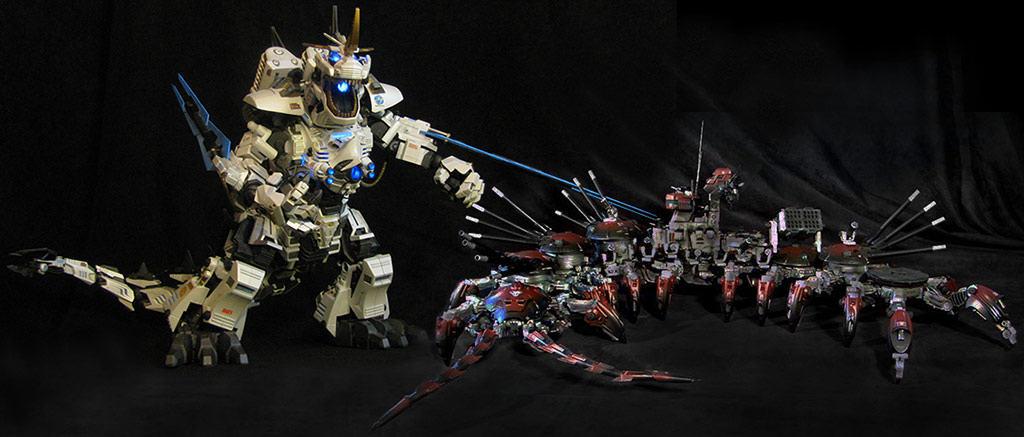
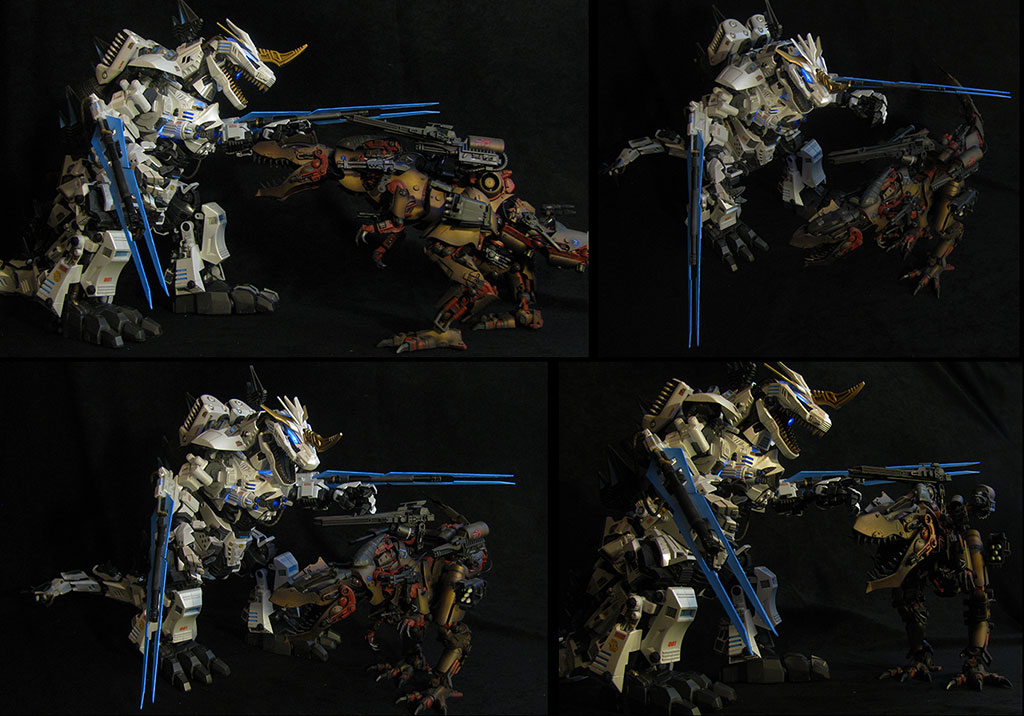
SUPREME KING GOJULAS vs. FUSILLADE
Would the mighty Supreme King Gojulas truly stomp the Zenevas champion, Fusillade, like the bug he is? The first factor to consider would be a ranged encounter. Fusillade's arsenal is comprised almost entirely of conventional weapons (albeit some deadly ones) that would have limited affect against the SKG's advanced armor and frame, but the sheer volume of fire could open the door to a lucky shot or two that could reduce the SKG's effectiveness. Still, it wouldn't be enough to destroy the SKG. Up close the Fusillade is actually a deadly opponent, but, again, the advanced tech behind the SKG's armor would almost certainly nullify any number of claw or bite attacks, and the Supreme King Gojulas could slice the centipede to pieces in seconds.
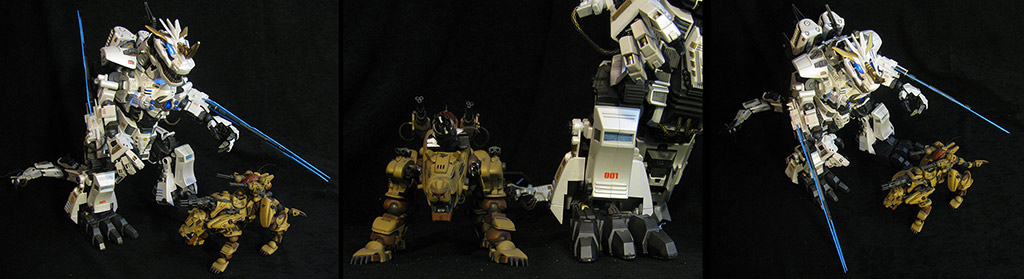
SUPREME KING GOJULAS vs. SIOBHAN
I wanted to include a few photos of the SKG near some of my less massive customs for comparison. The Siobhan is built from a heavily modified Gul Tiger, but the final size of the kit is almost that of a Zenebas Saber. Seeing the cat in front of the SKG gives an illusion of how much it dwarfs the Siobhan, but the photo in the middle is more true to life; the lioness is actually next to the SKG's foot, giving a realistic comparison.
CONCLUSION
The SKG is my largest build, ever, and a struggle beginning to end; I have never seen an articulated King Gojulas custom; now I know why! Would I do it again? Yep. Would it be better? Yep. What kind of customs would I make, if I had the resources? I would love to build a superior version using all I've learned. I would also love to smash two KG's together to see what comes out (King Ultrasaurus?) Of course someone would have to be willing to either foot the bill for that or ship me a pair of KG's!
FUN FACTS
Here is a glimpse at the kinds of resources the custom took to build:
Cans of white primer = 1 whole (double coverage) can
Tubes of Loctite Out-Door Adhesive = 2 full tubes
Jars of Testor’s Gunmetal Buffing Metalizer = 3.5
Lengths of cables/chains = 154” or 12.8 feet (390-ish cm) ... closest guess!
Build Time = 190 hours
Paint/Decal Time = 14 hours
Final Assembly Time = 4 hours
Custom Firsts:
First use of a micro-LED string
First use of spliced wiring
First inclusion of ballast weights
First use of a pearl coat
First use of acrylic sheeting
Largest & heaviest custom to date (shipping weight = 6.2 pounds)
