HISTORY
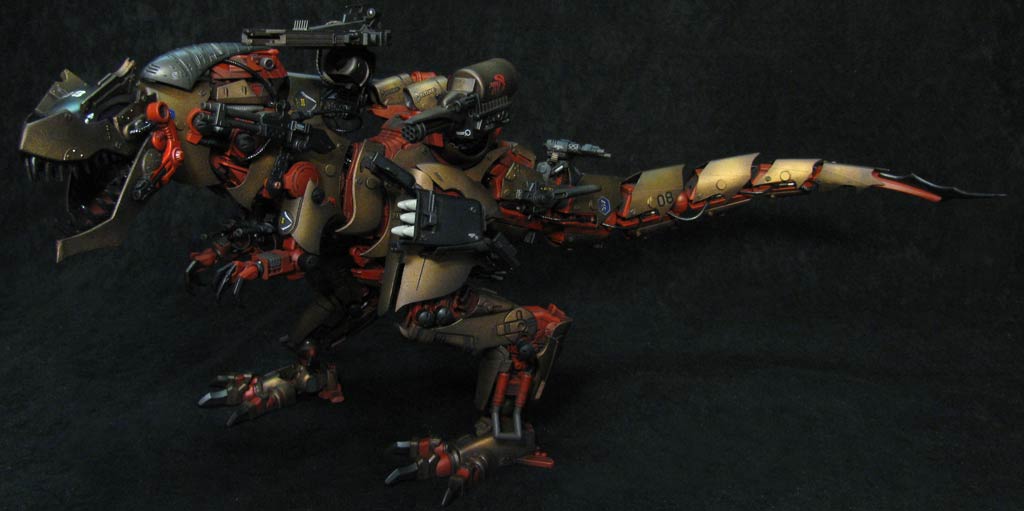
Prior to Helic and Zenebas' clashes on the continent of Ayeri the Braedurin Empire was well on its way to dominating that land mass. Zenebas' insistance that the younger power bow to their forces and aid in the destruction of Helic drew Braedurin into the war... and they brought with them the terrifying technology known as the RiPPeR (Reactionary Particle Projectile Rail) Cannon. While smaller versions of this weapon were disturbingly common, the version every pilot now fears was borne onto the field on the backs of these monstrous machines. Braedurin needed a new unit to carry the valuable gun; something packing enough power to use it, the strength to deploy it at speed, and durable enough to protect the weapon through extended battles. The result of their extensive R&D combined features of several of the most effective combat chassis known; the power, strength and agility of the Energy Liger carried upon the strong, agile legs of the Salamander. With some heavy modification they created a Zoid with the size of a Gojulas Giga, the maneuverability of an Aero Saurer, the firepower of a Dark Horn, and the power generagion capabilities of a Berzerk Fuhrer.
DEFENSES (Armor)
Braedurin is known for having perfected many technologies, making any of their units far more threatening than they first appear. The Eradicator has excellent armor; a light yet strong compound that combines superior heat dispersion with a semi-rigid element to absorb, reduce, and redirect kinetic forces. Each piece is also free-floating, shock-dampened, and insulated to offer some resistance to energy surge and EMP based weapons, as well as reducing the machine’s ambient noise and heat signature. The armor plates are secured over an already reinforced structural assembly akin to those used by Helic and Zenebas the past century.
CAPABILITIES (Performance)
The primary purpose of the Eradicator design was to produce a strong, fast, agile weapon platform. Despite its great size and mass, the XZ-336 cruises at a running speed of 190 KPH due to its ample power supply and massive stride. The legs and body are built with Magnesser-enhanced, armored jointing, making the Eradicator a very slippery devil, able to slide and dodge about with terrifying ease. It’s strong, broad talons assist it in clawing across rough terrain and compensate for severe angles, as well. Pursuit thrusters mounted on the hips and undercarriage ramps the top speed of the XZ-336 Eradicator up to 240 KPH, greatly exceeding that of many “fast” attack Zoids such as the Helcat and contending with more modern machines such as Geno Saurer. It can maintain this speed for durations exceeding 30 minutes, but sustained high run speeds can put the joints and some structures at risk. Generally this speed is used for small bursts to take enemies by surprise. Further, the lower, third engine is vector adjustable, rotating by 45° with 5° of vertical adjustment to aid in dauntingly deft maneuvers. At the front of this module is an advanced ground sensor suit that helps the Eradicator blaze over even extremely rough terrain and target close-in foes. With a streamline shape, the XZ-336 can also swim like a crocodile at speeds up to 10 knots.
ARMAMENT
The ZX-336 carries a daunting variety of lethal weaponry to protect its precious cargo of high ranking field officers and advanced technology. The chassis is armed with a balance of melee, close-in, medium, long, and tactical ranged weaponry rather than putting all of its eggs in one basket. This may weaken it in specific roles, but it makes for a very stable and trustworthy platform. Of course its ability to vaporize virtually any opponent in a single shot is a considerable consideration for any foe seeking to engage this massive theropod in battle.
“War-Storm” 100mm Gatling Cannon – left torso side-mount, forward & rear arcs, 45° axial rotation, 360° vertical arc
Braedurin R&D engineers have long studied the common and efficient Gatling-style cannon, seeking to build the ideal optimized battlefield weapon. The War-Storm was designed to be the best balanced weapon for the XZ-336 Eradicator, complimenting and supplementing the other systems on the platform. The War-Storm is a gas-operated cyclic cannon capable of firing a single round, 6-round bursts, or pouring out 20 rounds per second until its 4,000 round capacity magazine runs dry. Each round is micro-fin stabilized with a kill range of 9 kilometers and a hardened “mag-neutral” Zi-metal kinetic energy penetrator atop a fraction-second delay vaporizing explosive core. The “mag-neutral” aspect is designed to allow the shells to fire through the Eradicator’s own Magnezer shields with minimal variance in trajectory and velocity. The canon is mounted upon an universal jointed armature affording it an extensive firing arc; it can swing about to cover the Zoid fore and aft. A single burst from this gun can gnaw through the armor of even heavy Zoids and leave units such as the Rhimos or Command Wolf as a splay of smoldering, shattered parts.
“Specter-Bolt” Force Howitzer – right torso side-mount, forward & rear arcs, 45° point-axial rotation, 360° vertical arc
In a nutshell, the Specter-Bolt is a direct fire weapon that substitutes projectiles with shards of concentrated force; a sniper rifle that fires force fields. The weapon is packed with sensitive electronics and classified technology which is encased in a heavily armored, shock resistant housing until needed. Once activated, the housing opens and the barrel extends. The system coalesces a “round” in the chamber and uses the same particle projection technology to direct it into the enemy. The shot retains cohesion for line of sight, only splintering apart if it contacts another force. In theory, it could shoot an enemy on the other side of a mountain. An external hyper-capacitor magazine allows it to recharge independently of the Zoid it is mounted to, allowing the Specter-Bolt to be carried by virtually any machine. However, if tied in to a strong core, such as the Eradicator’s, it can recharge in less than ten seconds.
“Hornet Hive” 35mm Canister Countermeasure System (x4) – various mounted locations & arcs
The designers of the massive XZ-336 were certainly not fools; they knew that large armored units were still subject to deadly damage from lightly armored vehicles or even infantry. The Eradicator is equipped with 360° of defensive canister countermeasure systems. These launchers carry nine tubes, each of which can be loaded with a different type of ammunition. Most commonly three tubes carry high explosive omnidirectional flechet rounds, the other six tubes are armed with any combination of ECM attracters, a high-burn flares, or micro EMP rounds that can incapacitate a foe within 200 meters of the detonation point.
“Sunderflare” 150mm Twin-Beam Cannon (x2) – shoulder mounted, forward arc, 190° inclination, 20° rotation
The Sunderflare is considered the primary weapon of the Eradicator, though not its most lethal. It taps the XZ-336’s ample power plant and is a pure energy weapon, and therefore is not limited by ammunition. Though designed to fire both 150mm barrels in a single, lethal strike of superheated energy, the guns can alternate between them to cause less damage to more targets, and cool faster between shots. Firing twin shots can melt through a Dibison’s armor in a half second and has a rate of fire of one shot per 20 seconds. Single shots can reduce a Rhimos’ armor to slag at half the rate of fire. The shoulder mounts limit the horizontal arc of the guns to wherever the Eradicator turns, but they can fire into the rear arc on their horizontal axis. This also allows the cannons to engage airborne foes. The effective range against most targets remains at some 5+ kilometers as lighter targets use a single barrel. However, should the pilot target light aerial Zoids with double-barreled blasts they can be destroyed at more than 8 kilometers distant.
“Razor Rain” Force Warhead (x5) – back mounted, forward arc, integrated construction
Located in the “hump” of the XZ-336 between the primary core cowlings is a concealed launcher armed with five “Razor-Rain” missiles. These weapons are designed to eliminate enemy avian units but they work very well against any Zoid. The delivery vehicle is equipped with a small force generator which creates a force field just prior to impact, but the field is entirely unstable by design. The field ruptures instantly after it is made as high explosives rip the missile apart. The result is that it sends an expanding shower of force field particles out to almost 50 meters. The result can cause thousands of microscopic cuts throughout its entire structure; smaller Zoids fall apart, larger units tend to experience dozens of catastrophic operational failures, including fatally wounded cores. The missiles are not especially accurate, but since they have no need to contact a target this has not been an issue. The range of the delivery vehicle is only 10 kilometers due to the mass of the generator. Also, they are expensive to produce, so commanders are requested to use other weapons if at all possible.
“Armorbane” 80mm Mass Driver (x2) – tail mounted, aft arc, 200° rotation, 60° inclination
This turret is located on the first tail segment aft of the tail gunner station. It was included in the Eradicator design to afford a rear arc direct fire defense solution, using hypervelocity slugs to pierce armor and smash smaller units to pieces. The guns have a range of 6 kilometers being most effective within 2, and may fire in tandem to tear up heavier targets. Each gun holds a magazine of 70 rounds but as a mass driver they can fire virtually any metallic object that fits in the breach. Manufactured rounds afford each gun a range of 7 kilometers and a rate of fire of 1 round per 5 seconds (to allow magnets to cool and capacitors to recycle). Improvised ammunition varies greatly, but is considered ineffective and inaccurate beyond 2 kilometers. One commander that had run short of ammo took time to cram spare bolts and hand hold pieces into the feed system, causing moderate damage at close range.
“Thermoshock” 140mm Friction-Laser Cannon (x2) – tail mounted, aft arc, 180° inclination
Heavy rear-arc energy cannons combine a superheated laser beam with an acoustic particle pulse. The pulse violently vibrates and rattles the target, rattling pilots as well as any fragile components, and can interfere with balance and sensor systems. The focused heat burst can melt through common armor almost instantly. More heavily armored targets need not fear armor penetration so much as armor and structural melt; the misshapen parts interfere with mobility. The beam has been known to cook off fuel and ammunition in targets, melt targeting system lenses, instantly burn through wiring and slag canopy glass onto pilots. The effective range is limited to within 5 kilometers against most targets, but is quite capable of killing “soft” vehicles and armored infantry at twice that range.
“Defiant” 35mm Burst Cannon (x4) – tail mounted, aft arc, 360° rotation, 200° inclination
A defensive turret of four Defiant light cannons was mounted beneath the first tail segment to discourage the approach of light Zoids, vehicles, or infantry units that might attempt to topple this Goliath. These guns spray out dense pellets shaped to cause effective damage to light armor and catastrophic damage to flesh targets; the rate of fire is in excess of 3,000 rounds per minute but typically fire in bursts of 10 rounds each (40 rounds per burst from all 4 guns). The guns can be cycled to lay down a withering rain of metal or they can pick off enemies by blasting away with all four guns in a single, hammering shot. The ammo magazines are held in the tail segment and provide each gun with 45 bursts. The cannon is vulnerable to jamming through the narrow ammo feed system that threads through the armored turret collar.
“Repulse” 50mm Recoilless Cannon (x2) – chest mounted, forward arc, 360° rotation, 180° inclination
Mounted as a pair but each gun can incline independently, the Repulse system fires 50mm armor defeating rounds at 4 round every second. Ammunition is belt-fed from an internal, chest mounted magazine into the guns through an inter-axial linkage; the magazine actually rotates with the turret to prevent feed problems. Spent cartridges are expelled from the guns through an armored cowling, further reducing possible jams sometimes occurring with return-feed systems. Though limited to only 300 rounds per gun, they are quite effective against soft to mid-weight targets and seldom require to be triggered continuously. They have an effective range of only 4 kilometers but are most often used in close combat anyway. A light weight but well engineered and reliable weapon.
“Arclight” 75mm Focused Plasma Cannon (x2) – Head mounted, forward arc, integrated construction
While abstaining from using its more powerful weapons the XZ-336 Eradicator has plenty of power for maneuvers and lighter weapon systems. The Arclight uses some of that ample energy and focuses it into bolt of superheated plasma that can defeat light armor instantly and penetrate reinforced layers with only a few bursts. The cannons were included to offer Eradicator pilots another forward fire option other than its heavy guns or its lighter defensive cannons. By mounting them on the head they have an excellent targeting arc, able to snipe anything the Xz-336 can point its nose at up to 2 kilometers away at maximum effectiveness, but arc cooling reduces damage drastically beyond this.
Magnezer-Enhanced Alloy Jaws – head mounted, forward arc, integrated construction
Not only does the XZ-336 have a powerful bite, it has a [i]powered[/i] bite. The Eradicator uses Magnezer technology to enhance its tooth blades with a burst of armor-shredding force. While its normal bite can cause great damage, virtually nothing can survive the energized jaws; one Helic commander witnessed an Eradicator ripping a Cannon Tortoise in half without even breaking stride, and the 5th Royal Battleherd watched helplessly as their flagship Ultrasaurus had its neck cropped from its body with no more effort than a gardener snipping the branch of a sapling.
“Warhammer” Focused Magnezer Emitter – head mounted, forward arc, integrated construction
Using both the Magnezer-enhanced jaws and a large directional graviton array at the back of the throat, the “roar” of the XZ-334 becomes a hyper-intense field of magnetic and gravitic forces. With a range of less than 100 meters this attack is very short ranged, but the result is similar to striking an enemy with a solid fist of force roughly the size of an entire Iron Kong. One witness of the weapon saw a Dibison smashed flat in mid-run amid a plume of armor shards and spraying fluids. The Warhammer uses tremendous power, and repeated applications can cause crippling damage to the Eradicator’s head (which can lead to self-destruct; see below), but as a last measure attack against a close-in opponent, it is a virtual guarantee of victory. It must be noted that energy shields pose no obstacle to the force of gravity. Zoids so equipped must not make the fatal mistake of relying on their shields for close-in defense, lest they be utterly destroyed.
Magnezer-Enhanced Alloy Talons – foot mounted, integrated construction
As with the jaws, the claws and talons of the Eradicator can be surged with Magnezer forces to cause catastrophic melee damage. When used in conjunction with the jaws, the talons of the XZ-336 can collapse a Blade Liger’s force field. De-energized, the Eradicator can use the talons to grip and climb large armored or stone structures (or enemies) with relative ease.
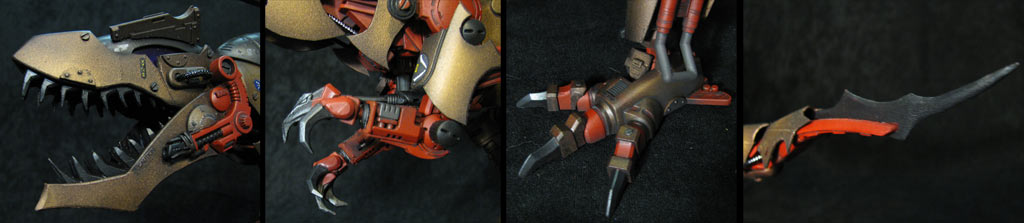
Magnezer-Enhanced Alloy Blade – tail mounted, rear arc, integrated construction
As with the talons, this wicked 8-meter long blade can cleave through virtually any common armor or structure. Using the Magnezer force system to wreck havoc with shields and sensory components, many foes are struck dumb upon the weapon’s activation just before they find their Zoids severed by the blade. The highly flexible tail also grants the blade a very large arc. It should be further noted that the tail blade is controlled by the Eradicator itself to engage targets of opportunity, so no pilot should rely on the Zoid’s driver being overwhelmed by close-combat chaos to escape this weapon.
AI-2 PROFILE
Not only is the Eradicator intelligent, it is wicked. Using synthesized evolution, the Eradicator Artificial Intellect And Instinct (AI-2) system more simulates a human than an animal; only a hardware failsafe prevents the machine from functioning completely independently. As the Eradicator is only piloted by high commanders, they are wise to couple their experience with their Zoids’ instinct and intuition in battle. The XZ-336 has a firm grasp of most combat situations, but its predatory instincts guide it savagely. It seeks to dominate everything on the battlefield; terrorizing lesser Zoids, challenging greater Zoids, and even intimidating its own troops. The Eradicator excels at finding and exploiting physical and psychological weaknesses while sundering foes apart at the same time. It enjoys destruction but it also revels in seeing an intricate plan come to fruition. The combination of savagery and patience is a recipe for one lethal machine. As a note of interest, Eradicators each have a unique name, further distinguishing them from other Zoids.
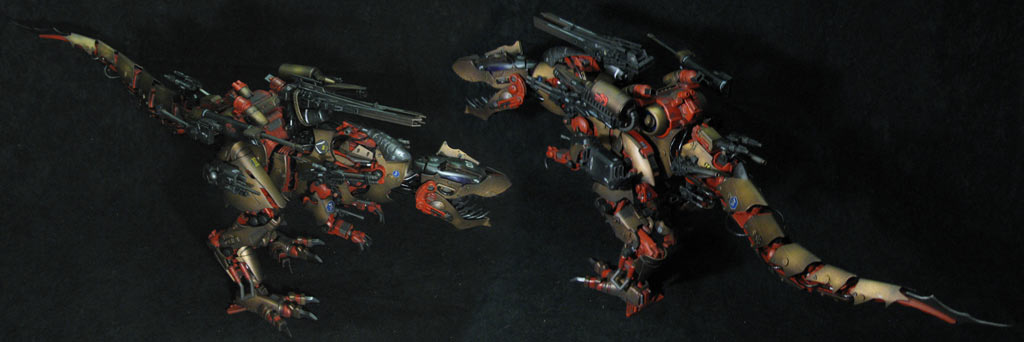
SUMMARY
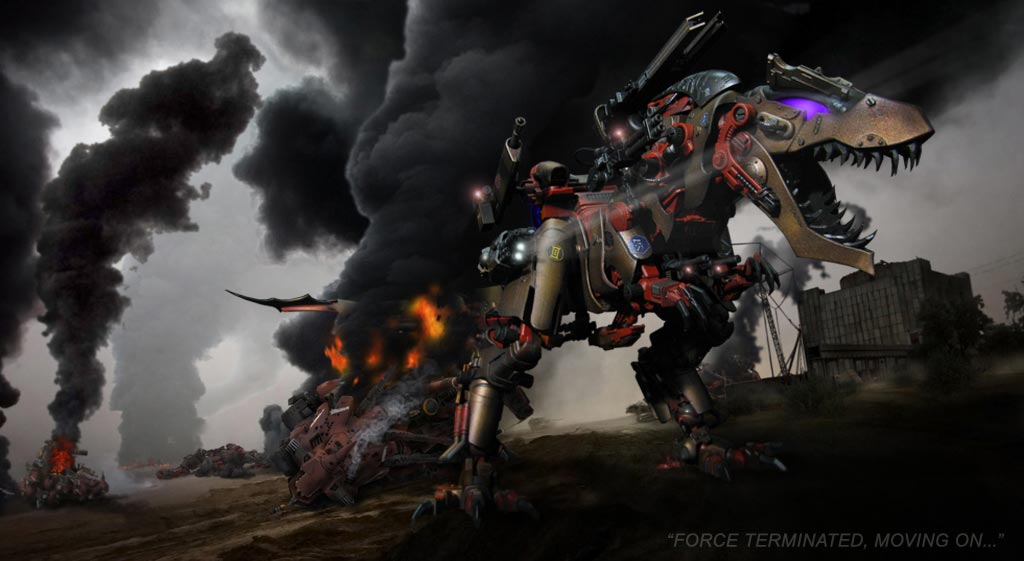
A feared engine of war since it was first seen on the battlefield less than a year ago, the reputation of the Eradicator now precedes it, shaking many pilots to the core when its designation appears on the horizon of their tracking scopes. The XZ-336 is exceptionally well evolved for its role; fast, strong, carrying diverse weaponry, and with the power to back its threatening posture. There are multiple documented cases of an Eradicator entering a battle and not firing a shot; it just charges through the enemy, shredding with talons, severing opponents with the tail blade, and ripping them apart with those giant jaws, throwing the parts through the air like so much chaff. Unfortunately, the stories of commanders fleeing their forces from the field after just identifying the Eradicator are little exaggerated. Even without the RiPPeR technology it is a raging terror. With that weapon, the XZ-336 Eradicator may well be the new deadliest battlefield combat system currently deployed on Zi.
BODY STRUCTURE: ARCOCANTHOSAURUS
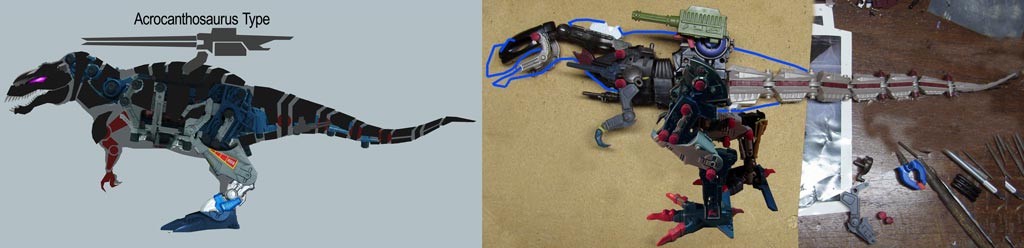
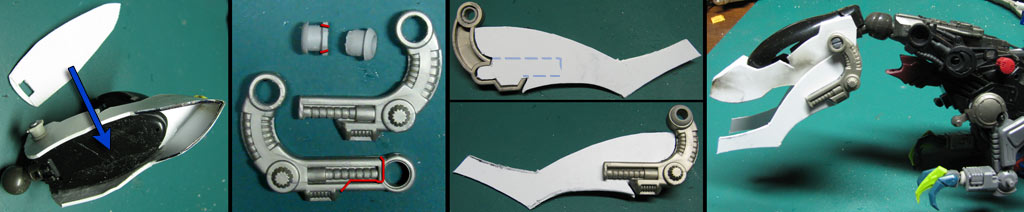
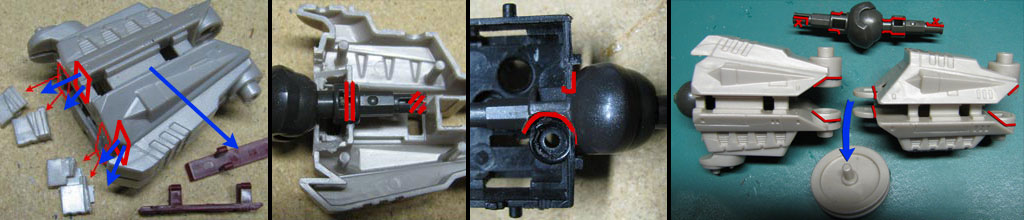
As a sort of category 1-B), I also decided not to do a species of theropod that was uncommon. While Zee the Zoidologist has done an arcocanthosaurus “(Goulas Acantha”) it is more a re-imagined Gojulas Giga than an all new model (and it is an excellent rendition!). I saw the dense, high back of the animal and knew it could look exceptionally strong and unique on the completed model. My early designs utilized the Salamander for 75% of the base structure (above left). However, I decided on using the unique shape of the similar sized Energy Liger torso instead, using the air compressor as a huge power generator for the new cannon. Besides, who uses an Energy Liger to build a theropod? The image on the left was a quick sketch done in Photoshop using photos of a Salamander and a few other Zoids I knew I had in stock… the red parts were unaccounted for, and the black armor filled out the final shape I wanted for the body (likely to be entirely scratch built). The photo on the right was taken at about 50% of the build process. The blue lines helped guide the shape I wanted to be certain I didn’t deviate too much from the animal.
THE BUILD
MAIN CHASSIS - KNOW YOUR INNER LIGER
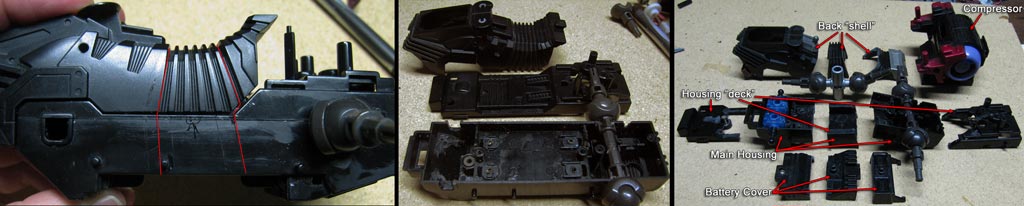
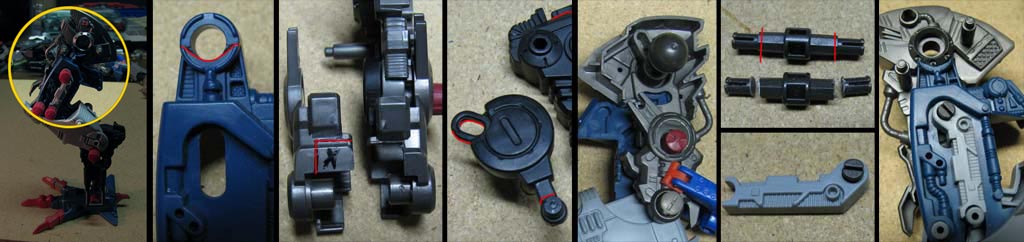
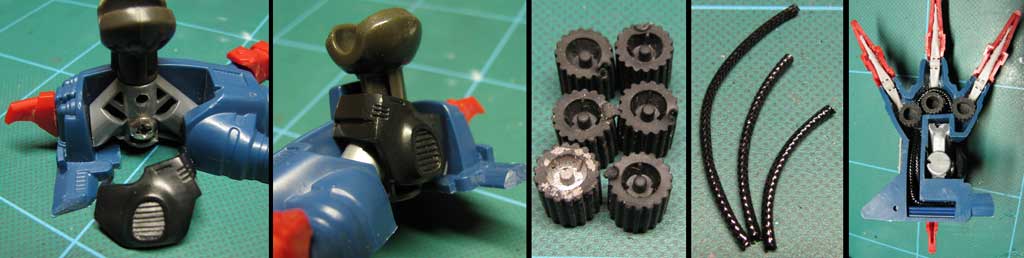
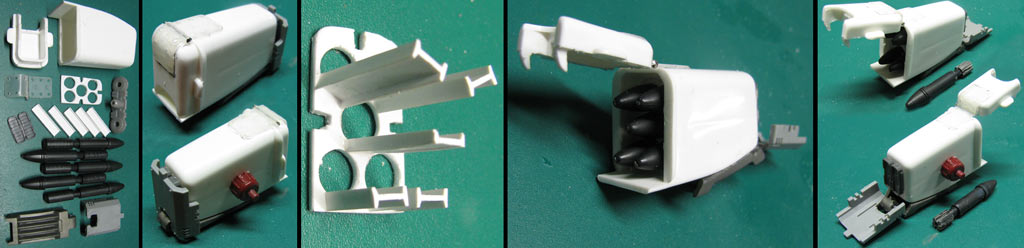
The first thing is to do a little house cleaning. Unscrewing all the bits from the Energy Liger’s body I realize that it is one of the most complicated engine boxes of the entire Zoids line. You have all the mechanics of a 4-legged kitty, plus the air compressor and the related switches, all in a space smaller than a Salamander’s motor. Further, rather than there being a main box and a battery cover like 99% of bat-op kits, the Energy Liger has a battery box, battery cover, shoulder box, back panel, and compressor box. The first pic shows the main motor and mechanics; the second exposes the air compressor pistons and gears; the third photo shows the leg drive shafts and battery compartment. The last image shows one of the two air chambers disassembled; I did not want to use them in the final build because they are not only very bulky, they are very identifiable, and I wanted folks to really wonder where I got many of the parts from.
HERE, THERE BE MONSTERS
The first thing I would like to point out about this build is this; second only to Ligers (and every other type of large feline Zoid), theropods are the most numerous customs on the Net. However, though I have been building customs since 2007, I have never so much as attempted a recolor of a theropod. If I was going to build a “T-Rex” Zoid, I was going to give myself a few goals. 1) This would be a BUILD, not a customization; I would not start with an existing kit such as Geno Saurer, Dark Spiner, Berserk Fuehrer, Death Razer, any Gojulas, Deathsaurer, or even one of the Godos line. 2) This build would have to be spectacular… perhaps not huge, but dramatic, detailed, and striking to see. The appearance would have to be unique, and it would have to represent the vision most of us have of a carnosaur; an active, effective hunting machine. 3) It would have to not only fit within my world of Zoids; Age of War… it would need to be a defining character within that world. I decided that it would be a command unit carrying a new, terrifying weapon never before seen on Zi, which I dubbed the RiPPeR (Reactionary-Particle, Projecting Rail) Cannon; a sort of acidic projectile that could literally turn a Zoid into a cloud of vapor on a direct hit. And, finally, 4) this build would require me to use all of the skills I had learned to date AND to try something altogether new.
NECK-ROMANCY
Originally I was just going to use the Salamander’s neck with some minor alteration but I realized I had no neck that adequately measured well with larger body. After trying half a dozen different parts, I decided to use the base segment of a spare Heldigunner’s tail. I shaved the hip connectors down so they would fit into the opening left by removing the compressor nozzle box above the Liger’s tail. Then I drilled holes through the sides of the back pieces. The Heldi neck was fitted with a Struxx ball-and-socket joint (for just behind the head), and the upper assembly was hinged in place with a two-sided Struxx post (now near the Zoid’s collar). I modified the Liger’s tail armor and flipped it, then put it back where it came from. This would be support for the neck from beneath, add some bulk and definition, and also create a sheath for the cabling I knew I wanted to add from the chest to the head eventually.
FURTHER NECKING
The neck was still looking a bit thin for such a large Zoid, and it needed more detail as well. I modified a spare Bear Fighter part left over from my wife’s Bamburian (a donation of love!) and drilled a port in the underside of the Heldigunner tail (now the top side Rex neck). This would create part of the hump that was a dominant part of the acro’s silhouette and give it an appearance of function as well. Pair of Liger Zero leg parts were shaved to fit against the sides of the tail, giving a much more robust appearance. I really like how the leg parts added heavy cables and hydraulics around the neck providing some much needed detail.
DECOMPRESSED
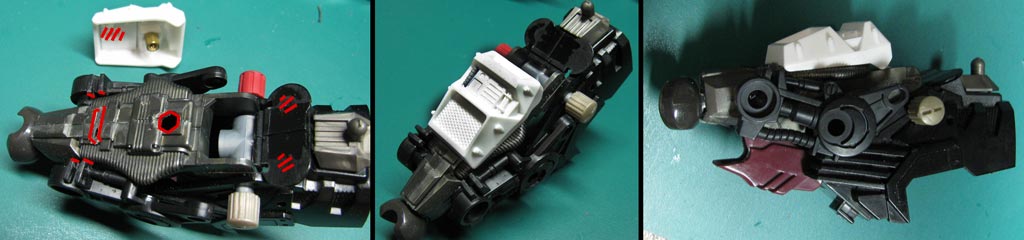
With the bulky air chambers removed there was a huge open gap allowing you to see the insides of the compressor box… which now had its guts removed. I did a quick look about for something that could be used to fill the voids and still look like it belonged there. Naturally, I did what any other Zoider would do… I took a couple of bags of baby food (odd, how they come in bags of fruit puree mush now), cut the spouts out (cleaned them!) and stuck the caps on either side of the housing. Voila! Armored-cowling intakes. You can see in the last to images how the removal of the air chambers greatly reduced the bulk of the unit.
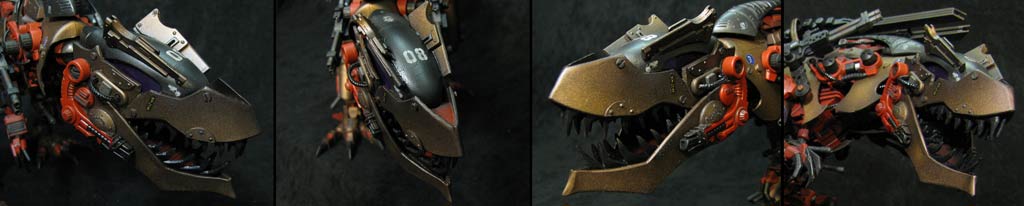
TRULY JAW-DROPPING
You’ll notice a thing or two about the skull here but the pics don’t really show some details well. Most of these shots show the shape of the side armor but not the vented cap inside the top of the nose to fill in between the canopy armor and the snout. Though the picture shows the insert forming the roof of the mouth, it couldn’t catch that this piece is also made up of horizontal vents and arcs upward near the snout. Further, inside the very nose are triangular support pieces for strength. The armor plastic has to twist to retain its shape, and it’s so thick that it was ripping itself free. I did something extreme to fix the situation; I used a lighter to soften the plastic and reshape it… this is why you can see some scorch marks on the head. The second photo shows how I sawed down the Gojulas arm parts into mandible supports. I also had to cut down the Blox joints to fit the Struxx posts and leave room for bolts in the end. The third image shows the lower jaw cut from styrene. Notice that it’s far more complicated than it looks; the Gojulas parts were partially shaved to allow the Styrene to be inserted inside these parts. This was necessary so the jaw would clear the skull without scraping. The last photo shows the jaws being fitted in place.
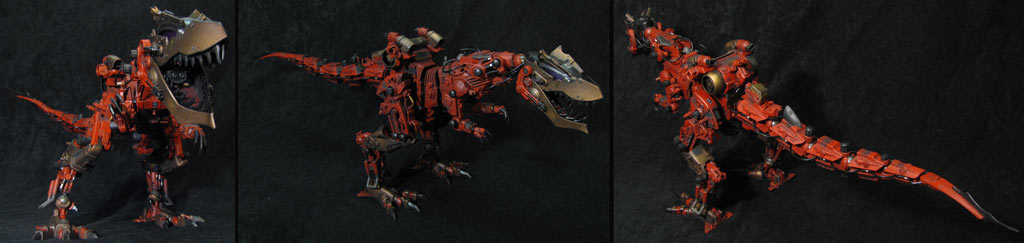
DIVIDED WE FLEX!
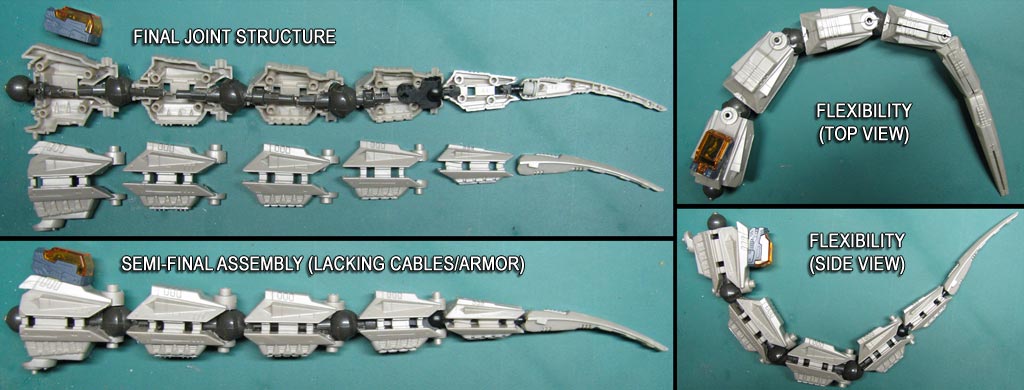
After fitting many of the parts I looked with satisfaction at how my Eradicator was shaping up. One thing kept needling me, though… my XZ-279 Siobhan. That Zoid would be less than half the size of this one, and I gave it a flexible body. I could do no less on the Eradicator! That would be a step backwards (violating personal challenge #4). So I planned out how to divide the torso into three flexible pieces. Just one catch; the torso was already made of four pieces of plastic; two for the motor housing, one for the battery cover, and one for the “filler” that made up a part of the spine. That didn’t include the compressor housing, but that had been dealt with. Cutting the torso apart created [i]12[/i] floating pieces that then had to be re-assembled into 3 sections before I could even plan the joints! In the last picture, above, you can see some of the complexities, here. The cams are removed and replaced with Struxx joints for the hips, a pair of Blox for the inner shoulders, and another pair of Struxx for the waist, and the tail and neck had yet to be addressed.
SKULL & MAW
With the jaw in place I took some shots to show the supports inside the roof of the mouth and for the mandible. I also began adding some detail plates with rivets to the head. Since I only used sheet styrene, I didn’t want it to appear too bland. You can see in the last three pictures a bit of the ribbing and curvature detail used for the inner mouth and underside of the mandible. Again, what doesn’t show here is that the mandible is held by two interior pieces with different curves; this added not only great strength but an appearance of mass.
BROW BLADES & BORES
From the beginning I knew I would have to add the brow blade armor to further match the silhouette of the acrocanthosaurus; they would also serve to visually lower the eyes that were riding quite high on the skull. I took a pair of hatch doors from a Warhammer 40l Land Raider and carved them into the main blades, then I mounted the trimmed bits to bulk out the undersides of the ridges and another pair of smaller doors from the same model to add thickness and detail to the upper portions. The new ridges were kept angular to match much of the hard head armor lines, but I cut a curve into them to unify the overall “smooth and hook” theme I’ve built up for the custom. Finally, it took months to do it, but I capped the mandible posts with a pair of gun barrels. From the start it made too much sense to place “common” weapons on the head, but I didn’t want to spoil the profile. I played with a half a dozen gun types, including making some from spare hip cams and scrap, but in the end they all lacked what I was looking for; something compact with a heavy bore, treating the rest of the mandible as the majority of the weapon. I ended up taking a pair of pistols from a Mega Blox Neo-Shifter and chopped off the handles. The size was perfect, and the details of the guns matched well with the existing parts. They are unobtrusive weapons with a slightly organic look, which matches the rest of the Eradicator.
IT’S ALL IN YOUR HEAD
I wanted the Eradicator to be detailed inside as well as outside, and I really wanted that to shine in the cockpit. There is actually room for four crewmen in the head! I examined fighter aircraft for my inspiration here, and even though cockpits are large enough for multiple crew I wanted Eradicator to have its own brain and to appear as though it were laden with all sorts of equipment. In the end, I decided on to make him a single-seater. The “deck” of the pilot station is an overturned USS Arizona battleship command deck. The center was cut out and a super-high detail resin F-14 ejection seat has been set into the deck. The consoles surrounding the pilot and making up the computer framework are bits from a dismantled SATA port from my dead motherboard. The screen is an observation deck from the Arizona, shaped to fit under the armored skull of the Eradicator and its inner structures capped with a smooth screen cut from sheet styrene. There are several places where cables will be strung after the initial painting is completed.
LEGS – A COMPLETE RE-IMAGINING
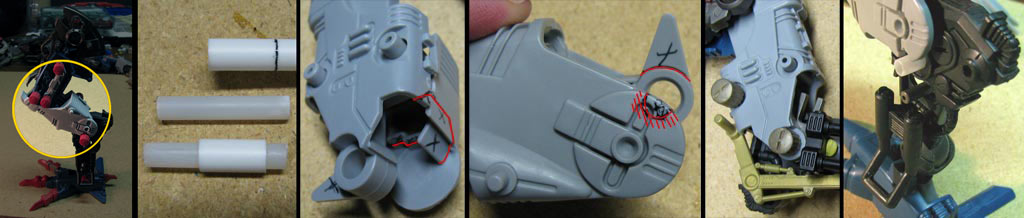
I stuck with the Salamander legs, since they are really the only other large Zoid legs designed for a theropod out of the box. However, they didn’t look quite right, and so I set about modifying them. Heavily. In the end only about half of the Eradicator’s legs are Salamander, the other half are a combination of Energy Liger parts (thigh and hip), Liger Zero parts (shin), and many other bits. The images above focus just on the extensive modifications required to build the Eradicator’s hip and thigh. Some of the mechanics became little more than surface detail as I stretched the overall leg, but most of the original joints had to work between the three models’ parts. Nearing the end of the build I was forced to rough-up the hip joint ball to add friction and a screw for strength to support the model’s growing weight.
STANDING SHIN-DEEP
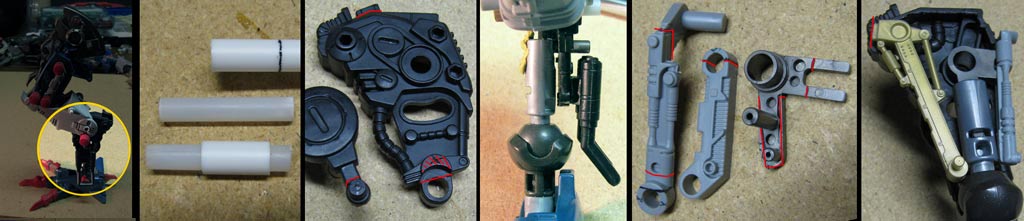
Fortunately there was little modification needed for the Salamander’s shins. Except some armor cuts. And internal structure cuts. A new joint hole with recess for the cap. And a new peg built from scratch from two sizes of plastic tubing that could transition from Salamander to Liger Zero and back to Salamander. The open interior of the Salamander’s thigh would also allow me to insert some detail pieces and thread cabling from thigh to foot when all was done. The knee would be stiffened by using some Loctite as well; the model gained significant weight near the end of the build and a stiff knee was required to keep it posed.
AN ANKLED-SAURUS!
I realized I was going to have to create an entirely new ankle when I saw not only how Salamander’s feet were too close to the shins, they offered no flexibility at all. I needed the new parts stable, strong, and flexible. So, using the Liger Zero leg for guidance and a modified Energy Liger part as an anchor, I modified a Struxx post and affixed a ball to the end of it. The 2-part pins here would secure this section to the shins. To bulk up the ankle and add some detail, I took the shock/roll bar from a CP-07 howitzer and attached it as an outside joint guard. I then hacked apart a Salamander wing strut and glued it to the front of the post to add both strength and some much needed details. On the rear I trimmed the spare leg struts from a Bamburian to make some excellent looking supports and hydraulics. The back-bent knee required some reinforcement over the other joints in order to hold the weight of the Eradicator; more than any other point on the model, this awkward joint wanted to roll forward and so was stiffened with LocTite.
FLAT-FOOT TO TALON-TED!
I had to carve the heck out of some Struxx parts to build an interior support for the new socket joint; it needed to be very strong and stable to hold up this monster. This was inserted where once a simple and effective pin resided. But this added more height. After all of these modifications, something didn’t seem right anymore. The Salamander’s foot now appeared a little small… and a lot boring. I took out a pair of Buster Eagle talons and marked them carefully. If I messed this up, I would have NO suitable feet for Eradicator! I cut off the toes of the Salamander, and then off of the Buster Eagle. I took some large Robart aileron hinges and affixed them inside the Salamander feet. Finally I added curvature to the Eagle claws and glued them in place.
SCARY CLAWS
The new Eradicator feet are designed to offer all the support of the solid Salamander pieces, but all the visual dynamics of fully flexing claws. In the images above you can see that the hinges allow the Eradicator to grip a bottle cap or adjust to odd angles, but they are still stable enough to hold the Zoid’s weight. I wish the claws could counter-flex to look proper with a long stride pose, but we have to give up some flexibility for a freestanding custom. I also wanted to make the heel claw flex, but the mechanism was looking too large and awkward. I decided, also, that I would “fill out” this build, so I made sure the underside of the foot was complete by adding components to fill those hollow feet with traction and thruster equipment.
BRAEDURIN
Empire
COMING TO A HEAD
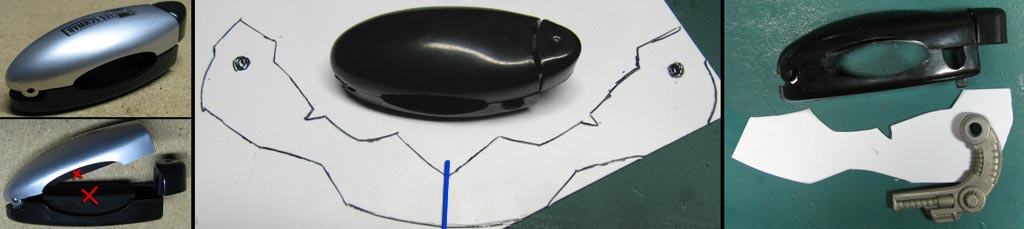
One of the inspirations for the entire project was an auto sun visor clip for sunglasses. For years I thought it would make an excellent Mk-2 head for Deadborder. Then, one day, I found a cheap black one at a local store. I brought it home and tore the firm foam padding out of it and began playing with armor designs; as the rest of Eradicator grew (longer legs, longer body, larger tail) the head started to shrink! I drew out some ideas loosely based on the real acrocanthosaurus skull’s shape. I cut the skull armor out of some heavy sheet styrene. I marked the jaw axis where the Strux provides not only the pivot point for the mandible but the securing point for the neck’s ball joint. The last frame shows where a Gojulas arm actuator will become the primary mandible structure.
LET'S PUT A SMILE ON THAT FACE!
I didn’t want my first ever theropod to have those simple little straight or blunt teeth like all the others in the line, so I went for something a little more aggressive. Eradicator has chompers designed to rip other Zoids apart. Four sets of teeth were cut from thick sheet styrene and shaped using micro files. There’s actually quite a little trick involved with them, shown in the middle image above; the lower jaw set start wider at the back and cross with the upper set to become narrower in the front. This required shaping and setting both rows so that the points would scissor without bumping. Finally, the last two images show the building and placement of the “Warhammer” intense gravity emitter. It’s built with an Asoblok base, two Killer Dome gears, and a portion of USS Arizona bridge tower.
FLEXIBLE BOOSTERS
I decided to risk trimming off the outside stabilizers to improve the appearance, hoping that the wide talons and even weight load would keep it steady on its feet. Though the model’s stance was quite strong as it was, I drove heavy screws into the feet through the ankle posts as there was a lot of weight to strain those points. To cover the screws I added a detail that I had planned on since the beginning; a nice slab of armor. In this case it came from a Black Rhimos… the pieces fit perfectly with only one modification; cutting away the support pegs that bumped up against the screw heads. I also took the opportunity to “fill out” this build… I made sure the underside of the foot was complete by adding components to fill those hollow feet with traction and thruster equipment. Namely, I used six misshapen Gojulas caps and some braided cord to make thrusters. Across the heel is a small strip of hard drive cable. I debated adding more for traction devices in the toes, but the exposed hinge joints look great as they are.
DEFENSES (Countermeasures)
The Braedurin Empire are not fools; they know the best form of defense is to avoid detection completely… to prevent an attack in the first place. The Eradicator’s “soft-light” armor affords a slight reduction in its sensor and radar signatures, but it is also laced with an element known as SDC-0401 (Sensory Dampening Compound) that “smudges” its sensor signature. Hidden about its frame are also numerous active countermeasure systems; ECM canisters, flares, Magna-chaff, “sunflare” blinding canisters, anti-personnel grenades, etc. All in all, for such a big machine, the XZ-336 is rather difficult to damage with most common weaponry.
ENTRY: Zoids Poison Custom Contest - 2012 - Catagory B (Build)
XZ-336 Eradicator
Chassis: Acrocanthosaurus
Power Plant: XEL-BR (Energy Liger – Biped-Reconfigured)
Primary Mission: RiPPeR Cannon Assault Platform
Secondary Mission: Field Command Unit
Crew: 2 – 1 Pilot, 1 Gunner (minimum command rank: Major)
Statistics
Length: 55 meters
Width: 12.7 meters
Height: 22.5 meters
Mass: 200 tons
Performance
Land (Cruise): 190 Kph
Land (Flank): 240 Kph
Sea: 10 Knotts

CAPABILITIES (Close-Combat)
Unlike many Zoids of its size, the XZ-336 Eradicator is an extremely efficient in-fighter, even having been witnessed wiping out a large pack of Rev Raptors with unnerving ease. It has very intimidating talons that are large and strong enough to crush many lighter units outright and shred larger, more heavily armored Zoids. Its smaller claws are still quite capable of delivering moderate damage. The hyper-dense, charged tail blade can slash almost into the front arc without the Eradicator turning its hips, and it is powerful enough to cleave an Iron Kong in half. The most terrifying aspect of close-combat for its foes, however, is dealing with the massive jaws. It is fully capable of opening wide enough and snapping closed with enough force to rip a Cannon Tortoise in half. All of the Eradicator’s claws and teeth are enhanced with concentrated magnezer fields, allowing them to rip through most Zoid armor easily and even make progress against defense shields. Essentially, if the Eradicator lands a bite, the victim is suddenly torn apart by intense gravitational and magnetic forces.
CAPABILITIES (Electronics)
Speed and agility are of little use if a Zoid is incapable of navigating across extreme terrain or under extreme weather conditions. The XZ-336 was designed with the intention of being used as a forward command unit, and as such has an extensive suite of sensory and communications gear. It is considered a rough terrain, all-weather platform that can traverse rugged, unknown territory while quickly identifying targets and conveying those targets to its allies. As it is often a point fighter, either the commander or first officer may also take control of allied missiles and drones and guide them as though they were launched from the Eradicator. In an urban environment most Eradicators are equipped with the Commando urban warfare system; an armored pod loaded with a selection of light to medium armor and infantry defeating weaponry. This system also features the "Walleye" target enhancement system which adds additional close-combat data in confined environments. Additional pods compound the XZ-336's electronic capabilities.
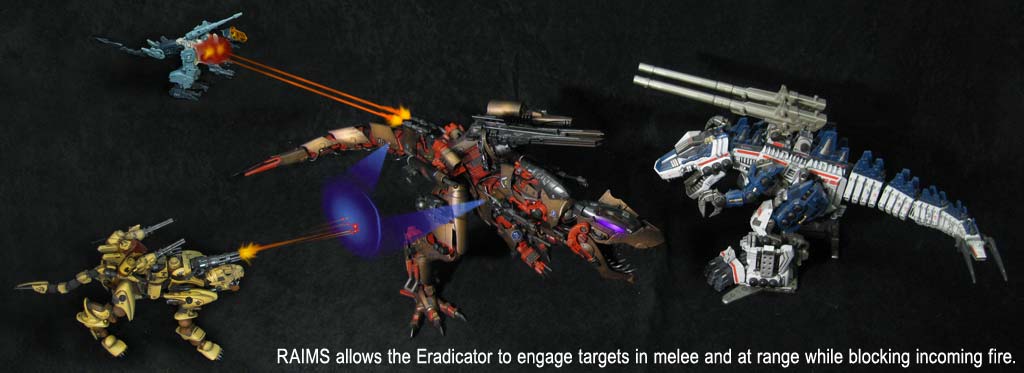
DEFENSES (RAIMS)
The real primary defense of the XZ-336 is the RAIMS System (Reactionary Arc-Isolated Magnezer Shield). This shield functions in a charged standby mode until enemy proximity or weapons fire alarms the system. It then snaps a small, temporary shield into place until the threat is cleared. It functions much like an intercepting strike, hence the nickname given to it by many pilots; “force punch.” This system requires only a small fraction of the power of continual-hold, all encapsulating energy shields and, because of multiple emitters, several small shields can be activated at once. In effect, dozens of projectiles find themselves smashed flat mid-air and never get within 50 meters of the Eradicator. The RAIMS system is usually programmed to ignore projectiles of less than 50mm, not wasting energy on lighter cannons or automatic weapons, and it can prioritize targets based on mass, velocity, and perceived threat rating.
PHAGE-DESTRUCT SYSTEM
One of the most unique aspects of the Braedurin Empire’s technology is the lengths they have gone to in order to keep it secret. Knowing that their weaponized viral-phage system is their principal strength, they would rather see any Zoid carrying the RiPPeR Cannon destroyed than to have it fall into enemy hands. These units actually have a number of phage pods incorporated in their construction. Should the Zoid become disabled, the pilot be killed, or the Zoid’s core be compromised, the pods detonate, effectively vaporizing the entire Zoid’s Zi-metal parts. Similar pods containing powerful solvents off-gas throughout major portions of the Zoid’s anatomy, eating away at insulation, plastics, and other non-metal compounds. Finally, after a minutes’ time, concealed high explosive charges rip the remaining structure into a 200-meter spread of mangled, melted, and twisted debris the size of a man’s hand. To date, nine RiPPeR equipped Zoids have been destroyed (though only one Eradicator), and not one shred of their technology has been recovered.


BUT I’VE GOT THESE TINY ARMS!
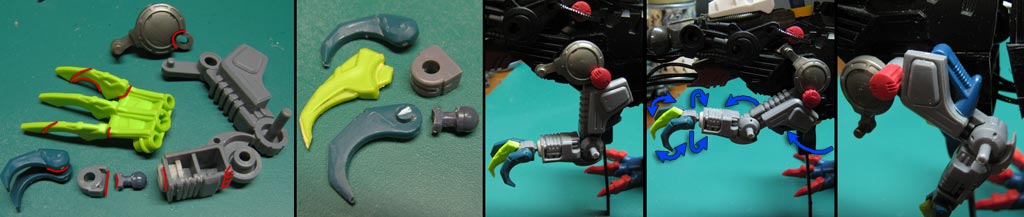
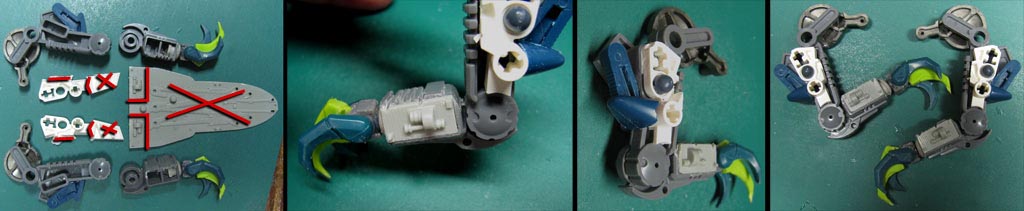
The original arms were going to be virtually unmodified Aerosaurer arms, but as the build grew so, too, did these limbs. The new ones are made from pieces from an Aerosaurer’s legs instead, with some extensive modifications. I trimmed out pieces to allow the new elbow about 25% greater flexibility and cut up some Energy Liger ankle joints to form some attractive shoulder mounts and lower the arms toward the ground a bit (these will become weapon mounts a bit later). Then came the claws. It seemed so simple at the time… except that an acrocanthosaurus has [i]three[/i] digit forelimbs, not two digits like a T-Rex. Oh, sure, I could have done these easily, but where is the fun in that? I not only wanted to add a claw, I wanted the claws and wrist to flex. The end of the Aero-leg was surgically removed with an X-Acto rather than a Dremel power tool (to preserve as much plastic of the joint as possible) and a slice was made down the curved end. This was fitted with the new central claw, cut from a Bionicle and shaped to slide in the groove. The old twin claw was cut in half and the hole in the hand partially filled with LocTite to form a snug, flexible fitting so that they, too, could swing up and down. The leg (now forearm) had the end drilled out to accommodate a Blox joint gasket. A small Blox link-pin was shaped and glued to form the wrist. Once inserted into the socked, the new hand can raise and lower, swing side to side, rotate, and the fingers all articulate. The final image shows a piece that doesn’t show up well in the other photos; the stabilizing claw from the Salamander (inner toe) was affixed behind the “scapula” armor to create triceps and add detail to that void.
FILLING IN THE DETAILS
When I created the much smaller Siobhan from a Gul Tiger I decided to fill out all of the pieces left open in the original model. I can’t exactly do that with the lion and turn my back on my first theropod, but this was a different experience. Where Siobhan required a lot of smooth armor to be made, Eradicator is designed with a more mechanical structure beneath a smooth armored shell. The filler bits had to look more machine-like. For the forearms, which had some of the largest gaps so far, I used the anchor pulleys from the deck of the USS Arizona (that crappy model has been a bonanza of helpful little bits!). The inner shoulder was made using Bionicle foot shavings left over from making Hellstorm. The dome filling the hole is a Blox connector cut in half and glued inside. Not the base of the triceps was completed by shaping the outer toe of the Salamander we removed when adding the talons. The gap above the elbow will be used to thread a cable later on.
ONE TALL TAIL
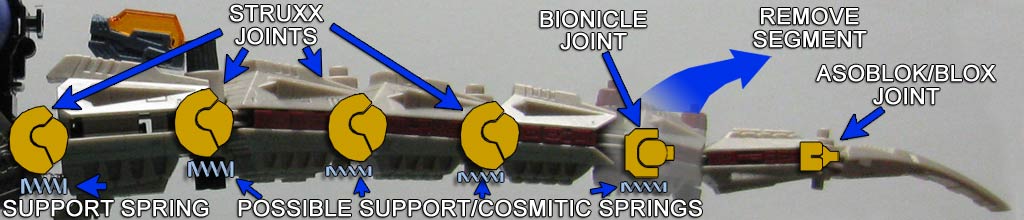
So, after much debate, I decided to use the tail of the Seismosaurus as the foundation for the Rex; the second runner up was using the neck, but I needed the sheer bulk of the first and second tail segments. I also wanted to improve its articulation from sideways hinges to full socket joints. This, it ends up, was a real trick. First, the tail tapers from fairly broad to quite thin (as is the nature of tails), and that required multiple joint sizes. Second, the tail of the Seismosaurus is quite solid and heavy; this means that the joints would probably not be strong enough to hold it all up. My plan incorporated four Struxx joints for the first four segments (including attachment to the body), then a Bionicle joint as it tapered down, and ending with an Asoblok joint (which I have used in several builds now and am running out of!) The fifth tail segment was removed in order to shorten the lengthening caused by the added joints, and also to reduce the overall weight a bit. As a flexible, weight bearing support, steel springs were planned for at least the attachment to the body, and perhaps even down the length of the tail. PERHAPS USE METAL CHAINS FOR FLEXIBLE UNDERSIDE SUPPORT?!
TO THE BITTER END
So the operation begins. Starting with the base of the tail I had to saw the tabs that held the original clip in place and cut and drill within the segment to hold the Struxx joint. The middle image shows the hacking needed on both the Struxx joint and the torso where the tail is secured; the screw hole had to be preserved in order to retain chassis strength. Moving toward the second segment I’ve marked where the wheel is removed and its supports are cut away to make way for another Struxx joint. This step is repeated for between segments 1, 2, 3, and 4.
SHAVED (DRILLED, SANDED, SAWED, GLUED) & TAPERED
As we progress southward we reach segment 4 which has a large Struxx joint at one end and a medium sized Bionicle joint at the other end. I needed to change my technique to accommodate the different shape and still try to keep the appearance similar. This joint also replaced segment 5 (which is such a slight variation in size that it won’t really be missed). The final joint is a standard sized Blox; the tail is literally molded to perfectly hold the rubber joint gasket inside it. After these shots, I did a little surgery to increase the flexibility of the final segment. Now it’s off to plan cabling and support structures, then finish it off with armor and details.
A MEANS OF SUPPORT
The first two frames above show something that had to be done to all the Struxx joints in the chassis and legs. The weight of the build grew to such a degree that I had to modify them to hold up. I flattened the end of each ball a bit, drilled it, and drove a small screw to add a tension. The new joints are twice as strong as the old ones… but it still wasn’t enough to hold the tail up! I worked out how to mount a pair of strong springs under the tail to assist in lifting it. These are looped through slots in the tail base and are then secured to the chassis with screws; it was the only method strong enough to hold the springs and still allow the tail to be posed. (Make armor cowlings to cover the ugly and obvious screws?)
HOLLOW POINTS
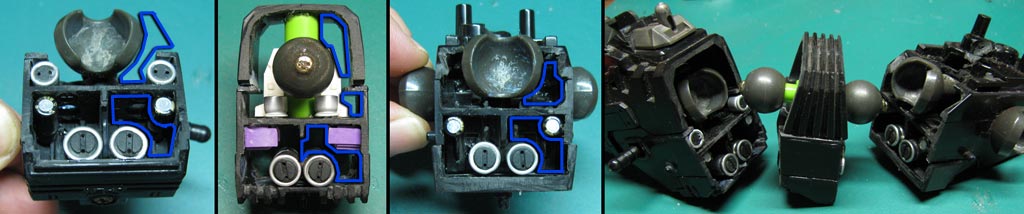
When I build my Siobhan custom I chopped the body into three pieces, then I filled the end of each piece with a vented wall for the appearance of solidity and some detail, then draped cables around those pieces. Eradicator is far larger, and cutting his motor housing up into three segments created gaps large enough to stuff a Command Zoid into! I decided to add many details inside that could be viewed when the sections were flexed around. Most of these components were stripped from a dead motherboard (it’s been so handy, hasn’t it?) The left three photos show the placement of the major detail pieces, mostly capacitors. The blue outlines show the voids left open to pass the cables through the segments (as opposed to around them). The first photo is the lower chest, the second is the abdomen, and the third the pelvis. In the final photo you can see how the three will link together, free of cables to show the details.
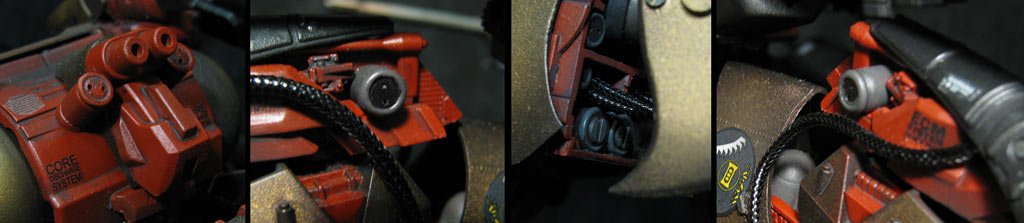
CABLE-INSANITY
I started threading cables with my Siege Tortoise custom, but really matured my technique on Siobhan and Hellstorm. I simply could NOT build this monster and leave out a lot of detailed cables and piping. One problem; I was fast running out of necklaces! So I turned to a new product… one that costs $5 USD for 100 feet of it: nylon braided chord. That’s a far cry from the $3 per necklace I used to pay! In these overview shots I was testing how well the product performed as well as how it looked. While it does look excellent, I don’t see it completely replacing using serpentine chains. Rather, I see it being used in conjunction with them. One aspect of using stainless steel chains for a project like this; they only flex so far and so are an excellent way to provide support while retaining flexibility and appearance. The chord does have another bonus; it’s available in black!
SHARING A COMMON THREAD
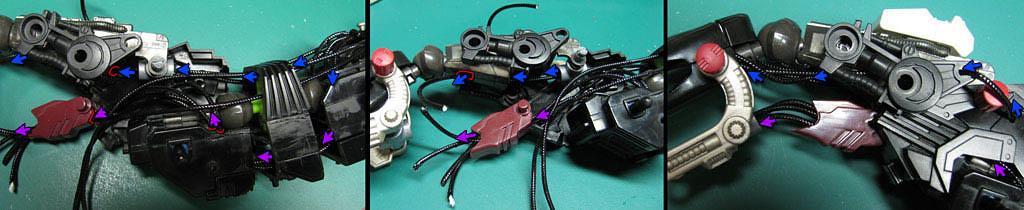
Okay, try to follow these small images; they show the cabling through the front half of the Rex. The blue arrows track the cables from the hips through the back plate cavities, then through the main neck structure, and finally into the back of the head. The purple arrows follow the “low road” cables from the hips, down into the battery compartment, through the belly, into the lower chest, through the lower neck support, and into the lower jaw. The little red marks show where various holes had to be drilled to pass the chords through the body sections.
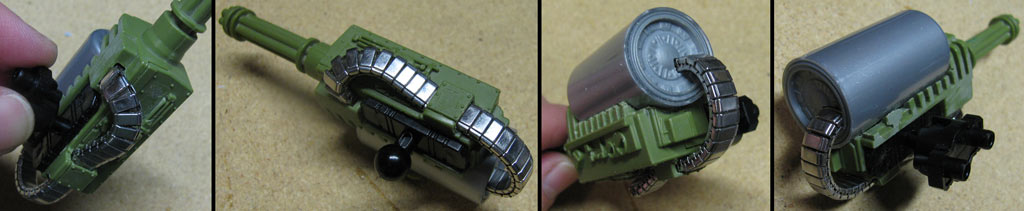
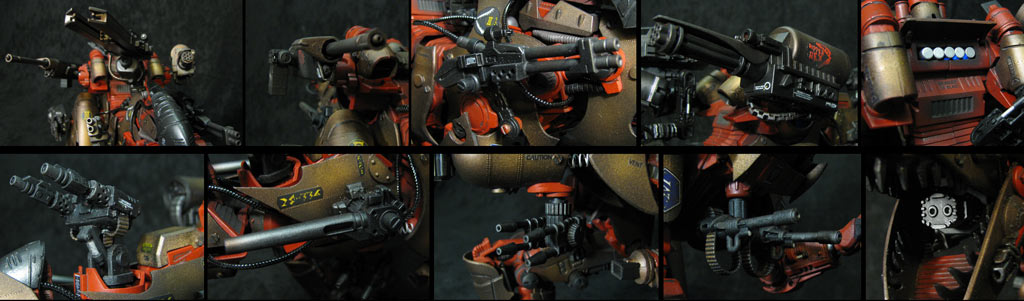
“WAR-STORM” 100mm GATLING CANNON
Ever since I saw I had an old, scraped up G.I. Joe RAM motorcycle, I knew that sidecar would end up on a Zoid. I wanted this gun to have the attention to detail as the rest of the Zoid, and the sidecar gun has excellent detail that can be readily scaled to a large 1/72 weapon. It would be chopped down severely to incorporate a large ammo magazine, and would attach via an articulated joint (after having abandoned my initial plan to adapt the entire compressor portion of the chassis to a turret). The third image shows the components for the magazine; a mouthwash cap, toy truck wheel, and spring steel watch band. The last frame show the pieces assembled.
UNDER, OVER, AND THROUGH
A close-up of the parts shows a subtle intricacy; the threading of the ammo belt. The proportions for this were determined after studying a number of real Gatling style gun systems. The sidecar has a port cut to receive the belt at a logical point near the gun barrels. The belt then passes through a small battery detail on the top of the sidecar (now the bottom); I actually drilled the box hollow to fit it perfectly. Looped over the back of the sidecar, the belt is aligned with the drum logically. If you were to trace the path of the bullets you would find them circulated within the drum pointed inward, cartridge fuses pointed out toward the skin of the drum, just like a real Gatling. You can also see the mount in these images; a large Blox joint gifted from a Dispelow.
MOUNT UP! … OR ... MOUNT SIDEWAYS!
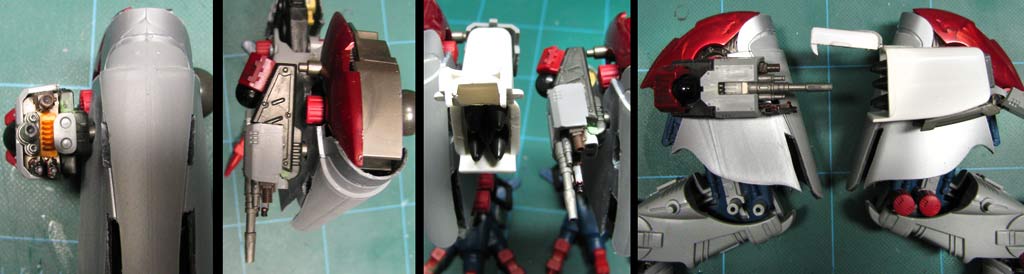
The mount for the “sidearm” weapons are large Blox connectors included with a Dispelow. The Energy Liger’s former wing mounts (here yet to be shaved) were given an extra hole each. The socket part fits snugly without any glue at all, allowing me access to those screws, should I ever feel the need to change more stuff in the future. The last three shots show the left side Gatling cannon mounted; it has a very flexible arc of fire, including being able to flip completely around to fire directly to the rear.
WATCH WHERE YOU’RE AIMING THAT THING!
It occurred to me after I did such a good job “finalizing” the Gatling cannon that if it was going to aim independently of the body it would require its own targeting system. The base of this unit was made from the square mounting peg from the RAM motorcycle. The large lens is a piece of scrap from a Bionicle part (I think… kinda hard to tell what it was. It was in my “nicely shaped tiny bits” box). The long, metal portion is the spring-loaded pin from the miniature watch band used to make the ammo belt. An afterthought I added was the armor cowling over the barrels; a piece from an old Gundam model which I had only one of. The final touch was to fill the hinge gap using the remains of one of Salamander’s toes.
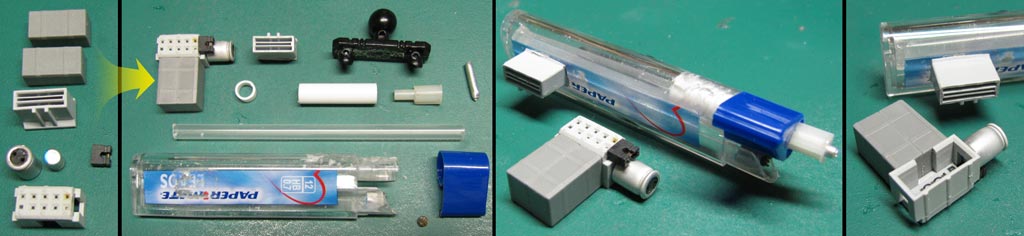
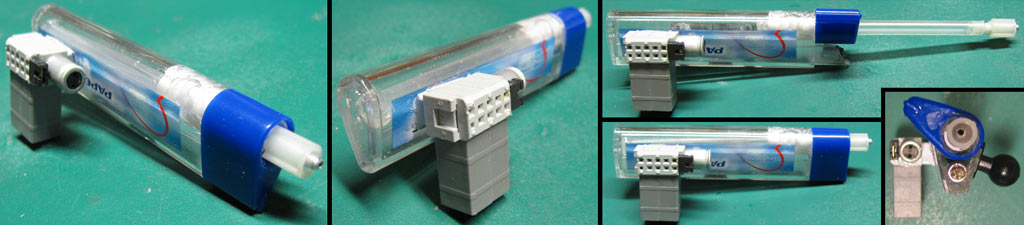
“SPECTER-BOLT” BEAM SNIPER CANNON
The second of ‘Rex’s “side arms” I created was designed to offset the solid projectile spewing Gatling; a single-shot, hard-hitting, energy-based sniper cannon would be just the ticket. I started with an interesting pencil lead case and saw what I could add inside and outside of it. Within, I slid a multi-piece barrel that could extend for distant shots; pulled out, the barrel increases the length of the overall gun by almost half. Beneath the barrel is a multi-lens sighting sensor made from a blown capacitor topped with the muzzle of a tiny, low quality helicopter model Gatling gun. The pod has an armored cover made from the cap of the case; it rotates to the side, clearing the sensor array.
OUTDOOR MAGAZINE
The external energy magazine and targeting system was made from a 10-pin computer socket and plug, mounted with a pair of armored boxes from a Warhammer 40k kit. Another capacitor and a jumper complete the external component, which can be removed to reveal a nicely detailed venting system (a cap for an unused motherboard socket). The last item to add was the large Blox joint matching the Gatling’s to give it a wide range of motion.
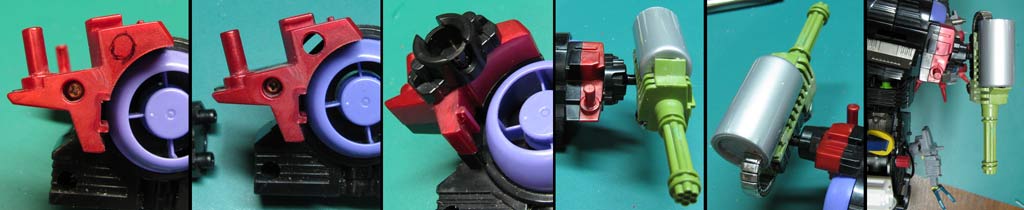
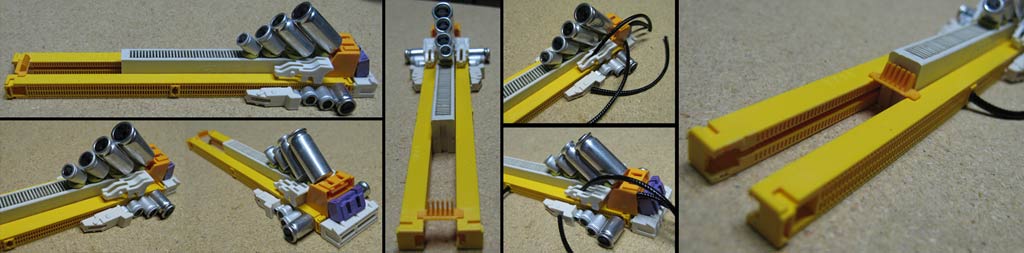
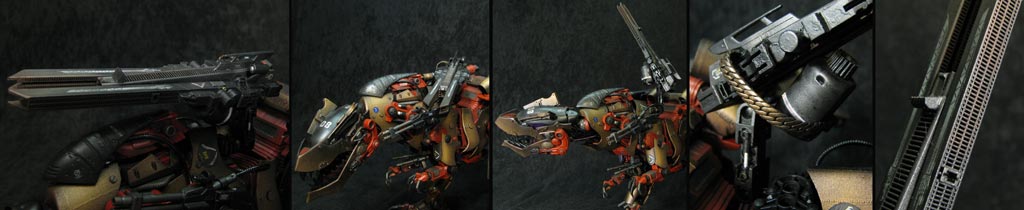
THE “RiPPeR” – DESIGN STAGE
The core of the Braedurin Empire faction is their amalgamation of technologies that have lead to the terrible “RiPPeR” Cannon; a weapon that essentially disintegrates any Zoid it strikes. It seemed a good idea to actually create that gun. The foundation of the design was along the “non-touching-multiple-rail” look. In this case, I wanted two rails as three started looking like Berserk Fuhrer’s eggbeaters, and four was just huge and clunky. Before doing any carving I decided to try and build the gun out of components from a burned out motherboard… the pieces have micro-fine vents that look terrific at small scale. I played with a selection of capacitors and cabling as well, which really gave a tech-heavy appearance.
REFINING THE GUN
You can see from these photos that the RiPPeR underwent a serious design change as it came together. I wanted something sleeker and less improvised looking as I began shaping the pieces. You can see the central bore was cut at an angle and became much smoother, the canisters were simplified and now protected within armored “hoods” front and rear, and the back portion of the gun was trimmed and lowered. Actually, at this stage, the gun looks like a pretty kickin’ space battleship.
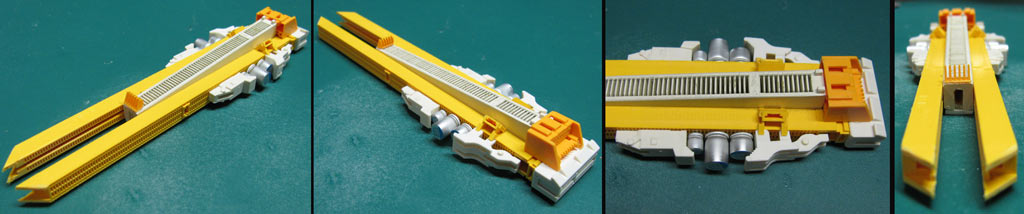
RiPPeR ARMATURE
Most of this photo set is for the armature that holds the RiPPeR Cannon; the last two shots are of the new muzzle. I labored for hours trying to find a flexible, strong, and attractive way to attach the RiPPeR to the Eradicator. I wanted to articulate the gun rather than imitate the Gojulas/Deadborder style static guns. I ended up shaping three Bionicle parts for the armature itself. The system rotates on the original knobbed body shell clip from the Energy Liger, mounting to Eradicator’s shoulders. To attach the gun I drove a motherboard socket screw into the base and shaped the Bionicle part to fit the hex nut. I also cut an angle on this base piece to mount a large magazine (since the RiPPeR uses particle-based projectiles, it needed systems for both energy and rounds). In the middle picture you are seeing a piece of a geometric puzzle I had in my parts box and a pair of Struxx posts cut from Siobhan’s heavily altered joints. Sadly, I viewed this “clip” to be cheap and ugly looking… it was replaced completely by a more appropriate system (see below) The fourth shot shows the armature and clip in place. Note the “7” shaped black scope housing (at this point lacking details). That is a piece from a video tape, also shown in picture 1, above. The arm was cut from that piece and shaped into a protective hood covering the Gatling cannon ammo drum feed port. The final two images show the new muzzle to the cannon. This is the “A” key from an ergonomic keyboard; the key cut away and the support post cleaned an mounted between the acceleration rails. I first used these parts on Diadalos and thought they really filled the bill here.
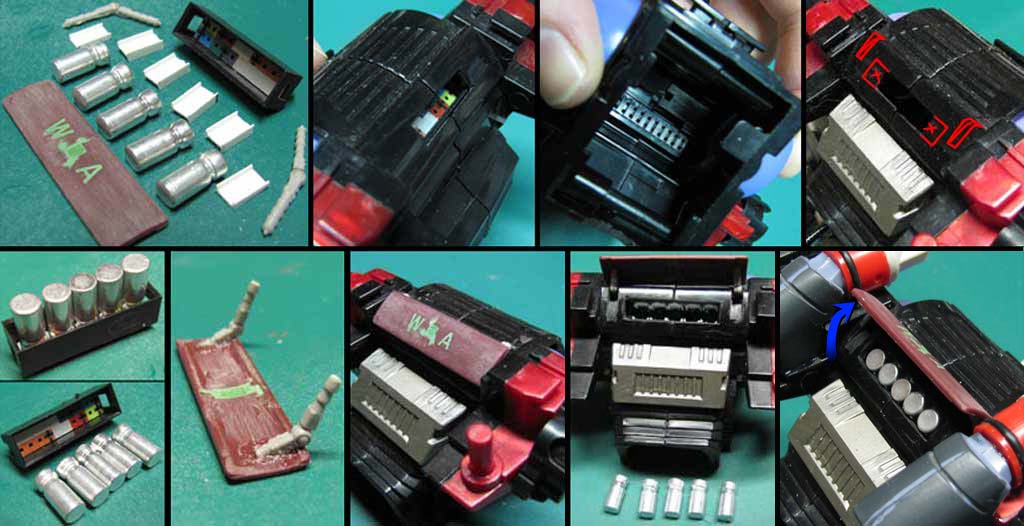
CONCEALED MISSILE BATTERY
What to do with the ugly switch slot (formerly the pump mode selector) in Eradicator’s back? Big intake? Thought about it. Command center, like Mad Thunder? Considered it. Plug it up? In a way, I went with that option. I widened the slot a bit and cut one thin slot on either side of it. In the main slot I mounted a socket from a motherboard (I use this thing a LOT now) which was sized to hold five compact “canister” missiles I made form capacitors (a common practice of mine, now). I took the original switch from inside the body and reshaped it a bit to fit on the outside as a cover. I then mounted a pair of Robart R/C airplane hinges to the cover and affixed those into the slot so I could open the lid to reveal them. The final image shows the missiles removed from the box and the ten launch rails mounted within. Had I made the missiles fixed rather than removable I could have built the CMB with six shots rather than five (the rails took up 1 extra missile space) but I opted for true functionality over one round of ammo.
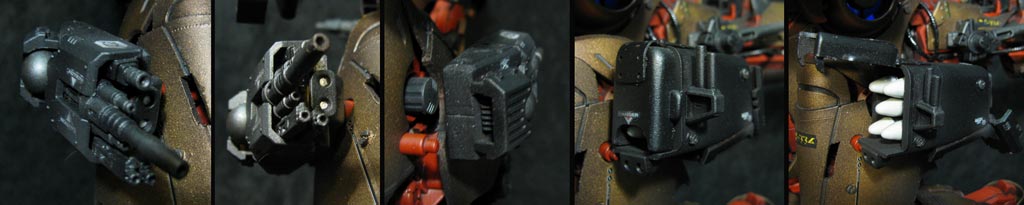
“HAMMER HAWK” MISSLE BATTERY
I wanted this custom to be a front line command Zoid with well rounded weaponry, and that included a heavy tactical option in addition to direct fire and short range weapons. The heavy ordinance pod located on the left thigh of the Eradicator existed in my first sketch of the Zoid; I had always felt the official Zoid theropods lacked weaponry because their body shapes limited the manner in which it could be carried, and the hip seemed an excellent stable point to place a weapon. The pod itself was inspired by a toothbrush travel cap… this plastic box snaps over the bristles of the toothbrush so you don’t have to have a large container that hopefully holds the entire toothbrush in your luggage. It was also large enough to hold 5 Salamander missiles… with a little modification. I had to create a face plate with 5 holes for the rounds, but this was not adequate to keep them organized. Beneath each hole, on the inside, is a styrene rail that holds the missiles up and aligns them with the launch tubes. The lid had to be cut off and re-hinged and the lip trimmed to fit over the nose cones, and the rear of each missile had to lose about 3mm of length to fit the curvature of the box. I decided to cut flutes and drill out the engine exhaust for each missile, as well. The rear armor is from a Warhammer 40k tank turret; it hinges on a spare Liger shield that makes the lower vent intake. The rear vent is a spare from a Kotobukiya base module. The mount is a Seismosaurus gun mount.
BIG TEXT
Little text!
GOING "COMMANDO"
The right hip mounts the "Commando" compact weapon pod for engaging smaller units and infantry in a point-blank, urban environment. I decided this pod would combine light cannon, heavy machineguns, defensive/countermeasure systems, and additional targeting and communications equipment. The first shot was a collection of bits I planned to use, but only the highlighted pieces made it into the pod. The rear half of the unit was made of a CP-04 Assault Unit, the front half from a Warhammer 40k Rhino tank turret. Atop these I mounted a Bionicle joint as a sensor dome and backed it with an armored cowling courtesy of a Saicurtis. In the rear of that part I mounted part of a motherboard SATA connector to form an exhaust vent (seen in the last photo). Inside the pod’s armor I used another part from the motherboard; a COM socket. This provided the structure to mount the weapons to, and also a small gear from a Killer Dome and a small piece from a Gojulas cap to act as a weapon system exhaust unit. The guns I mounted here included the Raven set from a Genosaurer, a large HMM Molga head cannon for a grenade launcher, and a pair of Warhammer 40K machineguns for anti-infantry use. A pair of 40k tank headlights were also mounted on the unit (and a matching pair were added to the “Hammerhawk” pod on the other thigh). Practically invisible in these shots is another SATA port grill mounted behind the flood lights.
ODD COUPLE
These images summarize the two hip weapon pods. The first two pictures show the “Commando” light weapon pod (here you can see the SATA part used to create the internal exhaust vents); the second shot shows the top view of the pod. In the second two images you can see the two pods next to each other for a sense of scale; the two units turned out to be quite well balanced.
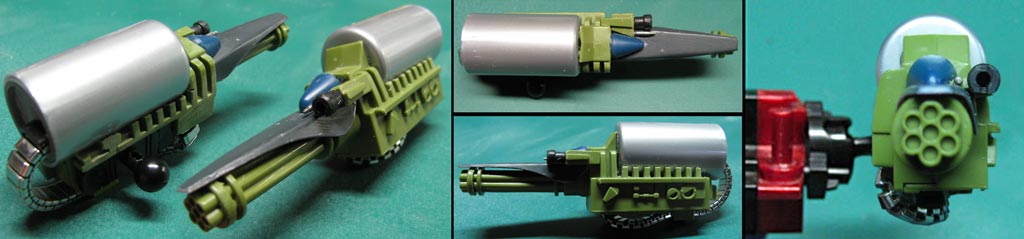
“SUNDERFLARE” BEAM CANNONS
While the Eradicator may seem over-burdened with weaponry, it really isn’t. The three heavy weapons on its back are specialized systems that would be conservatively used; the RiPPeR is reserved for vital heavy targets only, the Specter-Bolt is a sniper cannon ill suited for closer combat, and the War-Storm Gatling cannon is most useful against lighter targets at closer ranges. Two of these systems (RiPPeR and War-Storm) are further limited by ammo supply. To this end I decided to add a forward arc energy weapon to the mix; the Sunderflare twin beam cannon. I have been looking for a place to use the two heavy guns from a Ray Saurer for years; they found a home on Eradicator’s shoulders. First I decided to make the guns solid, so I cut gap covers from plasticard and filed it all smooth (each gun requires 6 intricately shaped pieces). Beneath the cylinder I decided to install a steel power cable for some variation (that silvery blur in pic #2). I used Green Putty to fill in the sight and cylinder and added a hard drive jumper to each as a sighting system. I also drilled out the ventilation holes on both sides of each gun. As a final detail, I placed a motherboard shunt to the top disc to act as a sighting system. The guns are mounted to the shoulders using Blox parts modified to fold down more closely to the joint. Increasing the arc of the guns required a little more articulation in the shoulder joint. I cut the ends off of two long Blox joint posts, drilled them out, and inserted computer cable hex-screws (the perfect size to hold caps) to extend the arms about 1/3” further from the chassis. In the end the guns can lie flush with the neck or raise just above it, rotate from straight down to about 65° backward, and can swing around 20° left to right.
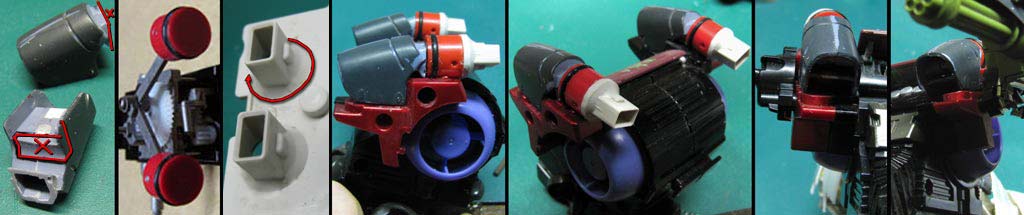
PURSUIT THRUSTERS
With the ever mounting weight (and intimidation factor) and the need to do something with those annoying hinge points that formerly held the Energy Liger’s wings, I decided to rummage through my parts bins for a solution. I’ve had these Gundam shoulder armor bits for a decade now and decided they would make great armored engine intakes. I had an idea for some nice rectangular engine nozzles by chopping apart the frame of a Microsoft keyboard, but needed a little more bulk; a cylinder that fitted almost perfectly with those nozzle parts. Looking around my desk brought me back to the pile of discarded Energy Liger parts. I pulled the pins from the air pump pistons and mounted them between the intakes and the exhausts; they were the perfect length and diameter, and had an interesting shape. The final product looks great; solid, smooth armor and angular nozzles compliment the theme of the rest of the custom, and the boosters add the feeling that the Eradicator is not only big, with heavy artillery and lethal melee weapons, it now appears fast enough to catch its prey!


ARMAMENT (modular weapon pods)
To increase the diversety of the XZ-336 platform designers included 8 Class-A hard points, 4 of Class-C hard points, and 2 Type-2 universal joint mounting modules. The standard configuration of the Eradicator equips the Type-2 joints with the "Warstorm" and the "Spectre-Bolt" cannons and uses a pair of Class-A points with a pair of modular weapon pods, leaving all other points free for mission-specific equipment. The weapon modules are designed to enhance the Zoid's extended and close-in combat capabilities.
“Hammer-Hawk” Theater-Engagement Missile (x5) – left thigh mounted, forward arc, 180° vertical rotation
These weapons are stored in a modular pod usually located on the Eradicator’s thigh. They are intended to offer the Eradicator an indirect, long range damage solution. Each missile delivers moderate to heavy concussive damage up to 50 kilometers away with reasonable accuracy. The armored casing helps the missiles survive light close-in defensive fire while providing extra mass for armor penetration and shrapnel to shred softer targets.
"Commando" Urban Warfare System – right thigh mounted, forward arc, 180° vertical rotation
This pod is mounted to the right hip of the Eradicator. Within its armored fram are mounted six light weapon systems and additional close combat assist systems including multi-spectral sensors, flood lights, and the "Walleye" urban environment filtered sensor array.
ARMAMENT (Reactionary Particle Technology)
Known by crews on both ends of the gun as “Death in a Can,” Braedurin Reactionary Particle technology is so classified that if it’s carrying Zoid becomes incapacitated on the field it will self destruct to prevent its capture. From the perspective of the enemies of Braedurin, the weapon seems to be a form of projectile fired at hypersonic speeds too fast for most close-in defense systems to counter. Any impact will rapidly eat away at the target, dissolving anywhere from 1-ton to its entire mass within mere seconds. The first recorded strike from a RiPPeR dissolved more than half of a Red Horn into acrid smoke, leaving a shell of a Zoid with soft parts and fluids seeping across the ground like a broken egg. The core of this round contains what has been labeled as the Devolution Molecule, and there is no known defense against it.
RiPPeR (Reactionary Particle Projecting Rail) Cannon – torso mounted, 360° rotation, 90° elevation
From the standpoint of the Braedurin Empire, the weapon system combines three advanced-technologies. The gun itself is a form of rail cannon using an escalating Magnezer field to produce a gravity/friction free state, allowing projectiles to propel at nearly 10 times the speed of sound. The round itself is in actuality a mini charged particle acceleration chamber holding a molecule of the Devolution Virus in stasis. The shell is a ring that captures and devolves the virus into a solvent for Zi-metal. On launch it captures some of the Magnezer energy and uses it as a catalyst to create a force “counter-field capsule” around the shot. When this field collides with a force field it creates an instability, allowing the projectile to slip through force shields and collide with the target Zoid. The accelerator casing is destroyed on impact, releasing the stasis field and fueling the reaction with the Devolution molecule, which begins to deconstruct any Zi-metal it comes in contact with. The amount of damage is directly related to how much Zi-metal is impacted, so deeper or broader penetrations cause catastrophic damage but a glancing hit can still dissolve large portions of a Zoid. The reaction stops when there is no longer enough Zi-metal to sustain it… either because the Zoid is entirely gone or it chokes itself out like a fire, consuming metal too quickly and being disrupted by large amounts of other substances (fluids, wires, insulation, etc.) This is the reason Braedurin seeks Guylos’ new Emeraldite infused reactive armor; it may be the only Zoid armor that can resist the phage. Assuming a direct hit an Iron Kong could be completely dissolved in roughly 20 seconds, but it would collapse within moments of impact as structures vaporized. A Command Wolf would basically cease to exist within 5 seconds. With an estimated magazine capacity of 500 rounds, it is possible that a single Eradicator could turn an entire heavy division into fumes during a single deployment.
“Phoenix Fire” Low Frequency Laser Cannon
This system is the most prominant of the integrated “Commando” weapons, included to slice through conventional armored vehicles or to destroy pinpoint targets without the need to engage the XZ-336's primary weapon systems. The Pheonix Fire is actually entirely capable of cutting a 30-ton Zoid in half with a sustained burst, though it is most often used to "snipe" communication lines, sensors, personnel though view ports, and other soft targets. It has an effective range of almost 3 kilometers but is most often used within a few hundred meters.
“Imperator” 50mm Automatic Grenade Launcher
The top socket of the Commando weapon pod was given to the Imperator, a drum-fed grenade launcher mounted to many conventional armored vehicles. The commonality of the weapon makes for simple opperation and plentiful parts and ammunition. The Eradicator's version holds three drums of 16 rounds of ammunition; each with a different load. One drum contains range-based airburst rounds designed to elliminate concealed infantry threats, the second drum holds operator programmable delayed detonation rounds that allow a shot to explode beneath a vehicle like a mine, and the final drum contains shotgun-burst flechet rounds that spray infantry with hundreds of armor piercing darts. The air-burst round can be toggled to delay after an impact offering it an armor or door piercing option.
Shaufax B3-9 15mm Anti-Personnel Machinegun (x2)
Integrated into the “Commando” urban combat system, the lightest weapons mounted on the XZ-336 Eradicator are a pair of high ROF machineguns designed to spray standard, lightly armored infantry units with standard combat rounds. Each gun is fed by a 1,200 round mini-drum and can spit out bullets in a steady stream of 20 rounds per second or in bursts of 20. The guns are mildly innacurate by design but quite effective within a kilometer.
Giefald-272 30mm Heavy Machinegun (x2)
Considered the primary weapon of the Commando urban combat system, the Giefald-272 machinegun is the most common vehicle mounted weapon in the contested territories. They are not especially powerful or fast firing, but they are very accurate, rugged, and reliable. Each gun is equipped with an 800 round ammo drum which can be emptied at a rate of 5 rounds per second. The bullets are armor defeating and make short work of light armored vehicles, infantry, and light structures. Concentrated fire from both guns can defeat light tank or Zoid armor.


DEFENSES (Structure)
Even without armor, the Eradicator is a formidable machine. Its body structure is reinforced, much like the ancient Helic Republic Zoids, and each component is coated in a compound that aids in the dissipation of heat to provide further defense against enduring internal damage due to laser fire.

Winner Best Overall &
Most Original / Creative
Most Original / Creative
Zoids Poison 2011
Custom Contest