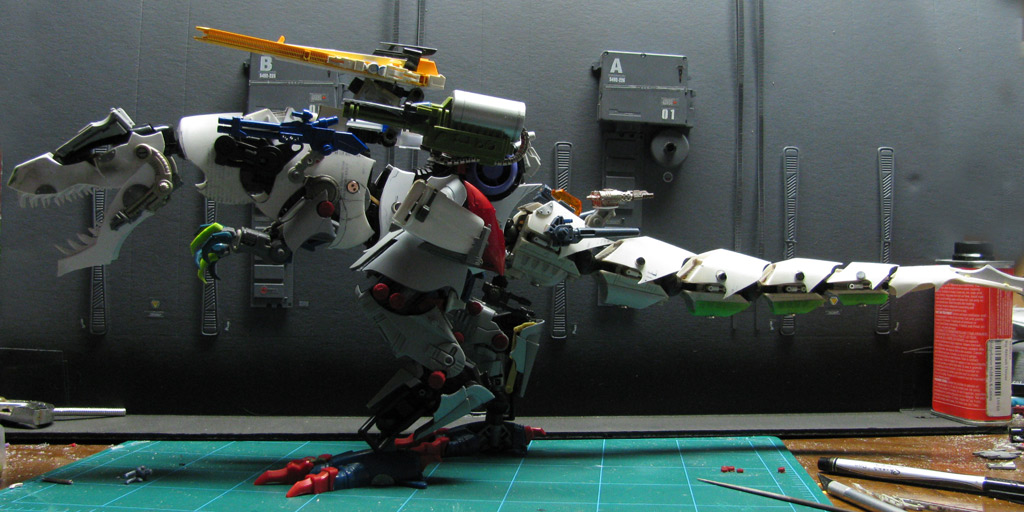
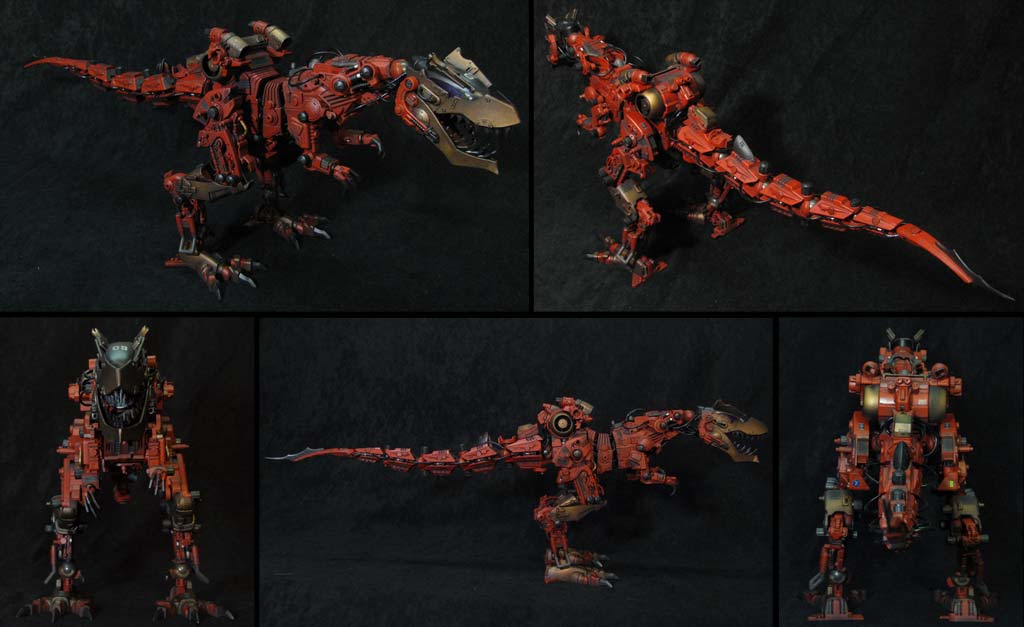
BODY STRUCTURE - FIRST ASSEMBLY!
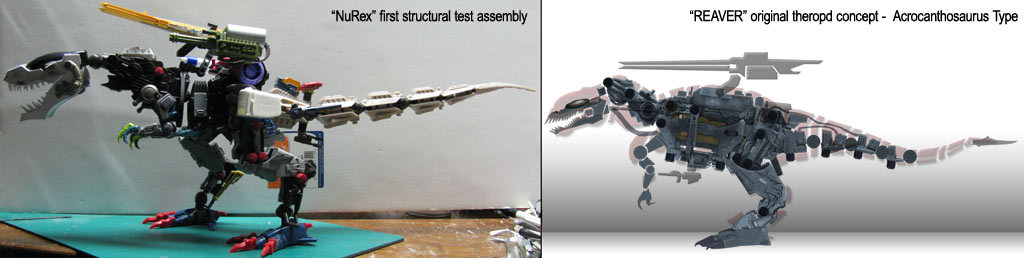
After many hours of labor and frustration, the time could be postponed no longer; I had to see if all of these large, complex, heavily jointed components would actually hold together! The picture on the upper left was taken just after I had snapped all of Eradicator’s parts together for the first time… I felt, if it fell apart, I would just cry. As you can see, he stands quite well. Not only did he stand, he stood strong! Eradicator was a bit front heavy at first, so I knew I would have to add some ballast to his tail, but he could stand long, stand tall, strike poses, bend his head and tail around, and was effectively functional the first time! Compare, if you will, the scale image to the right. This was my first digital composite using 75% Salamander parts, a few Liger parts, and unknown bits drawn hastily in to fill the gaps. The new model is roughly 25% larger in every dimension but I estimate only 10% heavier due to the sleek profile.
DESKTOP ENCOUNTER (Structure Test)
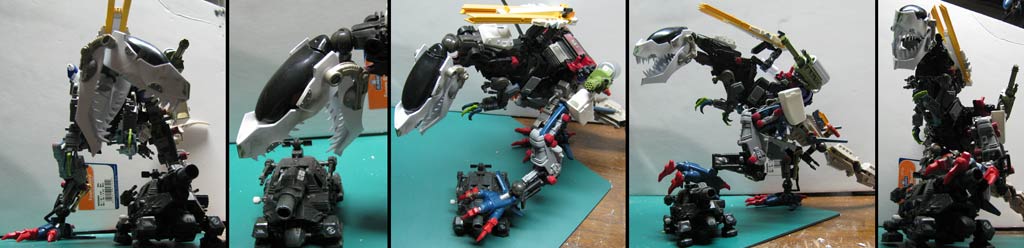
Well, I wanted to test out Eradicator’s flexibility, but also an option of building a dynamic display stand for him out of a Zoid carcass. That turned into a quick photo shoot of the giant theropod making his first kill on my desk. These shots give a sense of scale as well; the jaws yawn open enough to completely engulf a Cannon Tortoise! The last three shots demonstrate the classic “T-Rex takes something down by standing on it” pose, which I am considering for a display stand.
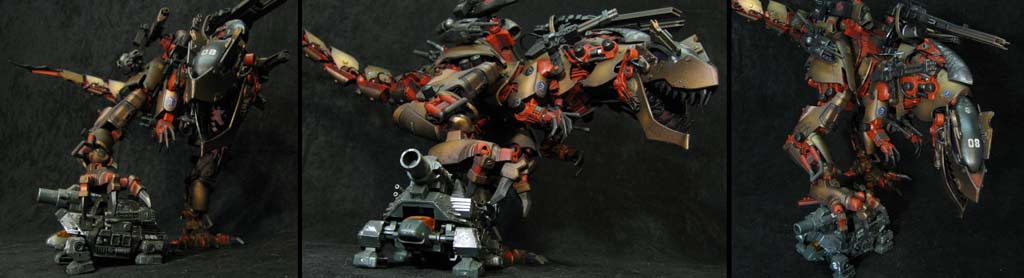
STRUCTURAL FINE-TUNING
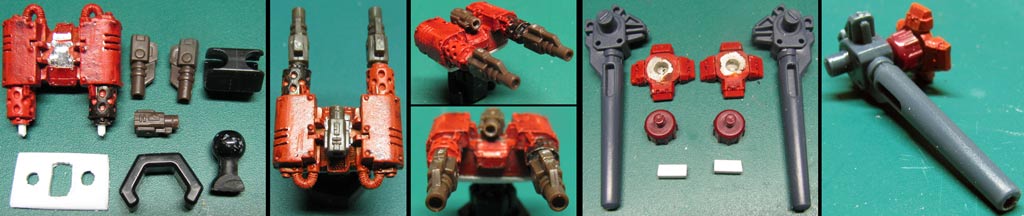
First I had to fix the balance issue. My wonderful, super-supportive wife (and a rockin’ war gamer) supplied me with some metal Warhammer 40k parts (shown with blue arrows). These small changes made for near perfect balance at the hip. The second frame shows a few more additions: green arrows point out pieces added to test out future details (side armor and the lower pursuit thruster). Purple arrows show the addition of the HammerHawk heavy missile pod (courtesy of a travel toothbrush) and rear/underside “Defiant” defense gun battery (courtesy of Bamburian). The last picture shows the location where I mounted the universal-jointed chest cannons. I’ve been saving two pairs of extra Shield Liger guns for years, and figured they finally found a decent home!

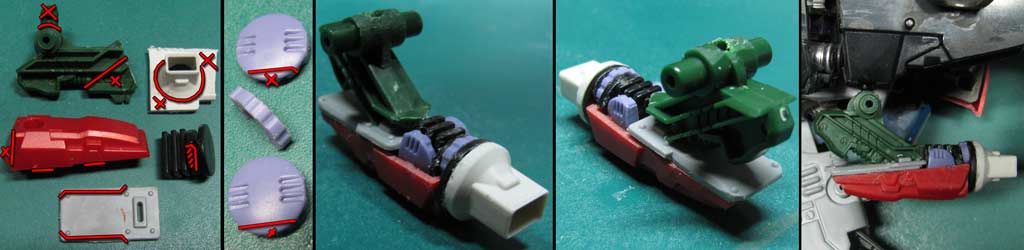
STRUCTURAL FINE-TUNING
First I had to fix the balance issue. My wonderful, super-supportive wife (and a rockin’ war gamer) supplied me with some metal Warhammer 40k parts (shown with blue arrows). These small changes made for near perfect balance at the hip. The second frame shows a few more additions: green arrows point out pieces added to test out future details (side armor and the lower pursuit thruster). Purple arrows show the addition of the HammerHawk heavy missile pod (courtesy of a travel toothbrush) and rear/underside “Defiant” defense gun battery (courtesy of Bamburian). The last picture shows the location where I mounted the universal-jointed chest cannons. I’ve been saving two pairs of extra Shield Liger guns for years, and figured they finally found a decent home!

ZOID PARTS LIST
Energy Liger
Chassis, hips, thighs, ankle posts,
Shoulder weapon mounts, missile battery door,
RiPPeR magazine (motor), pursuit thruster housing
Various detail parts
Salamander
Leg structures & details, triceps, Gatling armor
“Hammer-Hawk” missiles
Heldigunner
Neck structure
Elephander
“Thermoshock” articulation mount
Bamburian
Neck vent, hamstring hydraulics,
“Defiant” gun turret
Buster Eagle
Talons, “War-Storm” sensor array,
Tail joint, “Sunderflare” cannon supports,
“Defiant” turret, pursuit module housing
Underside pursuit thruster housing
Aerosaurer
Arms, Claws, head cable plates
Gojulas
Mandibles, RiPPeR magazine (cap)
“Defiant” turret collar (cap)
“Commando” exhaust vent (cap)
Talon thruster nozzles (caps)
Disbelow
“Outrigger” weapon mounts, aft gunner station,
“Thermoshock” cannons
Seismosaurus
Tail, details, “Thermoshock” & “Defiant”
cannon mounts, “Hammerhawk” pod mount
Pursuit thruster details (caps)
Sturm Tyrann
“Warhammer” emitter, Pursuit module engine details
Liger Zero
Ankles, thigh & neck structures
Shield Liger Commander
“Repulse” 50mm cannons
Geno Saurer
“Phoenix Fire” and Shaufax guns (“Commando” pod)
Killer Dome (gear)
“Commando” exhaust vent
HMM Molga
“Armorbane” barrels & sight
“Imperator” grenade launcher
Ray Saurer
“Sunderflare” twin beam cannons
Dorsal power router
Black Rhimos
Interior foot armor
Deep Diver
Pursuit thruster module pylon
Sacurtis
“Commando” Unit sensory cowling
Soul Tiger
Dorsal sensor pod details
NeoBlox CP-03 Beam Gatling
“Hammerhawk” sensor & control system
CP-07 Canonry Unit
Ankle roll bars
CP-04 Attack Unit
“Repulse” gun mount,
Pursuit module engine housing
“Commando” urban combat pod housing
Small Zoid Cap
“Specter-Bolt” barrel stopper/stabilizer (internal)
NON-ZOID PARTS LIST
G.I. Joe RAM Motorcycle Sidecar
“War-Storm” Gatling cannon
USS Arizona
Pilot station deck & viewscreen, inner forearms
“Warhammer” emitter, dorsal sensor pods
Kotobukiya Chain Base
“Hammer Hawk” missile pod exhaust vents
Bionicle Parts
“RiPPeR” armature, central hand claws,
4th tail joint, inner arms, “Commando” sensor dome
Mega Bloks “Struxx”
Large joints, foot inner structures, ankle posts,
neck support, Jaw linkage/cannon base,
various cosmetic posts
Mega Bloks “Neo-Shifters”
“Arclite” plasma cannons
Asobloks
Last tail joint, “Warhammer” emitter base
Gundam Model Kit
Gatling barrel cowling, pursuit engine intakes
Warhammer 40k Immolator (plastic)
“Specter-Bolt” cannon power magazine,
Canister countermeasure systems,
“Commando” pod housing, various detail plates
“Giefald” machineguns (“Commando” pod)
“Commando” and “Hammerhawk” pod flood lights
Maintenance kits, hinged ankle armor
Warhammer 40k Dreadnought (metal)
“Armorbane” cannon housing, “Thermoshock”
Cannon mounts
Robotech Hangar Bay
Jaw details
V-22 Osprey VTOL
Shoulder power amplifier node
Klingon Bird of Prey
Dorsal sensor pod cowlings
Honda Police Motorcycle
Dorsal power router
RECYCLE & NON-KIT PARTS
¼” Cylinder Rare-Earth Magnets
Armor anchors, various joints & weapon mounts
Steel Serpentine Chain
“Sunderflare” power cables
Deodorant Canister
Thigh, shin, heel, and shoulder armor
Clock Screws
Joint/assembly reinforcements
Shampoo Bottle
Body & tail armor plates
Soft Soap Pump
“Defiant” turret mount, sensor domes
Steel Watch Band
“War-Storm” ammo belt & sighting sensor
Ergonomic Keyboard
“RiPPeR” barrel & ammo feed inlet
Pursuit thruster nozzles
10-Pin Socket
“Specter-Bolt” magazine base
10-Pin Socket Plug
“Specter-Bolt” vents
PCI Card Socket
“RiPPeR” Main Housing
Server Shelf Peg, Screws, & Washers
Internal tail ballast (for weight distribution)
Memory Card Sockets
“RiPPeR” Magnesser rails
Motherboard Capacitors
“RiPPeR” compressor tanks,
“Specter-Bolt” sensor arrays,
“Hammer-Hawk” missiles,
Various detail cylinders
Sun Visor Sunglasses Clip
Head structure & armor
Robart Nylon Hinges
Talon joints, missile bay door hinges
RC Aircraft Hinges
“Repulse” gun detail
Steel Springs
Tail & torso suspension system
Nylon Wrapped Braided Cord
Threaded cables
Video Tape Parts
“Specter-Bolt” barrel, “RiPPeR” targeting unit,
“War-Storm” ammo feed armor
Aluminum Tubing
“Specter-Bolt” barrel, Detail hydraulics
Ballpoint Pen Lock-Pin
“Specter-Bolt” muzzle
DIP Shunts
“Specter-Bolt” & “Sunderflare” sensor arrays
Hard Drive Cable
“Repulse” & "Armorbane" ammo belts, detail vents
Sheet Styrene
Numerous supports & panels
Head armor, teeth, pilot viewscreen,
“Hammer-Hawk” missile rails, tail blade
Tube Styrene
Numerous supports, detail hydraulics
Circuit Board Screws
Neck heat exchanger & “RiPPeR” mounting pegs
Shoulder peg extensions, body cable anchor pin
SATA Ports
“RiPPeR” Cannon parts, pilot/gunner station hardware
“Commando” pod vent, internal torso details
Motherboard BIOS Battery Holder
“Thermoshock” turret armor
Motherboard COM Socket
“Commando” pod internal structure
Motherboard Memory Module Clips
Internal torso details
Steel Washer
“Thermoshock” rotation stabilizer
Zip Tie
Tail gunner control panel
Baby Formula Measuring Cup
Tail segment 1 underside armor
Mouthwash Pump Cap
Tail segment 2 underside armor
“War Storm” ammo canister
Cheap Laser Sword Blade
Tail segments 3, 4, & 5 underside armor
Soft Soap Pump (tube)
Knee joint pin. “Specter Bolt” extending barrel
Soft Soap Pump (steel bearing)
“RiPPeR” sighting lens
Stainless Bracelet
“RiPPeR” ammo feed belt
Blue LED Flashlight
Power core light source
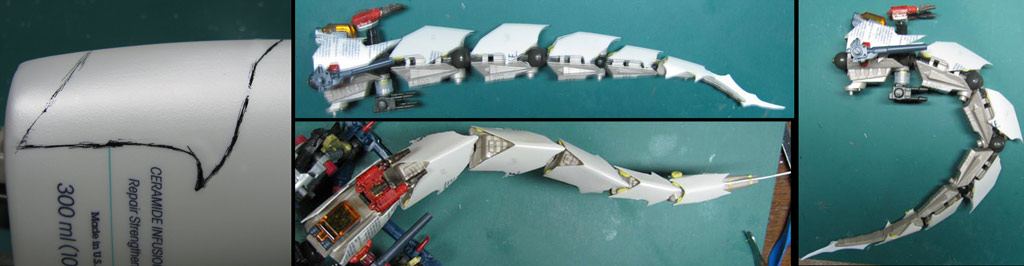
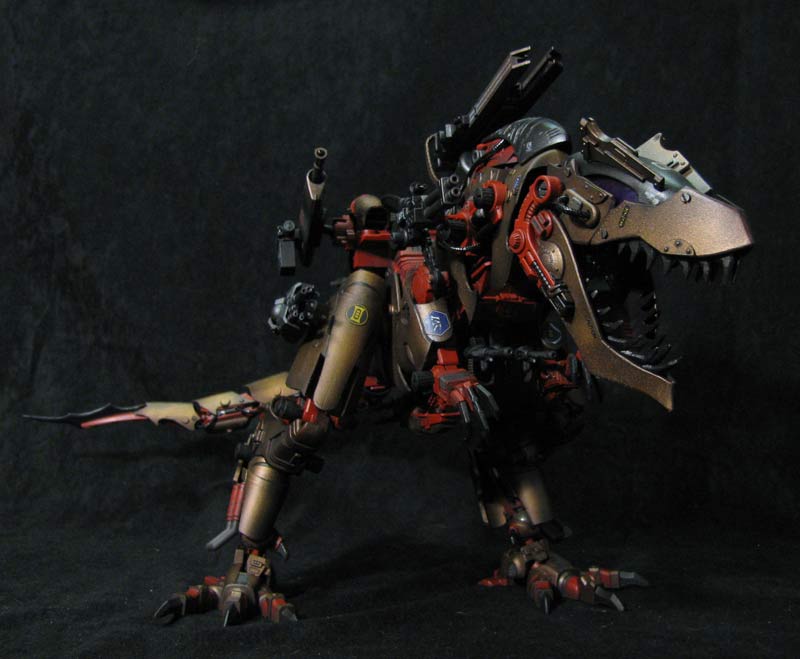
FIRST (AND LAST) COMPLETE PRE-ASSEMBLY
By this point I had logged a pretty sizable chunk of my life into the custom and had no idea if it was all going to work! The photo was taken at midnight about half way through the project. This was the first time I had actually put all the pieces together to see how well they meshed visually, and it was the very first test of my modified joints under the stress of the entire build. I know, the tip of the tail is cut off in the photo (I had to wheel my chair back against my storage shelves to get this much of the Eradicator in frame!), however, there were no tricks, here... the model is standing solidly on its own two feet without any support. It could strike several animated poses and required only a few structural tweaks (strengthening the knees, hips, and first torso and tail joints). I was also forced to add some balast to the tail by cutting open the third segment and loading it with heavy metal parts.
PAINT BASE COAT
I agonized over the color of this build (and I’m still not sure I chose the best set). The colors were to reflect a new faction in my Age of War story, the Braedurin Empire. I wanted something that was somewhat regal, yet still looked rugged and tough. The first draft was to be a blue structure wrapped in gold armor, but it didn’t feel aggressive enough and I ended up going with red. The body structure is painted in two red tones; a darker red is used for some panels and detail pieces. The gold became flat brass edged in Burnt Iron; it is far darker than gold alone and gives an industrial weight. To add contrast and a real feel of menace, the weapons of the Eradicator are all based in black but to be airbrushed in Graphite Metallic in the end. This includes not only guns but teeth, claws, and the tail blade as well. I decided I liked the contrast afforded by the skull remaining black, as well. Further, the hydraulics dotting the custom are black with chrome pistons. Again, to add contrast and interest, the inside of the torso pieces are painted flat black and the cylinder forms there (and some other details around the body) were painted a medium/dark gray.
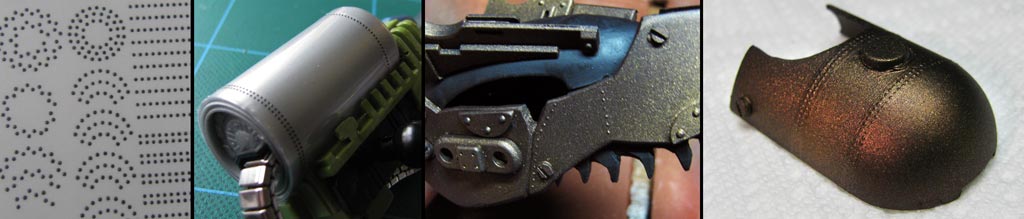
JUST RIVETING
The placement of a few Warhammer pieces had added some rivet details which I decided could be used to effectively create a theme for the Eradicator. As fortune would have it, about this time a Micro-Mark catalog lands on my doorstep with a new product; water-slide decals featuring [i]real 3D brass rivets![/i] Now, I didn’t want to overdo it; too many rivets and the Zoid would look like an old train boiler, but I definitely could see potential here. I tastefully added rivets to the armor plates and on various other parts of the model. In the end they would appear as texture details that, I feel, really enhanced its rugged character. I also didn’t want the armor to have this completely smooth appearance; it needed a bit more texture to look… Zoidy. This step had to be taken after the build was completely finalized and after the model was primed so the rivets would retain their maximum surface texture. Next time, however, I think I will go with the larger scale rivets on the bigger models.
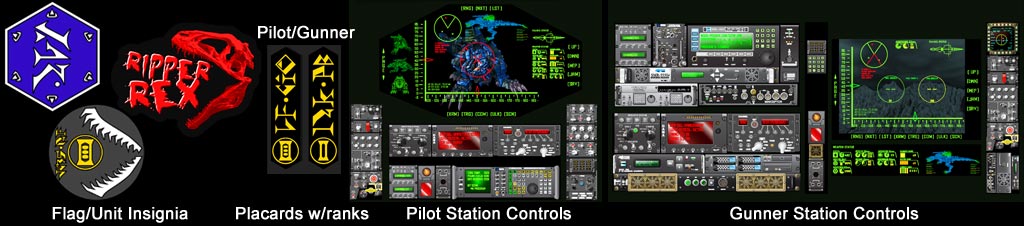
CUSTOM DECALS
As with all of my builds of late, I went with water slide decals for Eradicator using a combination of my custom printed decals, HMM Zoid decals, and some others out of my old stock. The ones above I generated for the build using Illustrator and Photoshop. The first ones are simple enough; the hexagon is the flag of the Braedurin Empire which I wanted to be a unique shape and color to distinguish it from existing factions, and also to stand out against the gold, red, or black surfaces. The "teeth" states this unit belongs to the First Elite Force, and reflects the Rank-3 General piloting the unit. I made the "Ripper Rex" decal using a photo of an actual acrocanthosaurs skull... it's a kind of an in joke to myself; "RiPPeR Rex" was my working title for months before I actually named the Eradicator. The two narrow strips are the names of the pilot and gunner; I invented the Braedurin language in order to give a more authentic feel to encountering an entirely new culture. The pilot and gunner station controls were generated through two means; the large, central screens were made in Illustrator to reflect the actual HUDs of the two stations, the control surfaces are designed after actual military aircraft and tank controls, aslo hand made in Illustrator. Below is a sample of just how sick I am about this....
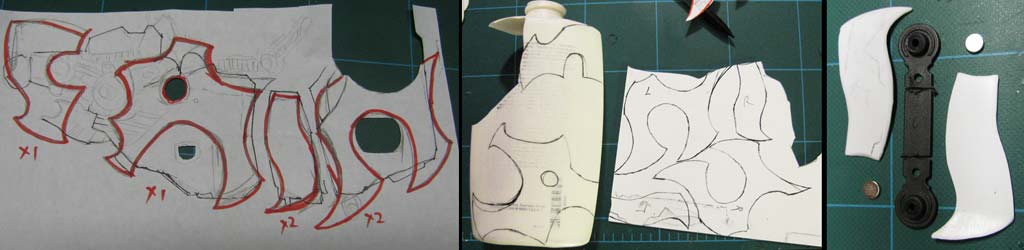
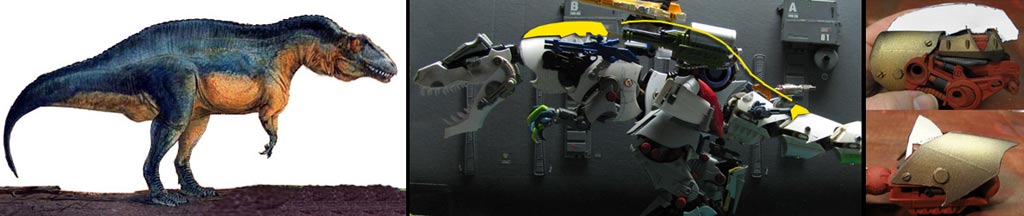
HUMP DAY
Yes, these photos come in the right order! After the entire build was done up to this point; assembled, sized, weighted, magnetized, primed, and base-coated... I wanted to draw the sillouette closer to the actual arcocanthosaurus. During this process I strayed from the large, thick "sail" (or tall, thin hump, if you prefer) that really distinguished it from other theropods. Here you can see an artist’s interpretation of the thin hump that travels from the base of the scull to the tail. My model lacks any resemblance to it. 75% of the area dominated by the hump is taken up by the power plant and the huge gap holding the RiPPeR armature, but I can still be truer to the original animal. I aided the look a little with the tailgunner station the power distribution hub mounted at the back of the power plant, but the distinction was still lacking. I wanted to create a hump over the long, thin neck and to fill in a little bit of the gap between the large first tail segment and the much smaller second segment. Together I hoped they would look right and function as a sort of ECM/communications suite. I also wanted to keep the additions very light as the custom weighed so much already (paint alone seems to have increased overall weight by almost 10%). I made two paper forms to decide how best to shape the pieces I would make and try to think of how best to attach them without demolishing the finalized work I had already done.
FROM ONE PREDATOR TO ANOTHER
For the “spine” of the two pieces I decided to go with something more detailed than a simple piece of styrene; I cut out four large chunks from the deck of the USS Arizona model I’ve been stealing little bits from. For the main shape of the hump I envisioned a kind of sensor array “canoe” like those found on military aircraft. I finally used pieces from a model I’ve had on my shelf for more than a year; a large scale Klingon Bird of Prey I found at a thrift store for $1. This produced an excellent cowl for both pods, however, it left the majority of the forward pod open. I filled this out with some detail parts; a spare Soul Tiger canopy and some computer bits. The capacitors help to unify the addition with the rest of the model since they appear in the legs, body, and RiPPeR. To attach the neck pod I reworked the component supporting it by driving a longer screw through it, then I affixed a magnet to the pod itself. The rear pod uses a far simpler method of peg and hole; though it required cutting into the finished tail segment.
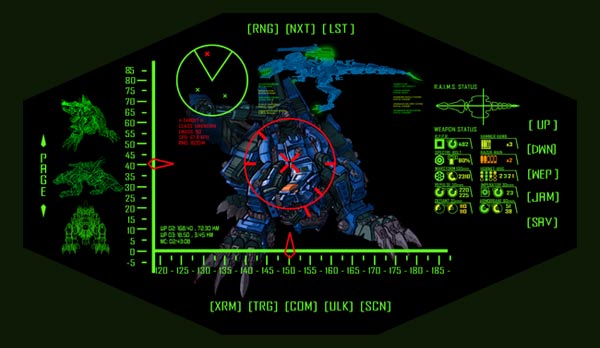
UP CLOSE AND PERSONAL
This image is just to show the stupid level of detail I put into the graphics for the XZ-336 Eradicator; the HUDs were all given a truly functional look with all the bells and whistles. Also, just for those who read this far, there is a preview of my next build here... the Zoid being targeted is my first commissioned custom! It's going to take a while to build it, but I couldn't resist incorporating the blueprint in the display. :D
ARCHIVE PHOTOS : NO ARMOR
I wanted to post a few shots of the custom lacking its golden armor because, quite frankly, I doubt I'll be removing most of that shell in the future (don't want to risk damaging the finish or popping any pieces off!) These shots just provide an overview of the Eradicator in its nakedness. I wish I could have built a full-fledged CAS for it, but really that wasn't the goal! The only reason I used the removable armor format was to ease the burden of painting it and to preven having to chop up the paint job in order to glue the bits together. Still, it opens the opportunity for some nice CP/CAS stuff in the future.
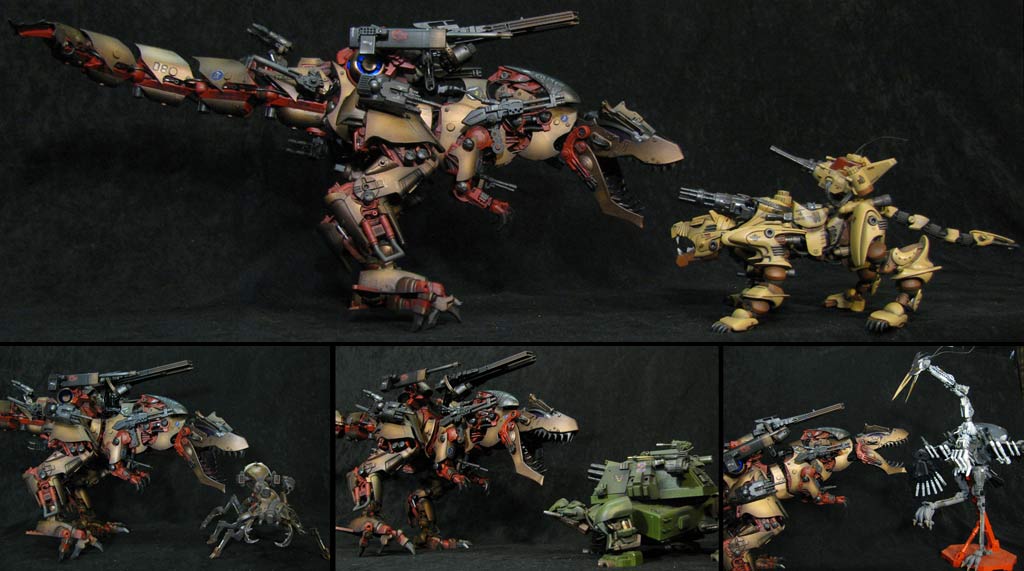
COMP SHOTS
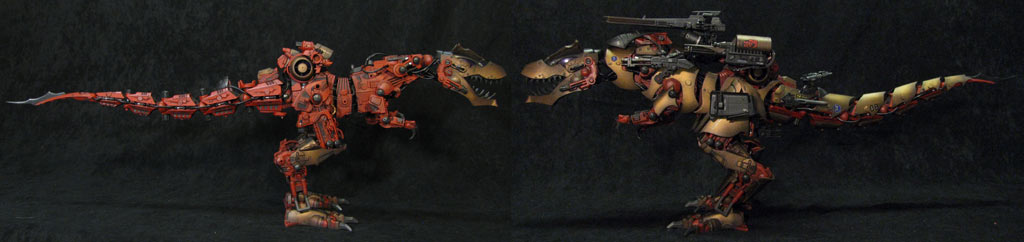
I wanted to record a few of these, as well; the comparison photos demonstrate the size of the Eradicator against a few well known Zoids. The first set shows it versus the closest kit I own; Gojulas Giga. You can see how it compares, being longer and sleeker, but not necessarily looking heavier as the Giga is a much thicker design with its broad hips and huge head. Against the mighty Deathsaurer the Eradicator looks more like a raptor; much thinner and sleeker but still dwarfed by the beast. Against more common Zoids, however, like the Cannon Tortoise, Eradicator is a terrifying giant promising a quick but very messy end.
BITS & PIECES
The XZ-336 Eradicator is my most advanced custom to date. It has more articulations, body parts, and detail pieces of any custom I've done; including Fusillade, Storm Heron, and even Seige Tortoise (which has 5 different variants). Here are some of the statistics for this build which I see as my greatest achievement to date:
Custom start date: January 10, 2011
Hours to complete: 188 (approximately 2 hours per week, 10 hours per week in the final stretch of the contest)
Assembled Components: 55 (structures : 26, armor pieces: 29 weapon units: 14)
Motherboard Capacitors hidden throughout the build: 32
Articulation Points: 64
Rubber Caps: 45 (46, if you include the snipe cannon internal stopper)
Magnets: 69 (55.2 pounds of pull!)
Length of Chords: 90 Inches (2.5 yards, 228.6 cm, etc.)
Part Sources: 78 (Zoid kits: 25, models/toys: 14, recycled components: 39)
Most extensively documented build to date
New Techniques: Magnets, 3D rivet decals, nylon chords, full (almost!) CAS, whole components made with computer parts (RiPPeR cannon), internal counterbalancing, custom canopy glass, and... My first ever therapod custom!
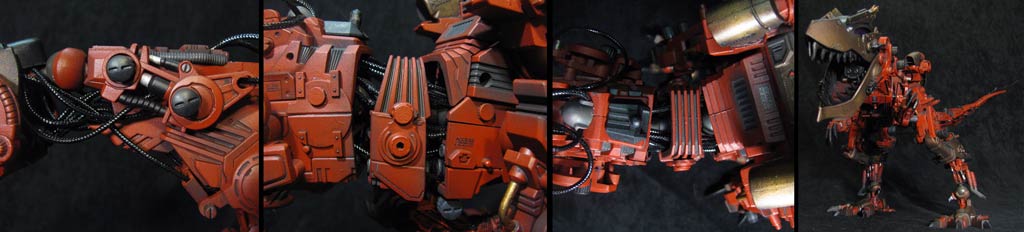
DETAILS: HYDRAULICS
There were many places where I decided to create hydraulic cylinders for detail. I wanted to hide the typical look of the Seismosaurus tail pieces that so many customizers have used. I removed the side panels that covered the original “string drive” and decided to fill the gaps with mini hydraulics… since I had no such parts, they would have to be created from scratch using tube plastic and aluminum. Though the tail segment trenches appear identical in size, in actuality they are all different and required two sizes of hydraulics and some slight modification to fit identically sized ones. I also installed similar cylinders into the RiPPeR armature to remove the plain, boring look there. Each hydraulic for the tail was made from three pieces of styrene tubing and one aluminum rod (a total of 30 tubes and 10 rods), and the armatures were built from four tubes and one rod each. The process of making 12 hydraulics took about three hours, and I feel it was time well spent.
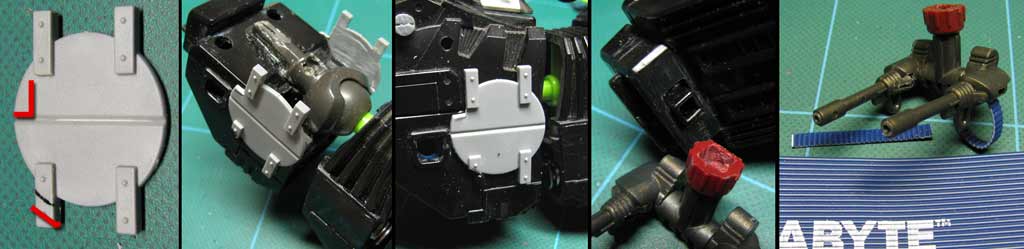
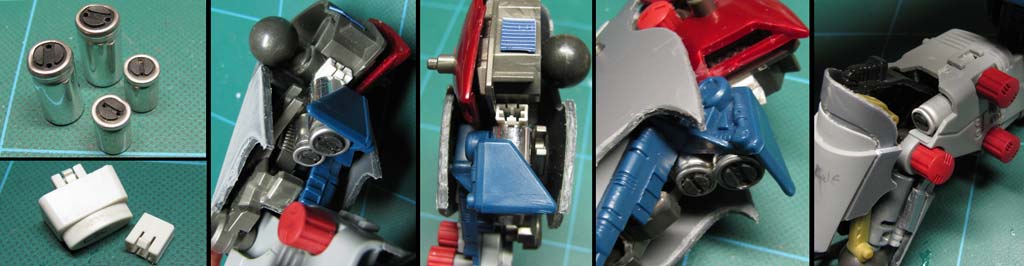
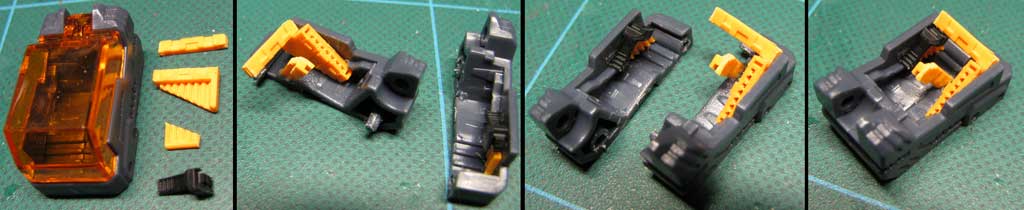
DETAILS: BITS & PIECES & 46 HAND-PUNCHED SCREW HEADS
Despite the overall excellent appearance of the build so far, there were several “naked” places around the Eradicator’s frame; some of these peaked through gaps in the armor, others were in plain sight. I took a collection of bits from various sources to add a little more detail to the custom. The black pieces in the first photo above were cut from a piece of the Energy Liger’s battery cover. Notice the slight differences between the two “n” shaped bits? This is proof that even major companies don’t mold things exactly the same way sometimes! The light gray pieces are from a Warhammer 40k tank, the bluish pieces are from an Aerosaurer, and the round dark gray pieces are from a Robotech hangar model from ages ago. The second picture shows the first of 46 screw heads I popped from a styrene sheet using a leather punch. Pic #3 has the detail bits added to the head (a cable will loop between the openings on the blue piece), and you can see the screws have been slotted. The fourth frame shows where I added a long vent under the thigh joint and one of the maintenance toolkits; it will be almost entirely covered in armor. The small gray hinges turned out to be perfect for flexible armor flaps that covered the inner foot structure nicely. The last shot shows the “n” bits adding detail to the otherwise bland dorsal missile bay cover.
DETAILS: FILLING LARGER GAPS
Though the build has come together beautifully, there were still a few areas of glaring plainness and large gaps left over from joining such different kits. The large hollows left by the Salamander’s leg armor served a function for that kit, but here they were left only to fill out the silhouette of the hips. Problem was, they appear very empty, so I put some large capacitors in the gap to add some large details. In the small space above these canisters I slid the post from a small keyboard key; now the Eradicator has an additional pair of small thrusters at the back of the hips!
VERY ILLUMINATING
As the project was coming to a close I happened upon these glorious little LED flashlights. As it so happened, one could mount perfectly within the body of the Eradicator with no modifications at all to the light or to the model. I decided that Eradicator deserved to be illuminated, so I devised a tool that could turn the light on and off by reaching through a pre-existing gap hidden under the hip’s forward power plant cowling. Ta-dah! Eradicator’s power plant now lights up! I intended the overglow to blast light from the hip section forward into the body as well to make it appear to glow a bit; after all, chopping the torso into three parts made it kinda difficult to keep batteries and lights in each section. In fact, to help the glow along, I painted the interior of the light chamber white, amplifying the ambient light.
MAGNA-CAS COMPLETE!
Here is the build with the armor with the weapon turrets installed. In the end the Eradicator ate up 69 magnets, but the result is simply awesome. Oh, and the final tally? Let’s hear it… 54 pounds of pulling power! Yep, as I built, refined, and painted up these parts, some would occasionally shoot across the table, stick to my knife, suck one of my files onto it, and, of course, stick to other magnetic pieces. I wonder if it interferes with local cell phone signals or anything? I do wish the CAS were entirely complete, but the armor of the head, legs, feet, and engines are simply painted on (though the overall look is very effective).
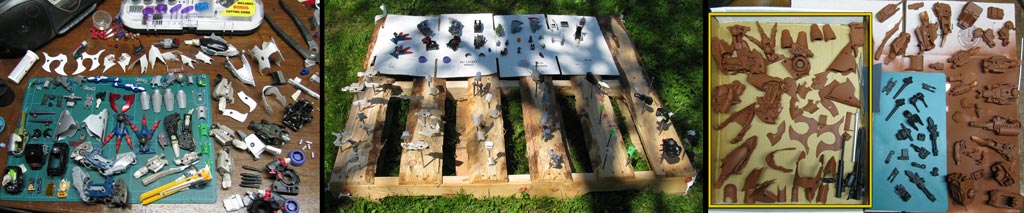
PLENTIFUL PLASTIC PIECES PRIMING PALLET PREPERATION
Getting the Eradicator ready to paint was yet another mammoth task; each ball joint had to be masked, as did dozens of pegs and other joints. The first image above shows the custom completely taken apart and masked. In the end, there are 114 components not including caps and cables; some components comprise complete, jointed builds themselves (TRIVIA! The head of the Eradicator is comprised of 35 parts, includes 3 joints, and weighs as much as a Guysack… not including the pilot station (with the pilot station the head is 45 parts). The second image shows my priming solution for such a vast array of parts; the magnetic pieces were mounted to 16 penny nails hammered into a wooden pallet, the non-magnetic components are on the cardboard piece on the back half. Mind you, this shot only represents the parts that I primed in brown. Notice the last photo; the Eradicator has two colors of primed pieces. The brown bits are structure and armor, the black pieces are weapon systems. The pieces in the yellow box have been set aside for the application of 3D rivet decals.
NAKED DETAILS: NO ARMOR
I wanted to highlight some of the stuff that vanishes beneath that golden coating. These views of vents, multi-red body panels, hydraulics, and custom labels almost all vanish when the armor is in place. This is especially true of the thighs and torso; the armor on the shins, calves, shoulders, tail, and even the neck can be pretty easily removed for display, but not the heavy, unforgiving and intricate pieces covering the largest areas. It was a shame to put this kind of detail into parts that will likely never see the light of day again, but I just couldn't do half the job.
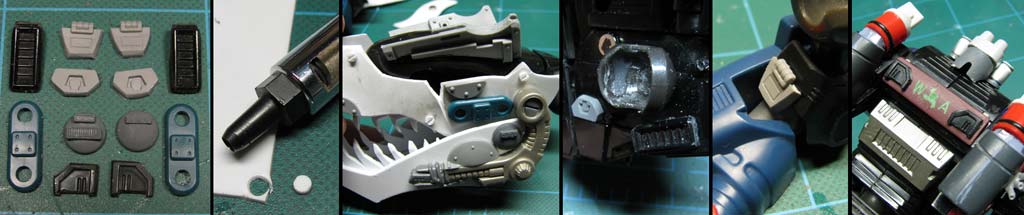
TAILGUNNER STATION
I have quite a selection of small cockpits, but they all feel like... Zoid heads. The only one that really felt right for the job was from a Dispelow (or however the heck it's spelled); it looked like a heavily reinforced bunker. I thought about replacing the glass with purple to match the other parts of the Zoid, but decided instead that I would paint the canopy as solid armor instead. This cockpit is essentially a large, square box... too large. The gunner flops around inside with virtually enough room to make it a 2-seater! I opted to solve this issue by adding internal controls to encase the gunner (and to make it look cool). The yellow bits you see up there are pieces cut from a SATA socket from my dead motherboard (I highly recommend customizers stock up on burned out motherboard parts!) I cut them into vented supports, a suspended forward control panel (with monitors) and the right side control surface. I also cut and shaped a control yoke. The left control surface is the head of a zip tie that ends up looking like an ejection handle. These parts had to be secured in a way that allowed the cockpit to be disassembled for painting. I love how it turned out!
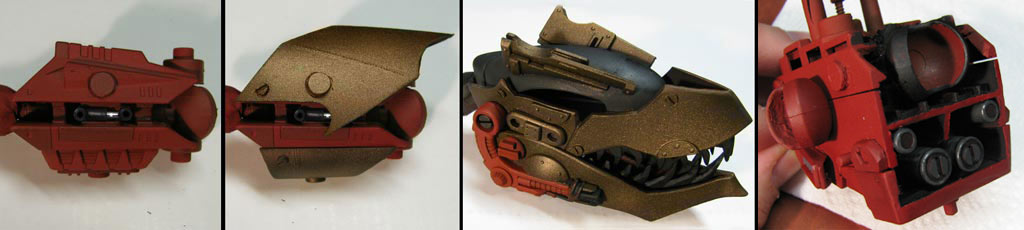
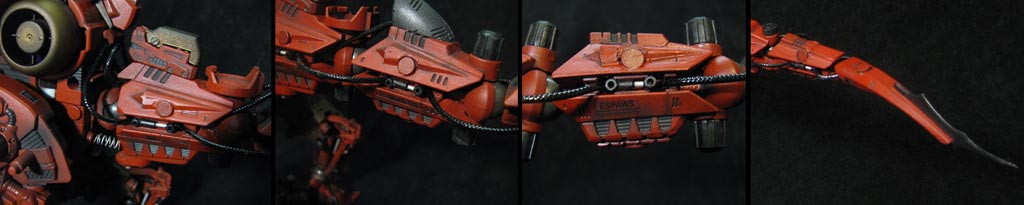
POWER PACK
One regret that I had with the (very cool) weaponry I designed for the Eradicator was that the central turret dipped into the place where the distinctive hump of the acrocanthosaurus was supposed to be. I decided that I could extend some form of equipment off the back of the large power plant to at least look... humpier. I took an ancient piece I had from an old police motorcycle model and fount it had exactly the right curvature to fit the Energy Liger chassis. To this I mounted the torso gun module from a Ray Saurer and a pair of semiconductors were placed on the cycle turn signal lamps. After placing a pair of rubber caps on the sides to really tie in the Zoid theme, I threaded a pair of power cables from the ‘Saurer piece to the RiPPeR.
CLOSE TO THE CHEST
With the main structures finished, there came room for some additional details and features. The chest module kept coming apart as I added more weight and complexity to the build, so I decided to add some support in lining up the upper and lower halves of the chest while giving some detail. The hatch to a Warhammer 40k tank was used to create a clamp that would cradle the upper portion of the chest and take away some of the empty, squared space. This would also serve as a magnetic mount in a bit. The third picture shows how I reinstalled the old power switch cover (minus the actual switch to reduce weight), the I drilled a squared hole in a Seismosaurus gun mount and fitted it snugly in place. The “Repulse” gun battery was taken from my Shield Liger Commander (whose custom cannon set leaves no room for the smaller guns); the guns were modified and laced on a CP-04 cannon mount.
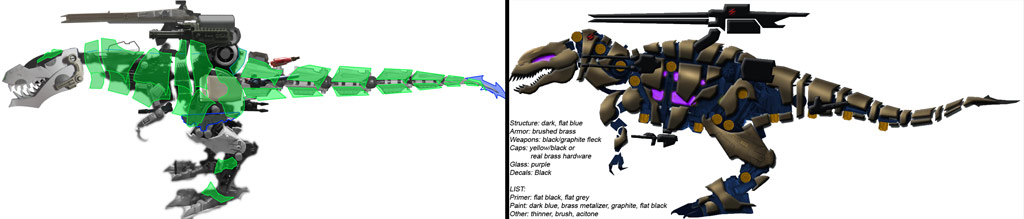
WELL, THAT WAS THE PLAN
As great as the Eradicator was starting to look, from the beginning I had envisioned this custom as a sleeker, almost organic looking machine. A complete set of smooth armor would also help to give it a unique silhouette and add some mystery to the build (I love it when you have to look at a custom for a long time to figure out what parts were used). The armor would have to allow the Eradicator to flex, and I also didn’t want it to bury all of the details. The two images above represent the armor planning stage after the body could stand on its own. The first is a black and white image of the Eradicator with green armor superimposed over it. The armor was planned from the start to be cut from one or two bottles of Amway shampoo… they have excellent curvature for the spine, they are durable, and, if paint won’t work well on them, they can be sanded to a pearly smooth surface. The second image is my original plan for the Eradicator but altered to plan out the final color pallet; deep blue structure with brushed brass armor and black (well, blue/metal-fleck graphite) weapons, and dark yellow or brass caps. Would have looked great, but I opted for a more “regal” and less Helic look by going with deep red for the body, gold/brass for the armor, and black caps for contrast.
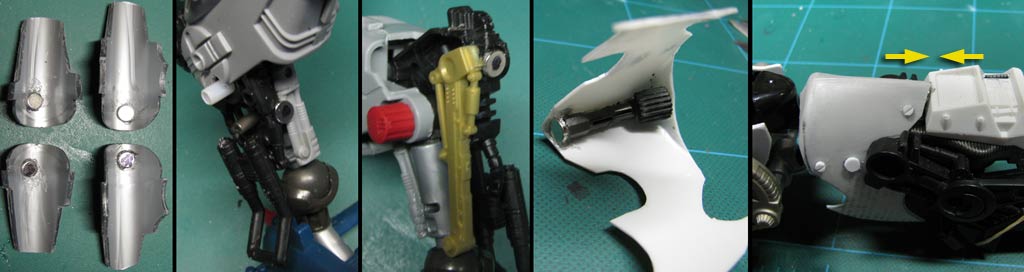
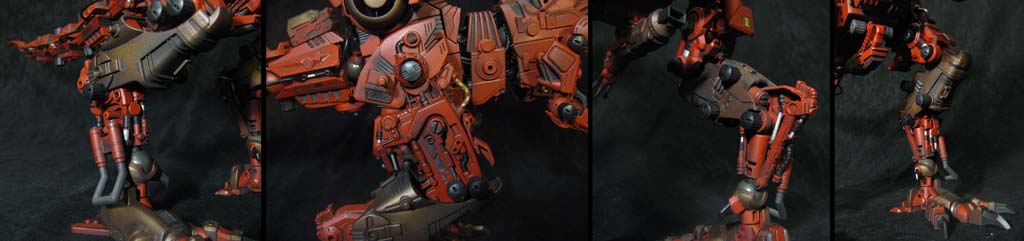
ARMOR: THIGHS & LEGS
As the rest of Eradicator was coming together there was clearly a deficiency in the size of its thighs. I knew that they would require armor to unify the appearance, but they also needed some bulk to cover that skeleton. I spent hours trying to find something that would work, and ended up resorting to my recycling bin. The first frame above is a pattern I traced of the leg to get some proportions to work with, and the second shot shows some working “sketches” on my material of choice… an empty deodorant tube. The third shot is a rough cut to give some idea where I was going with the armor design and helped me to refine it. What you may not be able to see here is just how thick that plastic is! It is easily 3-4mm in thickness; quite heavy, and with a low melting point. I had to use my Dremel at its lowest speed to prevent it from melting. However, as thick as it is, the plastic is also soft, and snaps around the leg with relative ease. To prevent the look of a flattened cylinder I dug up the original thigh armor from the Energy Liger and replaced it to create a rounded “cap” on the hip. The effect is, I think, just about perfect. The last three images show the final designs (though not the final, clean parts) for the leg armor. The Energy Liger’s leg weapon mount pins hold the armor perfectly in place and allow the original weapons to attach. The sweeping curves and hooks tie in with the look of the tail armor. I love the “handle” detail at the hip and repeated it at the shin and calf.
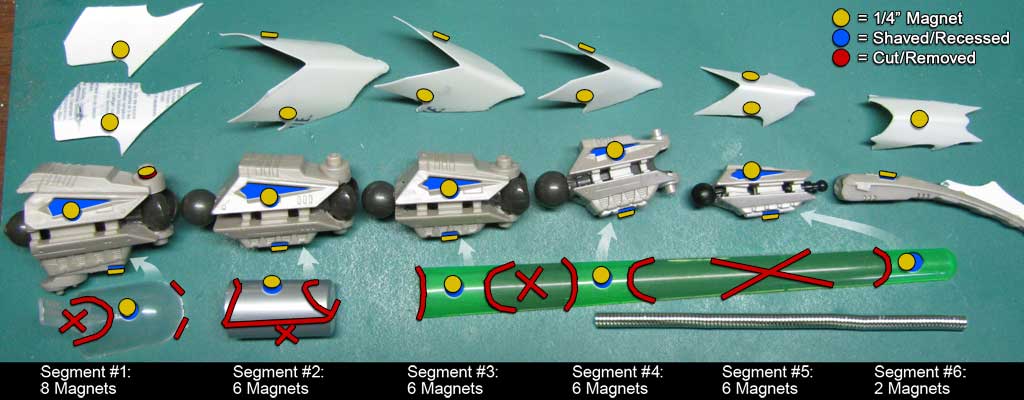
ARMOR: TAIL
Shampoo bottles in action! First I made paper forms to get the shapes of the armor pieces and fit them to the body, then traced those forms onto the shampoo bottle. The plastic cuts well with scissors though it’s quite thick and slippery. You can see in the second image that the first draft worked well but required a few minor tweaks to get it right; the bottles have curves that the paper forms did not. In the end, the spinal plates look excellent. I decided to secure the armor plates into place using strong magnets… gluing them would cover the detailed finish of the tail structure and screws were simply not an option. This essentially became the basis for a CAS for the Eradicator.
MAGNETIC APPEAL
Building lots of armor bits was one task, applying them was quite another. For the paint job I had planned for the Eradicator I didn’t want to secure the armor with glue; painting the red and the gold pieces separately would be a must. After the paint was finished I still didn’t want to permanently cover up all the details I had worked to make. And, let’s face it, with a custom with this much articulation, I wanted to be able to repair anything if it went wrong! My wife (war gamer that she is) suggested I use powerful magnets to click each piece of armor onto the frame. They hold like screws but are completely removable. The appeal was also there to use removable plates to make dioramas or even a CAS. I acquired a set of 100 ¼” magnets from a website (that’s the stack on the lower right, up there) and started to design their application.
ARMOR: TAIL (UNDER, OVER, & AROUND)
I prepped each body part and each piece of armor and affixed a magnet to each, but this became a real challenge. Each individual magnet has a pull of .8 pounds, so each pair of them could lift 1.6 pounds! Each body piece had to have a ¼” hole drilled to fit a magnet, and the polarities had to be such that one magnet would not repel the other right out of the reverse side. I have never worked with model parts willing to jump 4” with the force to knock my knife or file off the table. Further, though they held fast (really fast!) they created a very slick point of rotation; this required most of the dorsal armor bits to be affixed using a pair of magnets on each plus another pair was required to pin the lower armor into place on the underside. Doing the math, that’s 4.8 pounds of pull per tail segment! Ah, and to make matters just a little more complicated, I learned that super glue doesn’t stick to nickel-cadmium coated magnets OR to the plastic I had chosen for the armor; shampoo bottles. LocTite, however, had no problem affixing everything.
ARMOR: BODY
With all of the jointing of the torso, the weapon mounts and flexibility, and the attachment of the shoulders and hips, armoring the front half of the Eradicator was going to be a bit more intricate than the tail end. Similar to the tail, the most logical approach was a number of “half bands” with a set for the sides/back. Due to the RiPPeR armature and power core the top armor from the shoulders back would be best as side panels like the first tail segment. I decided not to add underside armor because each section had something I wanted access to; the chest portion had a gun emplacement, the second an empty peg (never know when you’ll need that!), and the hip section had the pursuit thruster pod. The neck would see the only full bands of armor, being encased side, top, and bottom, the lower band being separately mounted to the throat cable housing. To make such an intricate set of pieces I used the same technique as the legs; the first photo shows the paper tracing of the entire body, the second shows those bits traced onto the shampoo bottle and sheet styrene after the patterns were refined. The third picture shows the components for the waist armor; two “hooks” of styrene bent to a curve at the belly were affixed with magnets atop a black detail piece. This was the plastic tie for a toy my daughter got at Christmas (I save all toy tie bits now). It was required to hold the armor out a bit at the waist. The small holes mark where magnets were affixed and the raised portion helped to hold out and center the armor.
ARMOR: BODY (SLEEK & FLEXIBLE)
Continuing on with the torso armor, the first pic here shows a detail I required for the hip section. The blue arrow points to a shaving from an ink pen reservoir; there are two per hip armor piece that line up with the original armor securing pegs on the Energy Liger’s body. These did a great job keeping the armor from sliding around and bumping out of place. The second photo shows where magnets were affixed to the body pieces. Note the bright gray circular piece with the magnet mounted on the top half. That bit from a Warhammer 40k tank serves not only as a detail piece, it raises the magnet out to retain curvature to the armor when it snaps on, and it also acts as a clip to hold the top and bottom portions of the chest pieces in alignment. The front, bottom arrow shows the attachment point for the chest gun battery. The last photo shows the armor in place; it snaps in place with the magnets which continue the visual theme from the tail (most of these could have been mounted inside the armor; I decided to keep them outside purely for interest). Note the green arrow on the neck; that armor is secured in place both with a magnet and by clipping into slots cut into the Liger Zero leg pieces here.
POSITIVE SOLUTIONS
More magnets were used to hold on the shin, calf, and shoulder armor and various other bits. I decided to use magnets to secure the tail turret “Armorbane” and “Thermoshock” cannons in place, allowing them to rotate without the need to shape and secure pegs. A steel washer (for stability) and a magnet were glued to the Elephander turret; the sister magnet was installed in the Seismosaurus tail atop the first joint. For some time I had hoped to use this cool plastic part for some kind of turret; the oddly shaped black ring in pic 1 is a BIOS battery holder from my dead motherboard. The magnets are actually strong enough to snugly hold the turret upright through the battery holder despite the weight of the metal gun battery (which weighs as much as a small windup). The “pluses” are the feet of the Warhammer Dreadnought, used as the bases for the Thermoshocks. I had to drill the soft metal out to fit them over the first tail segment side magnets. Their sister magnets were installed into a pair of Seismosaurus mini-turret caps, which were drilled out to fit them. The magnets are strong enough to hold fast even through the dense metal, but I drilled holes through to increase the pull. In this way there are actually three magnets stacked on each side! The final shot shows the orientation of the guns which rotate using the magnet as a pivot point. You can also see the small DIP shunt I added as a targeting sensor; a feature duplicated on multiple weapons on the Eradicator.


BUILD CONTINUED


ARMOR: SHINS, CALVES & NECK
Eight more magnets were used to secure the shin and calf armor pieces into place. You can see in the second and third shots above that a black dot was drawn on each magnet so I would not accidentally mix up the polarity between the structure and armor magnets. Did that once; it was repulsive. The fourth shot shows the strengthening detail and magnet located at the crest of the neck piece. This one bit of armor was unique in that it clipped over the neck structure and was secured through a pair of slots in either side of the former Liger legs. The second magnet is located on the piece of Bamburian armor, pulling both back and slightly down for a strong, secure connection.


CUSTOM vs. CUSTOM
Finally, I really wanted to have a few images to show the progression of my customs and how the Eradicator compares to my previous builds squaring off with my latest entry: Helic's Paladin, Guylos' Dark Emperor, and Zenevas' Fusillade represent the largest builds for each of the Big Three factions (well, in 1/72 scale, Daedalos and Galant Mariner are in an altogether different category). Unfortunately, they are in storage off-site at the moment. So I decided to show Eradicator face off with Askari, Siobhan, Seige Tortoise, and Storm Heron, representing four of the most recent contest entries I've done. In all, I think the progression does demonstrate some improvements, but it also calls to my attention some ways in which I need to truly improve my skills. Perhaps my next build will record some better techniques, plans, and execution of those plans.
THE FUTURE?
I will probably add the few details to Eradicator that I planned from the beginning; a belly/chest filling piece made with the last segment of the Seismosaurus tail (it fills out the silhouette between the chest guns and the pursuit thruster unit), a similar piece that was planned for the throat, and possibly lighting up the eyes (though it's very cramped in the head!) I can also add moving booster cowels using the piston holes for hinges.) We'll see! If I do add those bits I will have to update this page some day. :-)
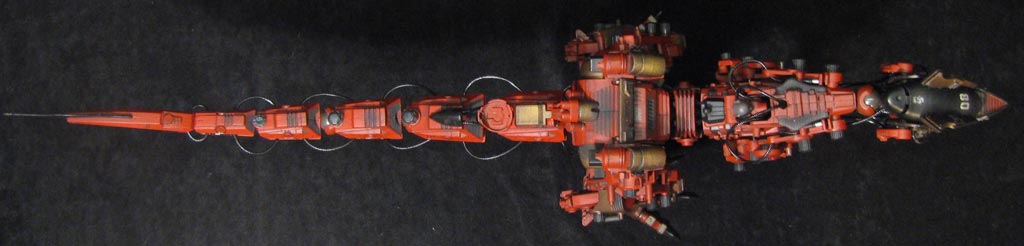

PURSUIT MODULE
One feature that is quite notable on theropods is the pronounced pubic bone; it defines the shape of the predator and it fills out the form of the torso. For my original design there was no need to address this, really; like so many other Zoid designs the body was plenty thick enough. But as this custom became almost 50% larger than the original plan the torso seemed to shrink accordingly. I decided that I could stretch the vertical dimension win a more or less anatomically correct pubic bone. It also needed to have a logical function (well, for me). I decided that the hip mounted pursuit thrusters were cool but placed all of the thrust high on the Zoid; a central, lower thruster would give more balance to the Eradicator’s charge. A Buster Eagle sacrificed for the main housing. This was capped with a Warhammer 40k armored hatch onto which a piece of a Deep Diver’s cannon became the support pylon. The Heldigunner CP-07 adapter formed the core of the engine, filled out with a pair of shaved down Sturm Tyrann caps left over from making Fusillade’s seats. Finally, I cut out and shaped another keyboard support peg to match the nozzles on the hip-mounted engines. In my mind, this unit bears in the nose a suit of ground sensors that aids the Eradicator in speeding over extremely rough terrain. The unit is mounted to the hinged portion of the Energy Liger’s battery compartment, and so the whole thing can tilt open for maintenance. Also, because the engine is peg-mounted, it can rotate and redirect thrust, helping the Eradicator make high speed turns. With a more balanced triad of engines, the Eradicator looks a bit heavier and also a lot faster.
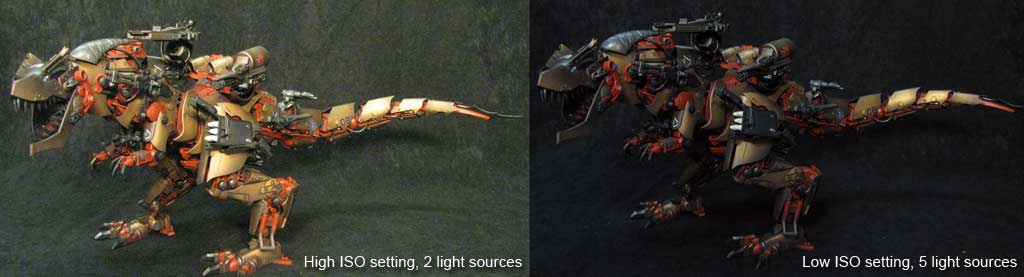
NOW I SEE THE LIGHT (PHOTOGRAPHY)
So, how much difference can photography make? Well... a lot. Photography is still a place where I suffer a great deal. I own a Cannon Cybershot digital point and shoot; not the idea equipment to film intricate details with. 90% of my photos were taken without the assistance of a tripod (mine sucks). The environment is my garage, with virtually no natural light and bare wood walls. The backdrop is a blackout curtain hanging on a pair of large delivery boxes, then clamped to the table to keep it somewhat smooth. The above shot on the left shows how my first shoot looked on high ISO with an overhead light and the reading lamp spot. The picture on the right featured three fixtures of 36" dual flourescent tube lights, a worklight spot clamped to the shelves over my head, and the flexible table lamp poised right beneath my camera, sometimes less than 10 inches from the model. I want a photo booth!