
IN THE BEGINNING
The original concept for Siege Tortoise sprang from cleaning up some shelves and running into an old watch box. The form was very tank-like and the wheels started turning immediately to create a new tortoise, treating the lid as a turret. The second inspiration that actually sparked the work was when we ran out of soft soap; I noticed that the pump had many interesting parts that could make a rather cool cannon. The idea that something was needed to keep Fusillade at bay came to mind as well; an artillery Zoid that wasn’t a super-Zoid. The Siege Tortoise concept was complete enough to warrant a build, and so the madness began again.
PARTS LIST
This extensive array of parts covers the components of all of the Tortoise modifications. Because there are five variants of the Siege Tortoise, I thought it best to list the parts by variant. The parts are also arranged first by Zoid parts, then other model parts, and finally by non-kit parts (such as wiring, paint can caps, and cheese).
XZ-204 Siege Tortoise – Base Chassis
Black Rhimos
Legs, hauling lugs, shell vents, head armor/”Hellseer” generators
Ray Kong
Feet
Seismosaurus
Head, primary weapon clip, gunner display supports, bolts
Gojulas Giga
Turret dorsal vent, defense modules, turret module locks, primary weapon port armor
Energy Liger
Engine blocks
Sauro Knight
Turret rotation joint
Gorhecks
Tail
Koenig Wolf (cap!)
Engine regulator
Deep Diver
ankle joints
Dispellow
ankle joints, tail joint
Killer Dome
Gunner seat hinges
SD Gundam
Head armor
Gundam (unknown kit)
Lower jaw
Gerwalk Ishkick
Gunner control deck
Transformers Whirl
Undercarriage cable housing
Cardinal Watch Case
Body, turret shell
Walkie-Talkie
Lower shell armor
Soft Soap Dispenser
Underside shell
Nylon RC Plane Hinges
Underside shell hinge, engine cover hinge, underside turret hatch
Asoblocks
Neck, hip joints
Bic Ballpoint Pen
Underside central hydraulic shaft
Video Tape Cassette
Gunner seats/displays/hinges
Game Piece Stands
Gunner control surfaces
Ben & Jerry’s Ice Cream Spoons
Primary weapon support system
Rubber Adhesive Stopper
Tail socket
Toothbrush Cover
Underside housings
Sheet Styrene
Leg vents, turret deck, shell underside, neck inner mechanism, engine deck, turret mechanism
Coffee Mate Creamer Container
Leg armor plates
Copper Wire
Turret access ladder, engine case handle
Serpentine Necklace
Armored hoses and cables
Elastic Chord
Engine cabling
XZ-204-B Siege Tortoise – Beam Artillery Variant
Bic Ballpoint Pen
primary weapon clip, “Eviscerator” energizer
Uni Gel Pen
“Eviscerator” main cannon
Phone Jack
“Eviscerator” sensor system
Copper Wire
“Eviscerator” sensor cables
Black Cloth
Main battery weather seal
Gojulas Giga
Communications uplink system
Elephander
Rear chassis
Salamander
Communications uplink system
Deep Diver
Cooling tubes
SD Gundam
Cooling system
XZ-204-H Siege Tortoise – Hybrid Artillery Variant
Dispellow
dorsal turret support
Ultrasaurus
Dorsal system vent
LB CP-03
dorsal turret structure
Starriors Gun
dorsal turret
Asoblocks
Turret exhaust ports
Bic Ballpoint Pen
primary weapon clip
Black Cloth
Main battery weather seal
Soft Soap Pump
“Ravager” core cannon
Styrene Tubing
“Ravager” outer cowling
XZ-204-M Siege Tortoise – Missile Battery Variant
Black Rhimos
missile bay vents
Zabat
radar sensory module, radar articulation armor
Killer Dome
Radar rotation cog
CP-26
Radar support post
Nylon RC Plane Hinges
missile bay doors, tactical missile fins
Hoth Diorama Turret
radar base
Cardinal Watch Case
radar dish
Bic Ballpoint Pen
tactical missiles
Pentel Mechanical Pencil
Tactical missile engine bell, radar antenna
Video Tape Cassette
Silo control officer seat
Bic Ballpoint Pen
tactical missiles
Brass Pipe Fitting
missile gunner support/radar tower counterweight
Copper Wire
missile system wiring
Styrene Card
radar vents, missile system housing, missile bay doors
XZ-204-U Siege Tortoise – Urban Warfare Variant
Zabat
armored light housing
Transformers Whirl
Quad cannon system
Warhammer 40k (Rhino)
topside DK-75MGS Cannon
Tube Aluminum
topside DK-75MGS Cannon
Tube Brass
topside DK-75MGS Cannon
Bic Ballpoint Pen
primary weapon clip
Black Cloth
Main battery weather seal
Clothing Price Tag Strips
armored lights
XZ-204-A Siege Tortoise – Aquatic Variant
Black Rhimos
Fore-fin engine housing
Gojulas
tactical missile tubes
Elephander
dorsal intakes
Gorhecks
torpedoes
Salamander
tactical missiles
Deep Diver
folding cannon
Dispellow
dorsal turret support
Godos
Folding cannon cable breech
CP-07
folding cannon base
CP-15
rear fin thrusters
Huey Cobra Helicopter
tactical missile pods, folding cannon armor
Warhammer 40k Landspeeder
Aft fin hydrojet nozzles
Warhammer 40k Dreadnought
Aft fin hydrojet trim tabs
G.I. Joe Cobra Rattler
fins
Asoblocks
Neck/hip joints
Bic Ballpoint Pen
dorsal thrusters
Video Tape Cassette
folding cannon barrel
Bic Ballpoint Pen
dorsal thrusters
Plastic Card
Hydrojet vents, shell
STEMS - (Siege Tortoise External Module Systems)
Each of the STEMS is essentially a Zoids CP kit all by itself. They can be mounted to any Zoid with standard small hard points, but were designed for the Siege Tortoise series. Their components, too, are listed by build.
“Trinity” Gatling Pods
(All items x2 to create symmetrical pods)
Rainbow Jerk (bolt)
Drum magazine front
Killer Dome
Drom magazine rear, motor radiator
Salamander Bombvern CP
Mounting box on #1
Sabre (sensor box)
Mounting box on #2
Mantis Toy
Drum magazine housing
Video Tape
Gun housing/mounting wing
Bic Ballpoint Pen
Horizontal support armor
Tube Brass
Gun barrels
Copper Wire
Cabling
Paper Post-It Note
Barrel stabilizing rings
“Twin Torrent” Missile Pod
CP-26
Missile pod, missiles
Red Horn
“Farsight” Target Acquisition System
Snipe Master
Mounting bolt
“Vendetta” 50mm Automatic Cannon
Buster Eagle
Cannon mount
Gojulas Giga (bolt)
Support Armor
Gojulas (bolt)
Drum Magazine
Death Razer (bolt)
Drum Magazine
G.I. Joe Cobra Bunker Machinegun
Main gun body
“Dire Wolf” 50mm Laser Cannon
Kotobukya HMM Command Wolf LB
Stock cannons
Buster Eagle
Cannon mount
Gojulas Giga (bolt)
Support Armor
“Vortex” Multiple-Fire Rocket Pod
CP-xx Viking Lance
Adjustable mount
Ultrasaurus
Sighting system
AH-7 Apache
MFR pod
Coil Spring
Power Cabling
Copper Wire
Cabling
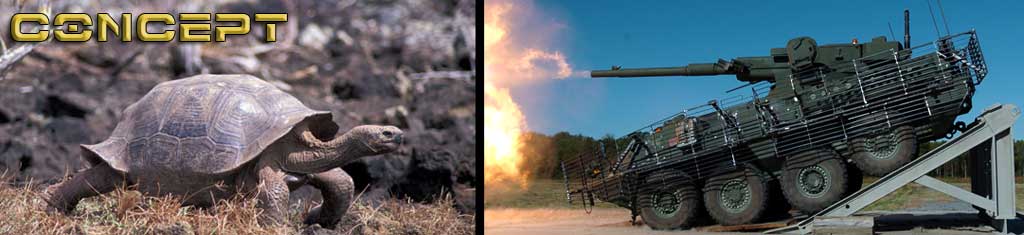
In brief the original idea behind the Siege Tortoise was to created an improved tortoise/tank Zoid... specifically, one with a turret. I always loved Cannon Tortoise, and this custom came along shortly before anyone knew of the Kotobukiya HMM Cannon Tortoise. You will even see some features duplicated between the HMM model and this custom, but I had long since made my cuts and glued my parts by the time I saw the first photos. Still, great minds must think alike... it was about time someone really made a tortoise/tank! Needless to say, at least if you've seen the previous page, the Siege Tortoise expanded into the ultimate CP custom of my collection (perhaps the most radical, CP-laden custom I will ever do), and it ended up as enough parts to create five distinctive Tortoise variants.
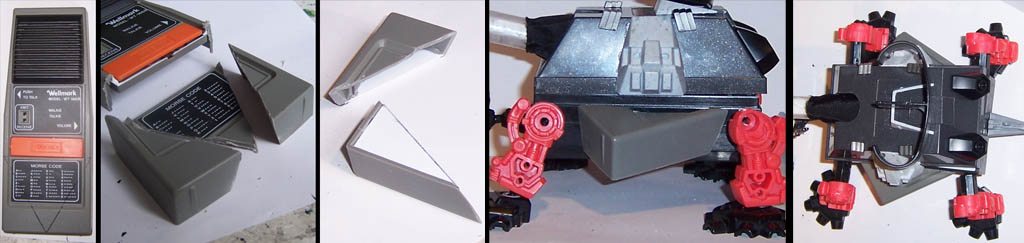
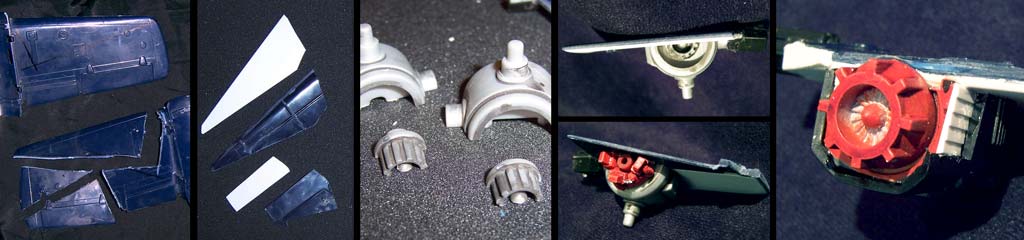
The watch box I started with afforded a great platform for the body. It was of thick, heavy plastic with sharply angled sides on the lid. The lower portion was divided to hold the watch, but this also gave it features that would support a head-retracting mechanism. I would have to scratch build a way for the turret to mount, however, since the mechanism space dipped to the bottom of the box leaving open air in the gap. The sides were drilled and mounted with Asoblock ball joints because they are heavier than Blox. In these shots you can see the already modified Black Rhimos legs and Gorilla Tron missile launcher-feet. You can also se the turret with the final adornments in the last shot, all from a Gojulas Giga.
THE CHASSIS
I carved up an ancient walkie-talkie to make the watch box look more like a shell, placing angled parts on either side between the legs and then making a sharp angled hood of armor over the neck and tail. I also wanted this custom to be "solid" compared to others I have done, and so, even though these pieces were well underneath the Tortois, I filled each of them with card styrene. Gorhecks donated its tail tip to become the new tail for the build. This was cut and “jointed” to look like multiple segments, then a Blox ball was fitted and a socket cut into a hard rubber “foot” pad. At this stage in the build, some parts are glued while others are just sitting there for the camera. In the final pic, only the side bits are attached. The "radar" is actually the portion of the box that held the watch band.
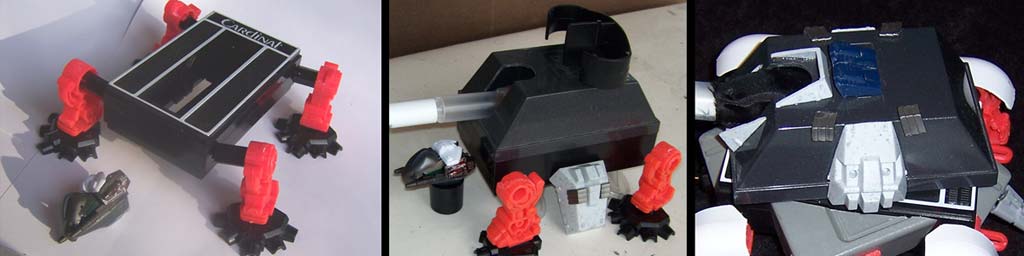
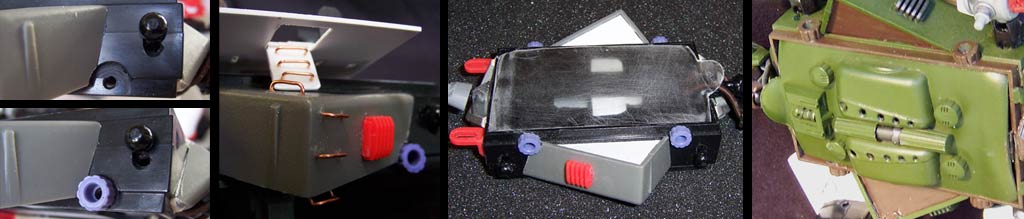
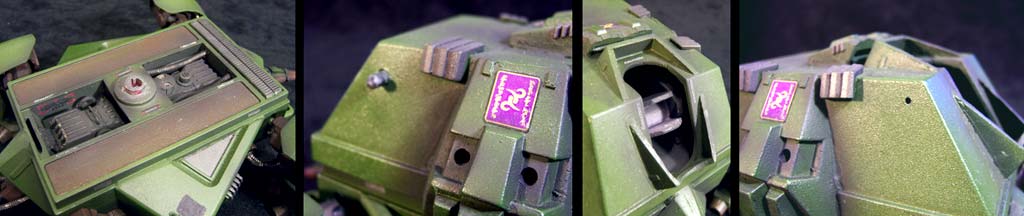
The open gap at the core of the box-turned-chassis was simply too visible when the turret turned; one could look down into the simplistic mechanisms beneath. I decided to create a cover to fill this in. A pair of shelves were made, one on either side of the turret “bridge”. Upon each of these was placed half of the air hose connector from an Energy Liger, which were then dressed up to look like engine blocks. I ran into an issue early on, though, that if something went wrong with the neck mechanism it would be nearly impossible to fix. So, I hinged the front engine segment. The copper wire handle atop the block was actually created by need, not by aesthetics… but it really makes the details that much more impressive.
The last portion of the chassis to be designed was the underside. To get the curvature I wanted, and the lip beneath the base of the neck, I turned once again to a completely odd source; soap! The soft soap bottle I stole the pump from in order to make the hybrid cannon was carefully cut and shaped into the belly armor of the Tortoise. This, too, ended up being hinged so I could get inside the Tortoise and fix anything that might loosen or break. Though it looked cool, it was too plain. I added some little extras to detail it up a tad; pen parts, a toothbrush travel cover, some rubber bolts and some other little bits. These also lowered the body closer to the ground, which really helped the Tortoise look heavy.

The overall body from the underside shows that the chassis appears solid and realistic. The head can draw into the shell and look almost straight up and down, as well as 90 to either side, and it can also twist left and right by 90 . The engine "hatch" that allows access to work on the neck mechanics (which I actually had to do twice after the feature was put in!) The belly hatch; I had to use this several times to work on the neck and hip mechanics from the inside of the model.
The lid of the watch box was all ready to make a terrific turret, except that it was hallow below. I created a floor out of my heaviest sheet styrene and fitted it with the necessary turret structure and gave it a spin. Perfect! But there was some work to be done to make it an actual turret. First, I had to cut a slot in the front to make room for the cannon. It all seemed like such a simple plan. Cutting a flat-sided box was never a problem, but figuring out how to mount the cannon was tricky. I couldn’t use the same technique I used with Fusillade because the cannon was so much larger, so I ended up adapting a Siesmosaurus tail clip. The pieces I chose to hold up the mechanism were a pair of spoons from tiny Ben & Jerry’s ice cream containers! They were styrene, strong, and had were shaped for rigidity. However, before I glued it all down, the mechanism demonstrated that it could allow the swapping of different components. I had run into several cool ideas while building the original design, including a nice pen that looked like a heavy beam cannon and a multiple-fire rocket pod from an old Whirl Transformer.
THE TURRET
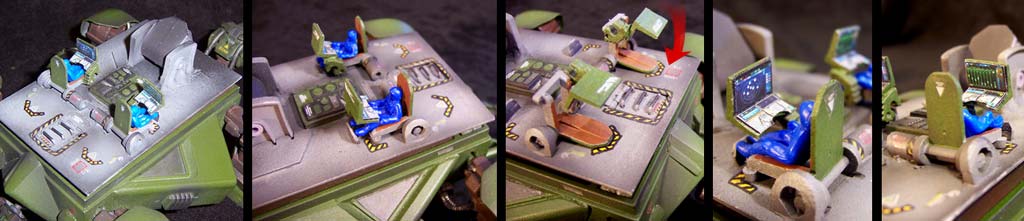
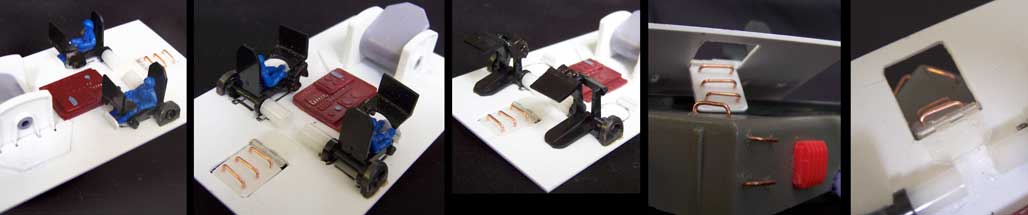
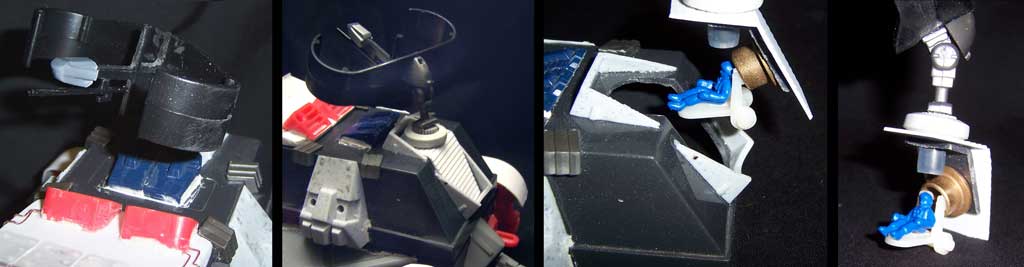
The interior of the turret was created entirely as a lark. The model was never intended to be shown opened, but I simply could not leave it bare! I created two gunner seats out of video tape parts; these can flip completely out of the way when not in use. No particular reason. I created the large control deck for no other reason than I had the pieces for a long time and figured they might as well go here! I realized as I built these features that there was no way for a crew to enter the turret! I ended up going through the trouble of creating a working hatch in the floor, complete with copper wire ladder rungs. To enter the turret, it turns 90° to the right. This lines the hatch up with the lower “wing” of the shell. The hatch opens and lands on the armored hull, right on a traction pad, and the copper wire rungs continue down the side of the body, the final rung hanging beneath the armor low enough for a crewman to reach it from the ground. I considered doing another ladder on the right side of the Tortoise, but opted to move forward with other portions of the build first.
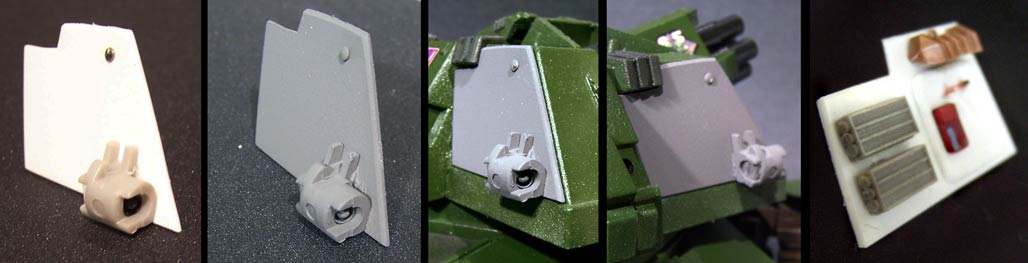
The finished mount for the turret is seen here on the left; the red part from a Sauro Knight atop a simple-looking bridge of styrene. The second picture shows the mount for the STEMS pieces; it is a sprue rod that carries all the way through to the other side. I also decided to leave the open ports in the Gojuals Giga armor, since they looked to me like armored car gun ports or grenade launchers. The third shot shows the Seismosaurus clip that allows multiple weapons to be interchanged, creating the main variant element. The last pic shows the small hole drilled in the forward hull. This allows alternate armor plates to be pinned in place, thus further making each unit unique with logos, ranks or hardware.
The final interior is still not designed to be complete; I considered placing a firewall inside, but decided I like it as is. I painted caution striping around the entry hatch and where the seats contact the floor, in front and behind. There is a warning label on the back of each seat as well. There are actually 26 labels inside the turret! 6 are on the central console alone, and each seat has 4. The others are spread about the floor, all appropriately placed, from warning signs for the seat joints to the operator rescue switches to the aid kit hidden in the floor panel (under the red arrow that shows the seat rocked back against the caution tape). You can see in the last two shots that each operator has a unique screen printed in high resolution as well. I decided with Fusillade that using unpainted blue pilots made them easier to see for photography. Perhaps I'll get back to painting pilots later.
I looked though my parts box for something to use as legs and ended up not using my original picks of a set of Gorehecks legs in favor of something that seemed to fit better… and something that would take MUCH more work. I modified the legs of a spare Rhimos and lowered them to the knees. There were a slew of parts left over, and the second shot above shows some of those which ended up being used on the custom in other locations. I developed new hip joints using Asoblocks, which function similarly to Blox but are much heavier and stronger. This gave the Tortoise a wider stance and inspired the idea that the legs, too, could be modular.
THE LEGS
I cut up some non-dairy creamer bottles for additional leg armor. For further separation and greater detail, the legs had several parts whittled off, vent-shaped sheet styrene covered the openings, and several removed bits were re-attached. These detracted from the “it’s a Black Rhimos” look and gave the Siege Tortoise a heavier, stronger and more armored appearance. I ended up using RayKong shoulder launchers for the feet; they looked very strong and stable and they had 5 “toes.” These had to be flattened on the bottom and each was altered to allow for Blox ankle joints. Together with the heavier Asoblock hips, the Siege Tortoise could spread its legs and stabilize for using its heavy artillery.
The spare cockpit from my HMM Command Wolf was originally intended to be used for the head of the Siege Tortoise. However, as incredibly suitable as it was, I really wanted something that looked less refined, more industrial, and more unique. Part of this stemmed from my decision to make the Siege Tortoise from a new nation; I wanted to blur its resemblance to Helic, Guylos or Zenebas. I used a spare Siesmosaurus turret\cockpit for a base. On this I mounted parts from two different Gundam models (one for the lower jaw, one for the “crown”), a Zabat and Black Rhimos. My thinking was that my new country of Gershai could purchase surplus cockpits from Zenebas suppliers and then modify them for their own use. At first I wasn’t entirely pleased with the look, but it seemed more and more fitting as time went on. It gave the Tortoise a wicked beak and an angry scowl.

THE HEAD
The tail itself is the tip of a Gorhecks tail, cut to make three segments and fitted with a Blox joint. This was locked into a diamond-shaped piece at the base of the tail; in reality, a door-stopper made of hard silicon. These were mounted to the back of the chassis and then I turned back to my trusty walkie-talkie to create a hood or armor over them. It was too difficult to fit the hood to the chassis, so I cut a "/\" in the chassis and locked the hood in.
THE TAIL
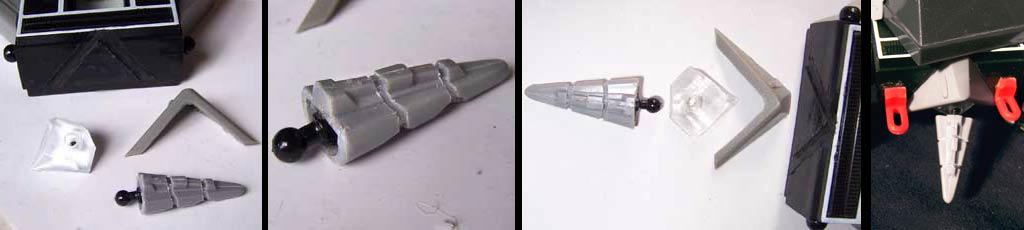
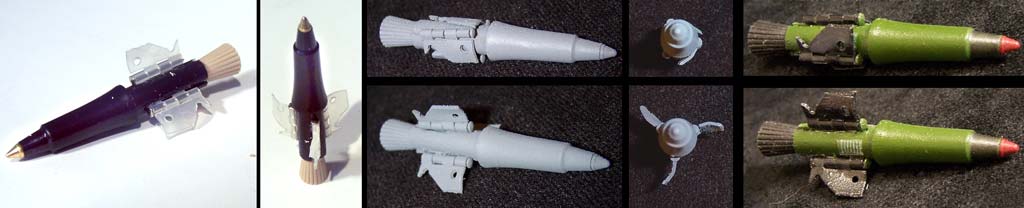
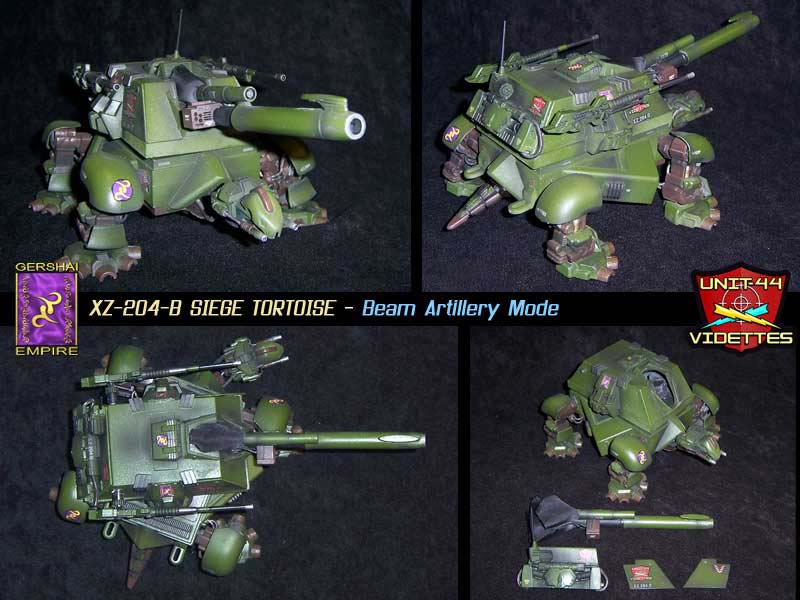
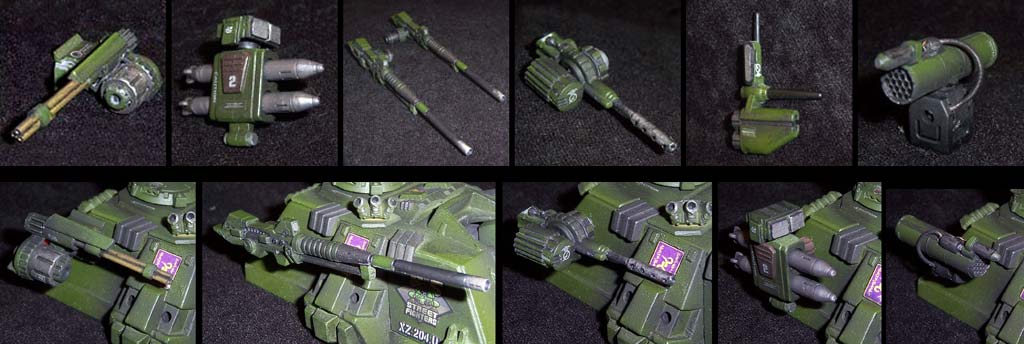
A pen. Not just any pen, but a Uni-Ball Signo 207. What brought about the desire for a modular turret was a pen that I used at work; it ran out of ink, and pens that run out of ink fall into my parts bin. This particular pen wasn’t that spectacular for a custom… until I cut the rubberized grip off and removed the pocket clip. THEN it became a cool heavy cannon barrel. I fixed another pen barrel to the end to function as the pin in the Siesmosaurus clip and gave it a look over. Nice! I wanted to distinguish this cannon to be easily distinguishable from the Hybrid, so I took yet another pen and mounted it atop the first, creating a sort of sensor-intake-shock system. I also took a phone jack and built the sensor array system off to one side; many military systems are asymmetrical and this lent yet more authenticity to the appearance. I placed the cloth weather skirting at the end of the gun and finally added cables leading from the sensor array into the turret.

XZ-204-B "Beam" Variant
The rear panel of this mode sports a complex system of cooling hoses and heavy power lines to feed the gun. There are bits and pieces of a half a dozen Zoids used here, as well as a pair of heavy serpentine chains for the main hoses. The first piece you see on the left is a hidden Zoid part; the valve system inside the hose joining block that comes with Energy Liger. The next picture shows the comm systems, a Giga claw fitted with an antenna and a rubber bolt, mounted atop the main cooling system framework. The bulk of this piece are a pair of Elephander trunk parts that create a sort of armored bumper. Behind this are locked some heavy hoses made from Blox joints, and capped off with Gundam armor.
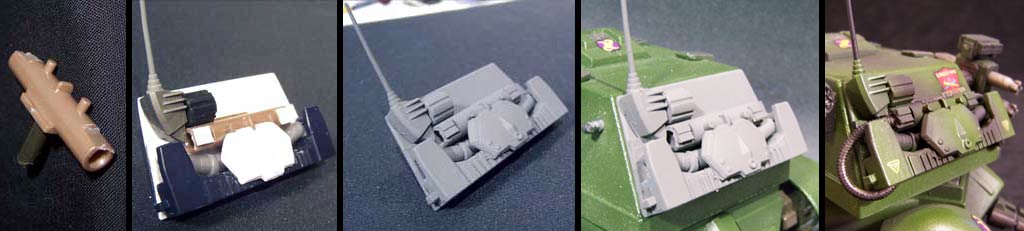
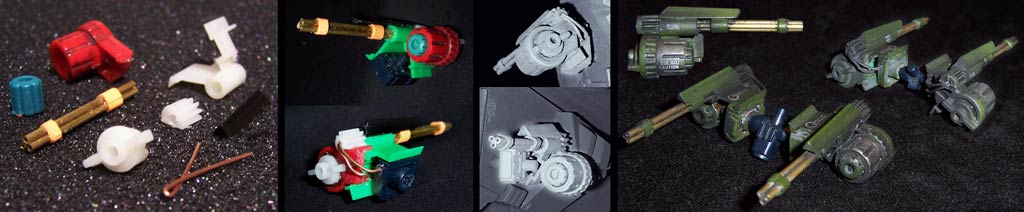
The original configuration of the Zoid was to wield a special cannon that could fire a long range shell that would defeat Fusillade’s defenses and score a hit. My idea stemmed from the soft soap plunger, which had a thick, vented base and a long, narrow shaft. I build a cannon barrel around the shaft so that it would not touch it at any point. In my mind, this weapon fired a solid projectile in the middle barrel and the “O” shaped opening around it was a plasma bolt discharger; the energy would envelope the round and its energy would fool a defense gun into seeing an energy burst, so Fusi’s defense guns would not even attempt to shoot it down. I also built an armored sleeve around the inner barrel, so this gun has 3 cannon layers, one suspended inside the other. Finally, I added the cloth weather seal like the ones on Fusillade; this both adds realism and fixes the ugly open gap around the gun.

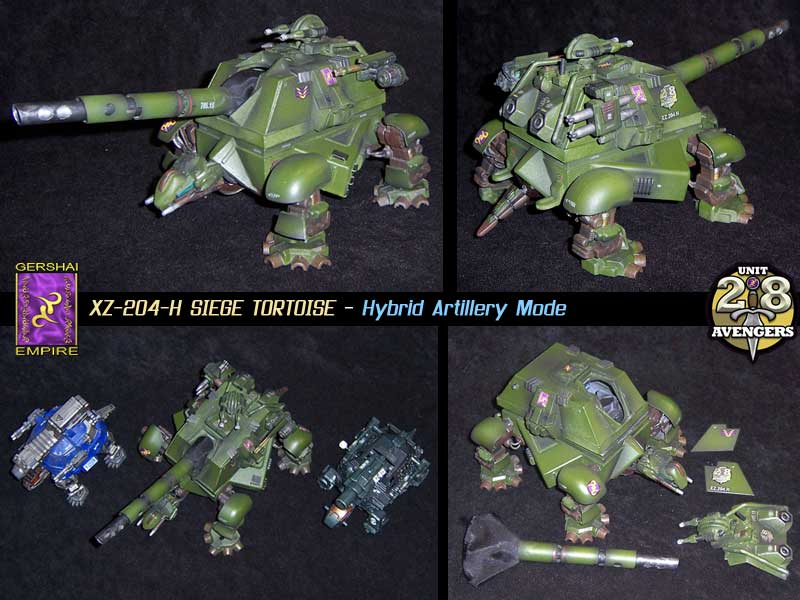
XZ-204-H "Hybrid" Variant
The rear panel for the –B variant took some doing. Not only did it cover the back of the turret, it wraps over onto the top of it. I figured this would be my “hot” Tortoise, armed with such a heavy beam weapon. I took to Asoblocks and used them for armored exhaust nozzles, and around these I built roll bars that followed the contour of the turret. Looked a little plain. I then took an item I won with Fusillade, a limited LB CP-03 Beam Gatling cannon, and chopped up the railgun that accompanied it. This became the hardware on top of the turret which also follows it down the back. The Gatling mount was then used as the base for a top-mounted light turret. I have been looking for a use for a little Starriors gun I’ve had for years; I placed a Blox ball joint on it and mounted it on top of the piece, giving the –B a 360° backup cannon.

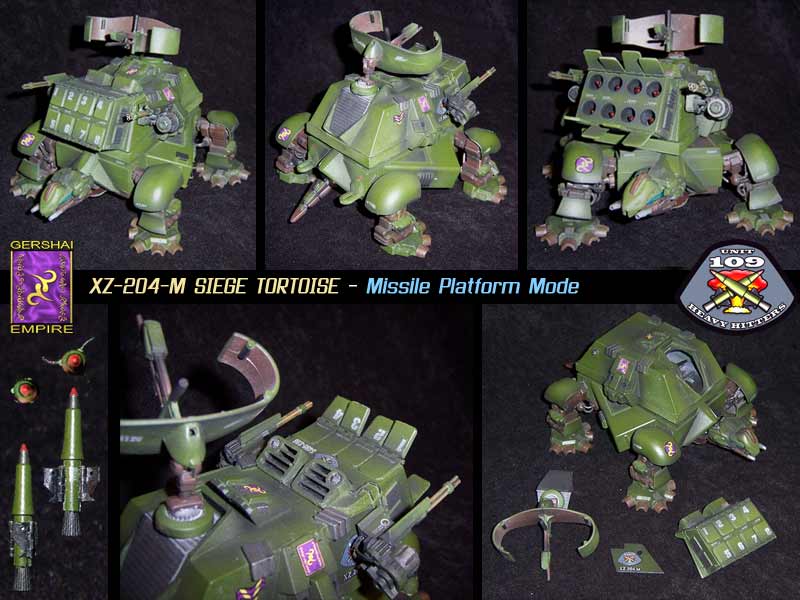
The –M variant was the second to the last idea that came to mind; to turn my Tortoise into a heavy missile tank. Ironically, the missile box would be completed in advance of the other components! It also opened up a problem and a solution that would drastically change the build; namely that hole drilled in the back of the turret. I decided shaping a missile box to replace the main turret was too difficult and limiting, especially when I could just use the flat back end of the watch box. Once I started work on the missile bay I knew I would need to cover the hole with something for each mode and began to make the first in a series of back plates. The gaping primary weapon port in the “front” of the turret then ended up on the back, and it had to be plugged in a completely different way.
XZ-204-M "Missile" Variant
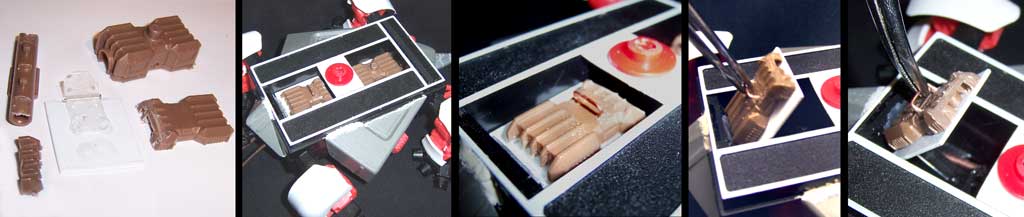
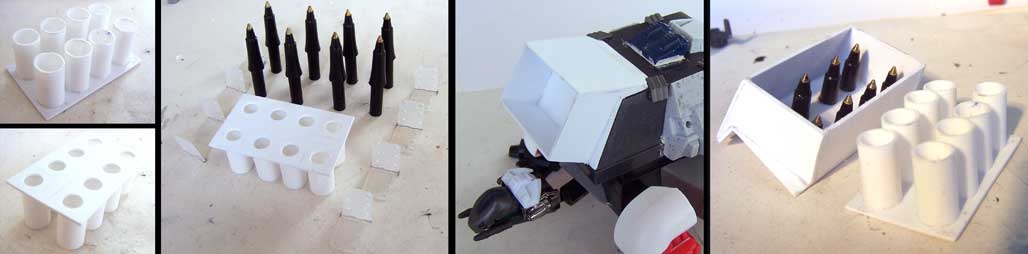
The main course of this meal is the missile battery. It would not be enough to plug it into the face of the turret; the weight of the box required that it lock onto the top as well. Building it was a total pain; it is not square, but a series of trapezoids at odd angles. I created eight tubes to hold warheads and smoothly bonded them together. For the missiles, I used eight pen tips left over from creating Fusillade. I drained out the ink and fixed them inside the launch tubes.

There was room around it to place various vents and real copper wires, which looked cool (but were eventually painted in favor of realism). The top of the box was detailed with pieces cut form Black Rhimos’ legs… they looked like armored vents. Each also had a hole in it that once held a peg from the Rhimos’ body. I found two tiny cogs from a disassembled motor and they slid right inside as ventilation fans. Nylon RC plane flap hinges were used to create the silo doors, which then had additional armor cut and shaped in order to give them a heavier look. Each door can open or close independent of the other seven, which looks good on the shelf but also makes plenty of tactical sense.

The other side of the turret was trickier, Formerly, this was the breach for the main gun; now it was at the rear of the turret. I knew I wanted to place a large radar dish there, but the armor I built to protect the cannons’ aperture was in the way. I designed a large vent grid to fill the hole and mounted this to an old Hoth Rebel Base turret. This became the base for my new radar, which ended up being the watch band holder that came with the case. Originally I was going to use a deodorant cap, but that’s been done. :P So, I fixed a few mechanical pencil parts to the dish and mounted it on a pole from a CP-26 kit. In the end, those turret armor bits actually allowed me to clip the radar securely in place. Within the turret, a brass fitting had to be used to counterbalance the weight of the dish. Into the fitting went a piece from a video tape which became a central seat suspended from the back of the turret. The –M version actually has a unique seat for the silo operator! This was a natural for me, as well, because the other seats were now facing aft, and internally would have been replace with exhaust ducting for the missiles.
This missile turned out so well, I gotta feature it here! Okay, it's a Bic pen tip with a Pentel mechanical pencil tip for an engine bell, with nylon hinges cut for fins. The fins actually operate like a real missile, wraping around the engine of the missile for storage and snapping out for flight. I actually like the original raw plastic colors better, and the primer version best. Perhaps I'll strip it and return it to the gray. While it CAN fit into one of the upper launch bays on the Tortoise, the missile is twice as tall as the opening. I could have made it work, but didn't want to cut holes in the tank turret, so the missiles in the bays are just the pen tips. I also decided not to make more than one of these, since it was such a pain in the butt.
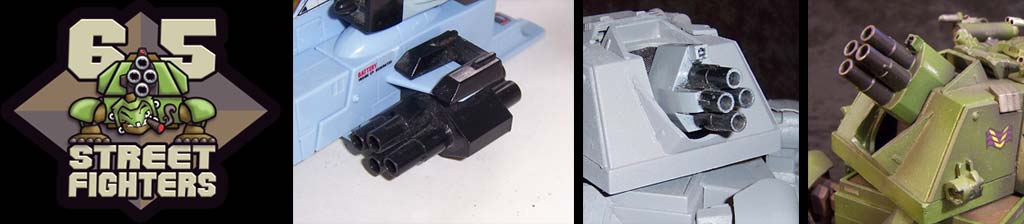
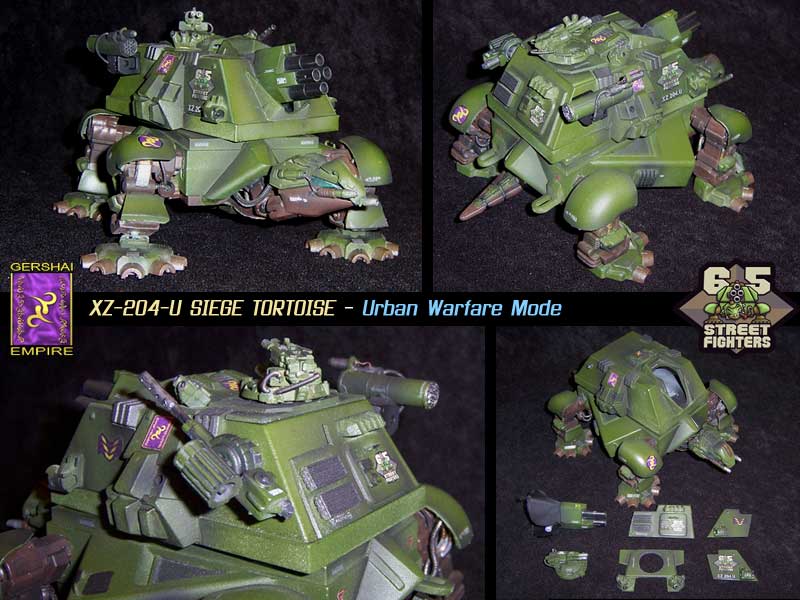
I love this variant, and regret not having taken more pictures of its development! The whole point of the Urban version was that it was more compact than the others (for fighting in tight streets, alleys and buildings), beefed up with armor and redundant 360° weapon coverage. It was the inspiration to create the unit logos seen on all variants of the Tortoise. The gun was the simplest to make of all the versions; the 4-barreled multiple-fire rocket launcher from a Whirl Transformer (a.k.a. Oberon Gazette). The clip was shaved off and it was mounted with a pen barrel to snap into the Siesmosaurus mount. Weather sealing was installed and it was finished. The clipped mount was later attached to the breastplate of the Tortoise and cables run into it.
XZ-204-U "Urban" Variant
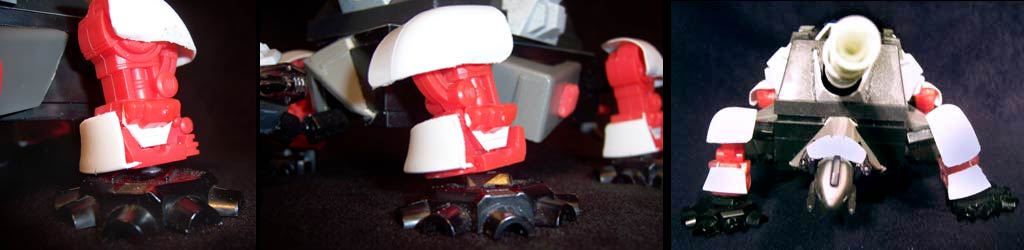
Unique from the others, the –U has additional hardware on its side plates. The joints from Zabat’s wings were perfect for armored headlight housings. I made these “multi-sensor arrays” with front, side and rear grilles. I assumed that an urban tank discharging chaff and smoke would need to see through it, light up alleys and detect anti-armor troops moving about could use them. And they look oh, so military! The lights themselves are those little zip-tie things that hold the price tags onto clothes at the department store. The –U back plate was also a little different, and I only have this one shot of it before it was primed. This Urban was intended to carry some foot troops as well, but I didn’t want to place a huge cut in the turret for a back door. The troop door is, therefore, only cosmetic. It has door controls and a painted copper wire handle as well. It has an armored, “lighted” hood over it to protect troops from debris and illuminate their deployment area. Mounted to the back of this piece is also a pair of “air multipliers”; redundant life support systems for the troops inside. In reality they are a pair of 150mm shell cases from a WW2 howitzer model.
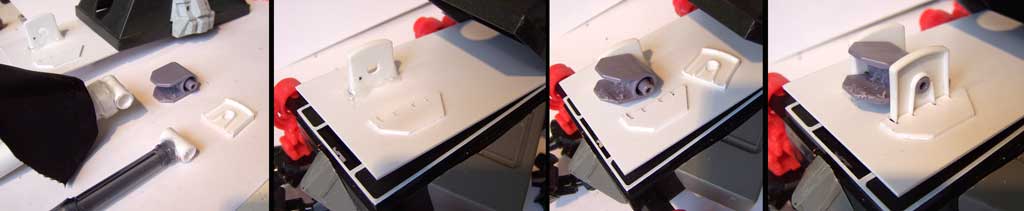
The –U also has a separate top panel. This piece is fitted between the upper mounting lugs and has some little features I like very much. The first is the defense turret. Cut from a WarHammer 40,000 Rhino, this turret is been refitted to 1/72 scale and the bolter guns replaced with more substantial metal gun barrels. These are also fed by tiny steel spring cables that feed from jacks located in the turret itself. On either side of the defense turret is a triple grenade mount. These really lend to the heavy, realistic tank appearance of the –U variant.
VARIANT BUILDS
As each variant has many custom parts of its own, we will now take a tour through the development of each one in turn.
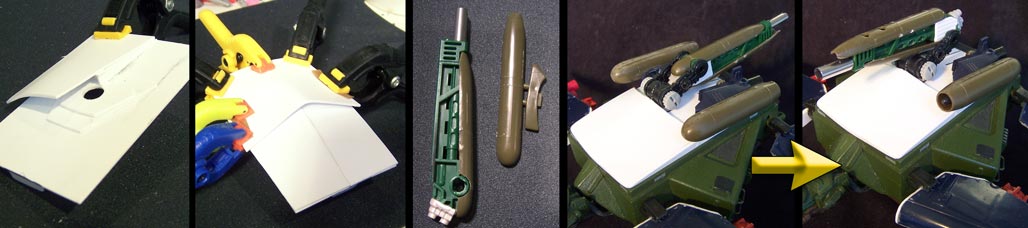
But there is more! I could not help playing with the idea of an aquatic variant, and so I designed a turtle-swap! This was the most ambitious variant of the lot. First, I designed fins to replace the legs. These are constructed from an old Cobra Rattler anti-tank jet from G.I. Joe. I trimmed them and filled the backs with plastic card, then mounted more Asoblocks for joints. The forward fins have engine housings built from Black Rhimos armor, and the engine nozzles themselves are taken from a WarHammer 40,000 Landspeeder. With so much wing area I added four clamps to hold removable torpedoes; each made from a sliced up Zoids rubber cap. The back fins have a different kind of engine, a prop system for maneuvering. This are made from the housing for a CP-15 Gatling, with a nozzle made from a Killer Dome peg resting with a set of trim tabs made from a WarHammer 40,000 Dreadnought’s hands. These fins also were threaded with silver chain cables that can be plugged into sockets in the chassis.
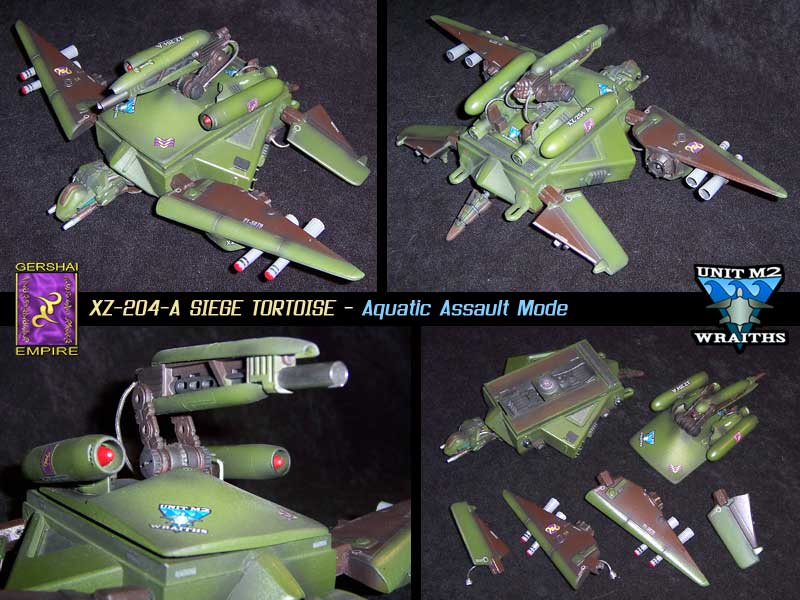
XZ-204-A "Aquatic" Variant
I decided right away that I could not modify the Tortoise’s shell for this variant. Instead, I took off the tall and blocky turret and designing a sleeker sea turtle shell from the ground up. The shell is made entirely of plastic card, and it required two days to build, form, dry and shape because the spring strength of the pieces wants to pop them off all over the place. I had the idea that the weapons of the turtle would be sleek until needed, so a set of flipping weapons were made. Two sleek heavy missile launchers were taken from a poor quality Huey Cobra model’s gun pods, then mounted to a pair of Elephander trunk parts that made up the turtle’s back-mounted engines. I then designed an artillery cannon that could rotate up into firing mode. It was almost the last thing I designed for the entire Siege Tortoise project. It uses a Deep Diver main cannon, trimmed down and capped with a part from a Godos twin machinegun. It has more Huey parts for the hydro-dynamic armor, and the final piece was a shiny metal fitting from my trusty video tape to make the flash suppressor. Twin metal cables feed the gun from the rear, and slide into the shell in order to reposition the weapon.
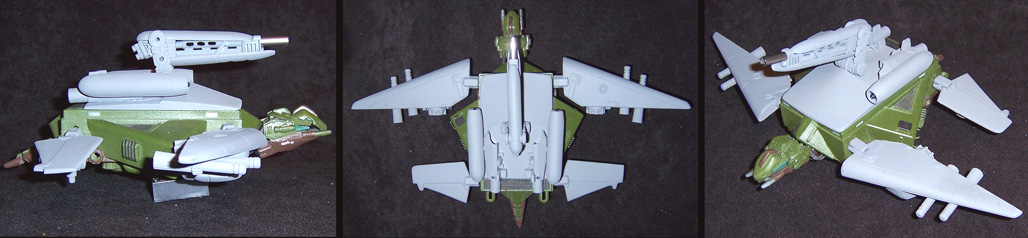
The pre-primed overview of the XZ-204-A. Before the colors are blended together in their military scheme, you can see the mish-mash of parts. The wing torpedoes (undersea rockets) are Gorhecks tail spikes fused to Pentel ballpoint pen parts. I am also pleased with the range of movement the fins have; being mounted on ball-and-socket joints, their wide range of movement is kept more realistic by the restriction of the armored cabling. In the final paint scheme, each rocket and missile also has labels on them, and each launching lug is numbered 1 through 4.


XZ-204-B Primed

XZ-204-H Primed

XZ-204-M Primed

XZ-204-U Primed
XZ-204-U Primed
You didn't think we were through, did you? Feeling that the turret still looked a bit plain on the sides, I created mounting pegs on the back. Initially these were for random Zoids guns, but I ended up designing and building my own CP set for the Tortoise; a matched pair of Gatling cannons, machinegun, modified missile pod and some repainted and modified Koto Command Wolf cannons. These became the STEMS, or Siege Tortoise External Module Systems. They became a part of the overall design philosophy of the Gershai and supported a realistic view of weapon design. Some of these components were as complicated as a small custom in and of themselves (the Trinity Gatling cannon comes to mind).
S.T.E.M.S.
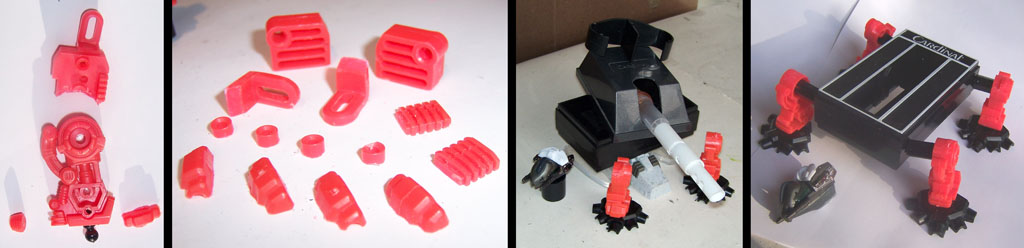
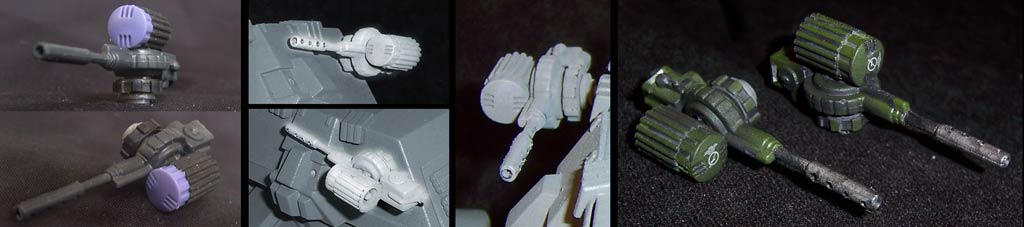
STEMS "Trinity" Gatling Cannon
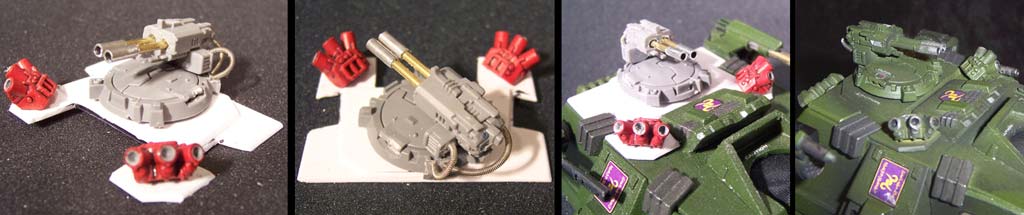
This little gun is the one that started it all. I had some parts after designing the Sternclaw that had potential… I just couldn’t figure out what for. One day I placed a piece of video cassette against the shoulder of the old mantis toy and POW! There are 13 parts in each Trinity cannon (the one missing from the first image on the left is the blue adapter mount from Bombvern- It was added at the very end when I could find nothing else to use!) The Trinity has three brass barrels wrapped with (ready?!) orange post-it note paper, my first experiment with using metal. I built a mirrored pair of these guns so the –M version of the Tortoise could sport one on each side. Each gun took more than 8 hours to complete.
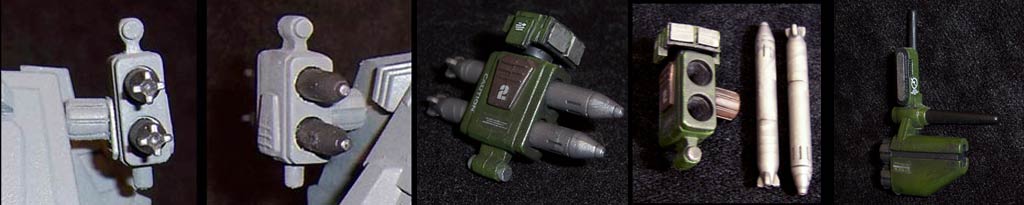
STEMS "Twin Torrent" Missile Pod & "Farsight" Targeting System
The Twin Torrent missile system and Farsight targeting array are almost entirely repaints, but they fit the bill very well. Perhaps one day I will replace both of them with something unique? In the meantime, the only thing that is really created here was the mount for the Twin, which is simply a rubber cap modified to hold onto the STEMS mounting peg.
STEMS "Dire Wolf" Laser Cannon
The Dire Wolf guns are another port made with minimal effort. Aside from being a repaint, I did make a custom mount for each gun using Blox adapters. They looked a little… well, a little. So, I made a ring from a Gojulas Giga bolt to add some detail. Again, I would like to modify these guns in the future.

STEMS "Vendetta" Automatic Cannon
I really like this simple little gun. It was made using a G.I. Joe machinegun, using a pair of different Zoids caps for the ammo magazine. The only other thing I added was a mount, like the ones on the Dire Wolf cannons.
STEMS "Vortex" MFR Pod
This little piece just happened, taking less than an hour from concept to dried paint. I had a spare MFR pod from an old Apache gunship helicopter, so I glued it to a mount. That wasn’t very inspiring. For detail, I created a targeting system by shaving a small detail off of part of an Ultrasaurus piece. I drilled the piece in three places and inserted a copper wire in one and a tiny spring cable in the other. Ta-dah!

I wanted to try a new form of detail on this custom; something I would no doubt use from this point on… if only it worked. Originally I threaded and glued elastic chord all over the Tortoise to simulate cables, but then I got an idea from Shevon, my fiancée. I was looking at one of her necklaces and examined the serpentine chain. I went to a local thrift store (actually, several stores) and bought them out of every chain they had! I ripped out all the old cables and re-worked the holes to fit the chains. These I clipped and glued based on size and flexibility, then painted them flat black. The silver has a natural weathering appearance due to the super smooth surfaces and thinned paint. Better, it filled in the gaps and dried making the detail pop and the chains became a bit more ridged and easier to pose. The final model has 32 silver chains strewn about it.
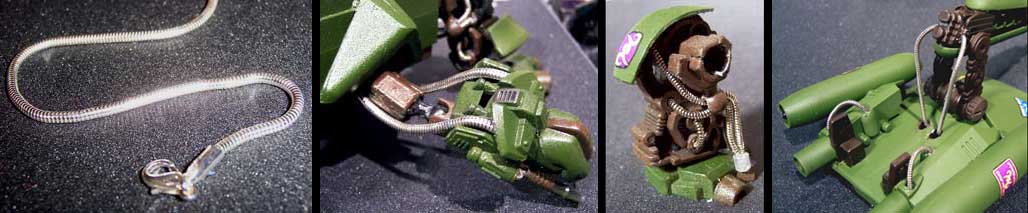
ARMORED CABLES
There are a number of things I would like to draw some notice to as you browse the images here. Note that I attempted to use a particular theme with all of the labels; simple white with some yellows are used on the outside of the Zoid, some red pops up in especially dangerous places. There are labels that one can’t even see without disassembling the Zoid; within the engine compartment, under the turret, inside the turret, even on missiles. I wanted to make the Siege Tortoise appear as much as a real military machine as it could… and still be a giant tortoise. There are caution stripes located in logical areas, mostly “pinch zones” such as hatches, seat mechanics and some joints. Exhausts are appropriately marked, as are “caution” and “rescue” areas. There is a medikit hatch in the floor of the turret labeled “kit under”, borrowed from the “high end master model kit” and “under license” text from my Command Wolf label sheet.

DETAILS
Thank you for taking the time to read through this exhaustive website...
I hope it was worth your time!